
The word ‘parfait’ always reminds me of my good friend Michael. There’s a quote from the first Shrek movie about parfaits that we used to think was so funny; so naturally, we quoted it all the time (Michael does a really good ‘Donkey’ impression).
Anyway, hubby and I have started running every evening, getting healthy, etc; so naturally, we’ve altered our diet a little (chocolate chip cookies stay, though. There will never be a world in which I exist without chocolate chip cookies. Never.). We’ve been eating a lot of plain non-fat yogurt sweetened with honey in place of desserts, which is great; especially with some fresh fruit mixed in. So of course I was excited when I received a box of the new Special K Granola to try out and review. And what better treat to make with granola than parfaits!

A little yogurt/honey mixture, a little granola, some blueberries and bananas and presto! – delicious parfaits (I could’ve stacked each layer neatly in a pretty glass like real parfaits, but this was much easier)! The crunch of the granola is great mixed with the soft fruit and sweet yogurt- a great dessert, breakfast or snack. I also received a box of Special K fruit crisps, which honestly, I didn’t really like, so I just won’t go there. But the granola really is good – it would be great in Dorie Greenspan’s Granola Grabbers, which are some of my favorite cookies.

Next time you need a healthy dessert or breakfast, try one of these parfaits – they really are satisfying and delicious! I won’t post a recipe, because really, you don’t need a recipe, you just pile stuff in a bowl and go wild. Enjoy!

This week’s TWD recipe, Coco-Nana Bread was chosen by Steph of Obsessed With Baking. I was toying with the idea of skipping this week, but I heard so many great things about this bread, I decided to give it a shot. Really glad I did; it eats almost like cake- really moist and tender, and the banana is barely noticeable. The best part, though, is how chocolaty it is – the chocolate chunks throughout the bread make it super moist and gooey. Yum!

This bread is pretty much more of a dessert than a breakfast food, but genius that she is, Dorie is trying her best to make all things chocolaty accepted as breakfast food. I vote yes. And I’m betting that this stuff will taste pretty darn good with your coffee in the morning. If you’d like the recipe, check out Steph’s blog – she’s got it posted.

I hope everyone had a wonderful, happy Christmas! We certainly did – we witnessed our very first White Christmas (in Texas!)!! It was totally wonderful (except the part where we had to drive home on frozen highways…not so much fun…). The weather lately has been totally unbelievable and completely wonderful – I’m sitting here typing this post watching the snow fall outside again! It’s SO cool! And this time I’m very thankful to be watching it snow from the comfort of my home, instead of driving in it.
Anyway, this post is all about a wonderful tradition. Coffee cake. The coffee cake my family has eaten for breakfast every Christmas morning since the 80’s (at least!). It absolutely wouldn’t be Christmas without it. Yuuuuummmm. And yes, I realize Christmas is over, but I wanted to share the recipe because really, there’s nothing “Christmasy” about this cake. It’s just a simple, normal coffee cake that can be enjoyed any day of the year – we just choose to eat it on Christmas. But that doesn’t mean you have to!

(If you’re wondering why only half of it has pecans, hubby hates nuts, so I made it half and half….silly boy!)
This couldn’t be easier to make – 5 ingredients total. Just assemble the night before, let it sit out overnight and bake it the next morning, and you’ve got delicious, gooey, coffee cake! Too easy! You’ve got to try this one!
Overnight Coffee Cake
1 package frozen white dinner rolls (I use Rhodes brand)
1 package butterscotch pudding (not instant!)
1 cup chopped pecans
1 stick butter, melted
1/2 cup brown sugar
Spray a bundt pan with cooking spray and sprinkle chopped pecans over the bottom of the pan. Arrange the frozen rolls in the pan and sprinkle with the butterscotch pudding mix. Mix the melted butter and brown sugar together in a small bowl and pour over the frozen rolls. Grease a piece of foil and cover the pan; let sit out overnight (do not refrigerate).
The next morning, preheat the oven to 350 degrees. Bake the coffee cake for 30 minutes, covered loosely with foil. Let sit out for 10 minutes before inverting on to a platter and serving.

I really don’t recommend omitting the nuts – it just doesn’t turn out the same (as you can see on the left side of the cake…) – they’re really necessary, in my opinion. This is a wonderfully delicious breakfast treat – give it a try this weekend! It would make a great New Year’s Day breakfast!
I know -I’ve been a terrible TWD member lately. I haven’t participated in weeks…bad, I know. And I’ve missed it a lot, too – it seems like every week, something got in the way of me baking that week’s recipe. My students’ All-State Choir auditions have been going on for the past few weeks and that’s been distracting, not to mention my hubby starting a new job…not that I’m complaining or making excuses, even – I just felt I should at least let you know where I’ve been as far as TWD goes. But now I’m back, and that’s all that matters! And what a recipe to welcome me back on the wagon! Dorie’s Sweet Potato Biscuits…mmm, MMM!!

These were DE-licious. They start out the way all normal biscuits start out; but then you add in mashed sweet potatoes (canned, even!) and a pinch of nutmeg and cinnamon and you’ve got a slightly sweet, spicy, flaky biscuit that will knock your socks off! I made a little maple compound butter (just a fancy way of saying “butter with stuff mixed in” – saying it that way makes me feel important…) to spread on these bad boys and WOW – we seriously gobbled them all up. They couldn’t have turned out better, in my opinion. A lot of other TWD bakers said they were having issues with the biscuits baking up totally flat like cookies – I guess the biscuit gods were smiling down on me because mine seemed to rise perfectly. Thanks to Erin of Prudence Pennywise (seriously love her blog!) for choosing these wonderful biscuits! Go now and check out her blog – you’ll absolutely love her! Get the recipe for these babies while you’re there – make ’em for Saturday breakfast this weekend!

Ok, I know I’ve been sort of MIA lately…it’s been a busy couple of weeks (translation: I started teaching voice lessons last week and have 12 freshman girls…it’s not the easiest thing in the world trying to get someone to open their mouth wider when they obviously think you’re the biggest loser that ever walked the earth…). But anyway, here I am, back to normal (hopefully) and blogging on a regular basis again! Let me just take a couple of seconds to tell you about this bread…it’s seriously good. I was browsing allrecipes.com for zucchini bread and just wasn’t feeling all that impressed with the recipes. They all sounded pretty boring to me. So I finally just closed my eyes and picked one (sort of) and ended up with this recipe. I’m SO very glad I did, because this turned out to be really, really good!

The inside of the bread was soft and incredibly moist, with just a hint of spice (I don’t like an overpowering amount, so this was just right!), and the top of the loaf had sort of a crust on it that was crumbly and delicious – the top crust was by far my favorite part! I can tell you with complete honesty that I will most definitely be making this recipe over and over again! It’s just perfect for Fall….or for those of us who just have to pretend it’s Fall since it’s still a blazing 95 degrees outside…ugh.

Zucchini Bread
-allrecipes.com
3 cups all-purpose flour
1 teaspoon salt
1 teaspoon baking soda
1 teaspoon baking powder
3 teaspoons ground cinnamon
3 eggs
1 cup vegetable oil
2 1/4 cups white sugar
3 teaspoons vanilla extract
2 cups grated zucchini
1 cup chopped walnuts
Grease and flour two 8 x 4 inch pans. Preheat oven to 325 degrees F.
Sift flour, salt, baking powder, soda, and cinnamon together in a bowl.
Beat eggs, oil, vanilla, and sugar together in a large bowl. Add sifted ingredients to the creamed mixture, and beat well. Stir in zucchini and nuts until well combined. Pour batter into prepared pans. (I sprinkled a little brown sugar over the top before baking and it helped to create the nice crust!)
Bake for 40 to 60 minutes, or until tester inserted in the center comes out clean. Cool in pan on rack for 20 minutes. Remove bread from pan, and completely cool.
**Note: This recipe makes two loaves – I cut it in half and came out with one perfectly sized loaf.

In the town where hubby and I grew up, there is a small little restaurant called The Purple Turnip that serves really good “chick food”. If you were to go for lunch on a weekday, you’d see 90% women – teachers, old ladies, business women and “ladies-who-lunch”…of course there will be the occasional male, but chances are he was dragged there by his wife. Their biggest seller? Quiche. It’s SO good. It’s different every day. Sometimes it has broccoli, sometimes spinach, sometimes asparagus…but it’s always totally delicious. Naturally, everytime we’re visting home, I always want to go to Purple Turnip. Quiche, followed by out-of-this-world tiramisu. Perfect.

Recently, I had a major hankering for quiche, and since an hour’s drive to Purple Turnip wasn’t in our near future, I decided to just make my own awesome quiche. And boy was it good! I was really pleased with the way it turned out – light and fluffy and filled with tons of asparagus, mushrooms and bacon…YUM! I will most definitely be making this one again!
Quiche with Asparagus, Mushrooms and Bacon
1 9-inch pie crust
7 large eggs
3/4 cup half and half
1 bunch asparagus, trimmed and chopped
1 small can sliced mushrooms, drained (you can use fresh, I just happened to have canned on hand)
4-6 slices bacon, cooked and diced
1/2 cup shredded cheddar cheese
1 teaspoon salt
1/2 teaspoon pepper
Preheat oven to 400 degrees. Press pie crust into a pie plate and set aside. In a large bowl, whisk together the eggs, half and half and salt and pepper. Add the chopped asparagus, mushrooms, bacon and cheddar cheese and stir to combine. Pour into pie plate and bake for 50-60 minutes, or until quiche is set (the center might still be slightly jiggly- that’s ok). If it starts browning too soon, cover it with a foil tent. Let sit for 10 minutes before serving.
*I like my asparagus slightly crisp, so I don’t cook it before putting it in the quiche; but if you like it really tender, you can blanch it in some boiling water for about 5 minutes before adding it to the egg mixture.


I didn’t get a chance to make this in time for last week’s TWD, but I sure wasn’t going to let this recipe pass me by! I knew as soon as I got the chance, I needed to make this cake. Luckily, my friend Courtney was coming to visit last week, which gave me a great excuse to bake it. Honestly, I wasn’t expecting much more than a regular old banana bread out of this cake – and it was, actually, very similar to banana bread…but SO much better! This will be my go-to recipe for banana bread now (I thought it was closer to a bread than a cake). Courtney, hubby and I all loved it. It was so good, I’m making it again for my mother, who is coming to house sit and dog sit for us while we’re out of town this week. I know she’ll love it with her coffee!

This cake was chosen (last week) by Mary of The Food Librarian. She has a great blog – be sure to check it out and get the recipe for this! You won’t be sorry! Come back tomorrow for my (regularly scheduled and on time!) TWD post – Brownie Buttons. So cute!!

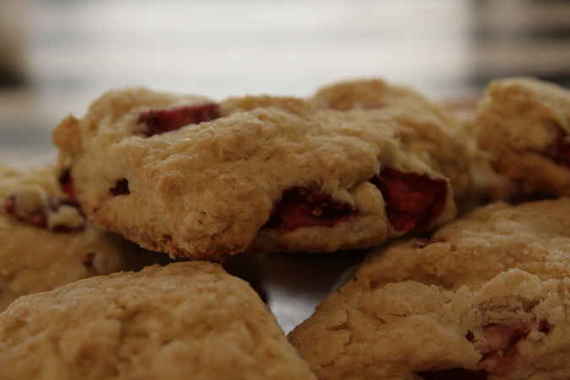
I actually made these scones months ago….these pictures have been sitting in my “to blog” file for ages now. I don’t know why I’ve waited until now to finally post them; I guess I just didn’t notice them or something. Silly me! This recipe comes from Katie over at Good Things Catered, and since she posted them (probably over a year ago) it seems like everyone has made them (she has that affect on people!). Yes, this is the same Katie from whom I got the famous “Easy Cheesy Beer Bread” – she’s good, I’m telling you!
These scones are full of fresh, juicy strawberries (thus their name, “Juicy Strawberry Scones”) and not overly sweet, so they’re perfect for breakfast or brunch with your coffee. I loved them smeared with melty butter as a late night snack! I even sent some to my hometown for my Great Grandmother, Baba to try, and she loved them! She really enjoys things like that, so I was thrilled when I heard back that she really enjoyed them. Give these a try for your next breakfast party, or even just a plain ‘ol Saturday morning…they’re perfect for any occasion!
Juicy Strawberry Scones
-Good Things Catered
2 1/4 – 2 1/2 c. all purpose flour (depending on how ripe your strawberries are)
1/4 c. granulated sugar, plus extra for sprinkling
1 Tbsp baking powder
1/4 tsp salt
1 stick (8 Tbsp) butter, chilled and cut into small pieces
1 egg
1/4 c. yogurt
1/4 c. milk
2 tsp orange zest
1 c. fresh strawberries, diced
Preheat oven to 350 degrees and line baking sheet with parchment.
In small bowl, combine egg, yogurt, milk, zest, whisk to combine thoroughly and set aside. In large bowl combine flour, sugar, powder, salt, and whisk to combine. Using pastry cutter or two knives, cut butter into flour until all pieces are smaller than pea-sized.
Add strawberries, and toss to coat. Add wet ingredients to dry and mix in lightly with fork until dough just comes together.
Turn dough out onto well floured work surface and pat into large ball. Cut dough in half. Shape half of dough into flat disk shape and cut into 8 slices.
Place on baking sheet and repeat with other half of dough. Sprinkle tops of scones with sugar and place in the oven.
Bake until turn slightly brown, about 25 minutes. Remove from oven and let cool on baking sheet for 10 minutes. Transfer to a wire rack and let cool (or eat right away!) Enjoy!
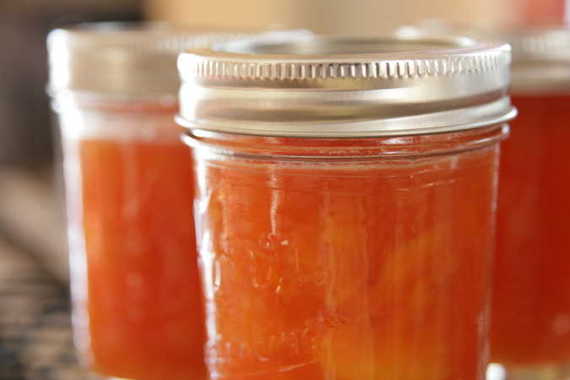
LOOK! Look what I’ve been doing today!! I’m so proud of myself…homemade jam!!! This is something I’ve been wanting to do for a while now, but always thought it would be too difficult. Luckily, my good buddy Tabitha talked me into it! She makes her own jam all the time and said it was no big thing. So, after about a thousand phone calls to Nana and a quick prayer- I had six beautiful jars of homemade peach jam (well, actually they’re preserves, but we don’t need to get technical…)!
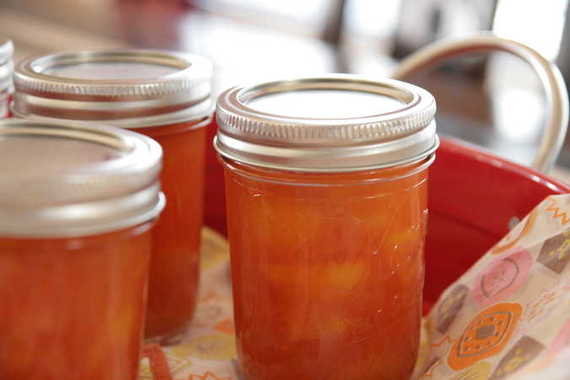
This has been such a fulfilling year for me as far as overcoming obstacles in the kitchen – I tackled my fear of yeast, bought and used a pastry bag numerous times, and made homemade preserves – just like my great-grandmother did! I felt almost as if I were chanelling Baba while I was spooning hot peach-y goodness into jars this afternoon. I know she’d be proud of me, making my own preserves. I know I am!
Ok, I know I’m making a huge deal out of this, but the truth is, making your own jam/jelly/preserves is really easy (just make sure you have your grandmother on speed-dial…just in case, ya know?). I bought a little package of Sure-Jell (as Tabitha advised) and (sort of) followed the directions that came with the box. I started with ten ripe peaches that I got at the Dallas Farmer’s Market yesterday, boiled them for about 2 minutes so the skin would peel off easily, cut them into little chunks, thew them in a pot with 2 cups of sugar and the juice of 1 1/2 lemons, brought it to a rolling boil, turned the heat down, added half a packet of the Sure-Jell pectin, stirred it all together and cooked it for about 5 minutes more, then spooned it into 6 sterilized jars and put the tops and lids on tightly. And voila! Peach preserves! If you’re freaking out (like I was) about sterilizing the jars and lids – don’t. It was totally easy. I just brought a big pot of water to a boil and carefully added the jars with a pair of tongs, let them boil for about 5 – 7 minutes, carefully removed the jars and set them on a clean kitchen towel to dry, then added the lids and tops for 30 seconds or so, removing them with the tongs and setting them on the towel as well. And that’s it! I really hope all of these (very informal) instructions haven’t been confusing in any way – if so, please let me know and I’ll try to re-word it a little better for you!
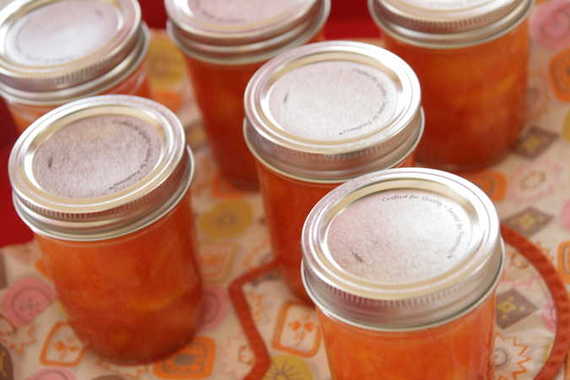
This was really so much fun – I really enjoyed making these preserves today. And I absolutely cannot wait to spread these on some homemade biscuits tomorrow….I’m thinking breakfast-for-dinner!! Yippee!!!
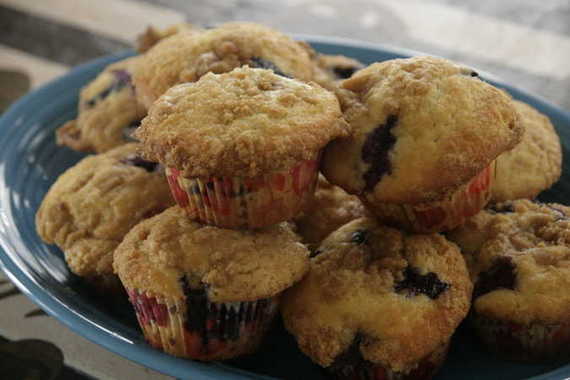
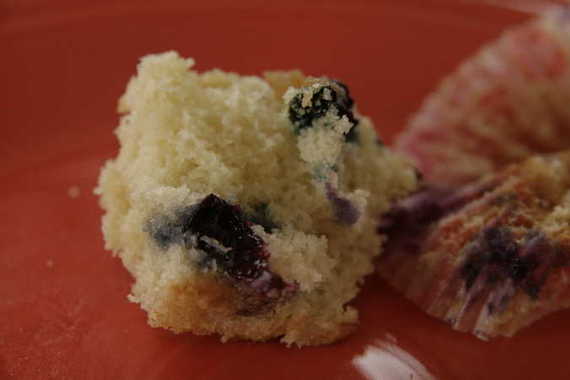
Do you love warm, fragrant blueberry muffins on Saturday morning? Ok, I know – who doesn’t, right? Well, we’re all in luck because these just happen to be the most perfect, delicious, easy blueberry muffins – PERFECT for Saturday morning (or Sunday…whatever)! And I’m sure none of you will be surprised when I say it’s an Ina Garten recipe – we all know my love for Ina.
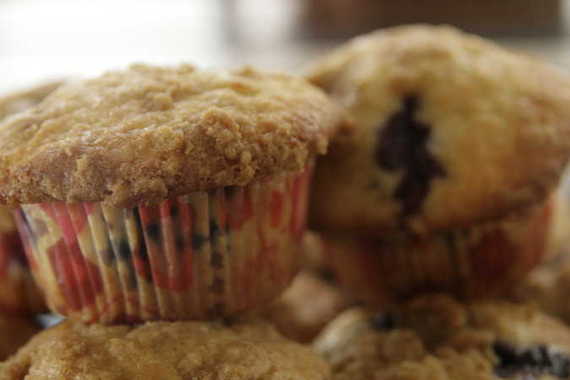
These aren’t just your regular, run-of-the-mill blueberry muffins. These muffins have a gorgeous, buttery, golden crumb topping that really send them over the edge. I couldn’t get enough of them! All you need is a cup of coffe and a couple of these bad boys and you’ve got yourself a perfect start to the weekend. Guaranteed. 🙂
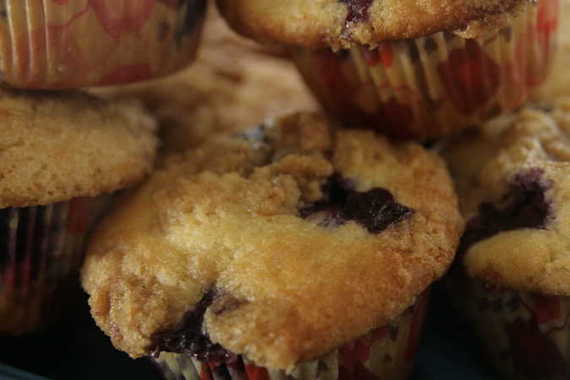
Blueberry Streusel Muffins
-Barefoot Contessa, Back To Basics
3 1/2 cups all-purpose flour
1 1/2 cups granulated sugar
4 1/2 teaspoons baking powder
1 teaspoon baking soda
1 teaspoon salt
2 cups buttermilk, shaken
1/4 pound (1 stick) unsalted butter, melted and cooled
1 1/2 teaspoons grated lemon zest
2 extra large eggs
2 cups fresh blueberries (2 half-pints)
For the Streusel Topping
3/4 cup all-purpose flour
1/2 cup light brown sugar, lightly packed
1 teaspoon cinnamon
1/4 teaspoon salt
4 tablespoons cold, unsalted butter, diced
Preaheat oven to 375 degrees. Line muffin tins with liners. Sift the flour, sugar, baking powder, baking soda and salt into a large bowl and blend with your hands. In a separate bowl, whisk together the buttermilk, butter, lemon zest, and eggs. Stir the buttermilk mixture into the flour mixture with a fork, mixing just until blended. Fold the blueberries into the batter. Don’t overmix! With a large spoon, scoop the batter into the prepared cups, filling them almost full.
For the topping, place all ingredients in the bowl of a food processor fitted with the steel blade and pulse until the butter is in very small pieces. Pour into a bowl and rub with your fingers until crumbly. Spoon about 1 tablespoon of the streusel on top of each muffin. Bake muffins for 20 to 25 minutes, until golden brown.
Hope you all enjoy your Father’s Day weekend and Happy Baking!


