Ok, it’s been cold/rainy/snowy/icy for far too long now. One of the perks of being a Texan is only having to deal with like, 3 days of REAL winter. Well, we’ve had it for weeks now and I’m sick of it. My kids and I are sick of being stuck inside. We need sunshine, we need fresh air! Granted, the snow was lovely and Cassidy did enjoy playing in it. But dang, what a PAIN it is getting kids ready to play in the snow! I had to ask myself if it was really worth it. After we each got on our 8 layers of clothing, mittens, extra socks, boots, etc, I was already sweating like a pig. Cassidy ran around a little bit, built a couple of little snowmen, and made a snow angel before she got bored. Elliott looked on from his bouncer, happy as a clam, while I frantically snapped pictures with my phone. “Cassidy, get back in that snow and make another snow angel! If I’m going to go to all this trouble I’m getting some good shots out of it! NOW SMILE AND LOOK LIKE YOU’RE HAVING FUN!”

Cassidy was ready to go in after only 30 minutes or so, go figure. But I did get some pretty good pictures of my sweet babies having fun, so I guess it wasn’t a total waste. 😉
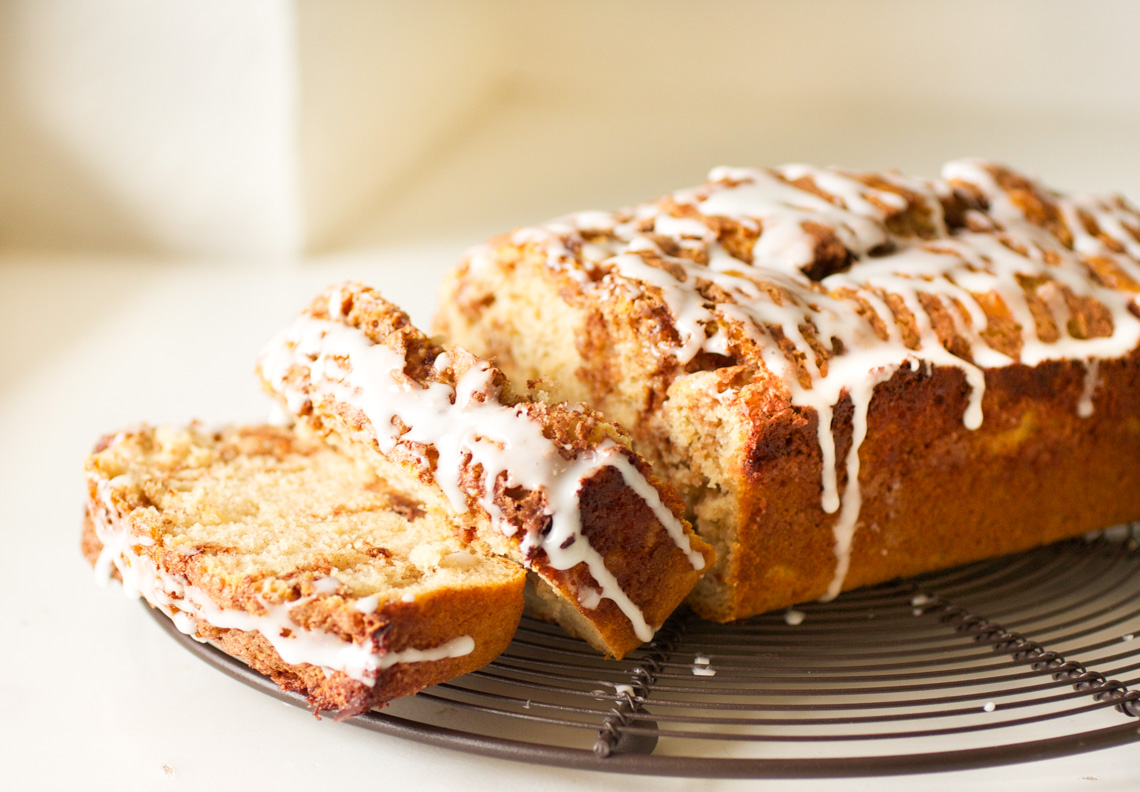
Anyway, Cinnamon Roll Bread! I always bake when it’s snowy and/or icy outside (it’s a thing), and I wanted something non-chocolatey and non-cake. I asked my friend Chris if she had any ideas and she sent me the link to this recipe. It’s really simple, really quick, and you probably already have everything you need in your fridge/pantry. It’s not too rich or sweet; it’s the perfect snack on a cold, snowy day. Have a slice with a cup of tea and try to make the best of all this freaking snow.
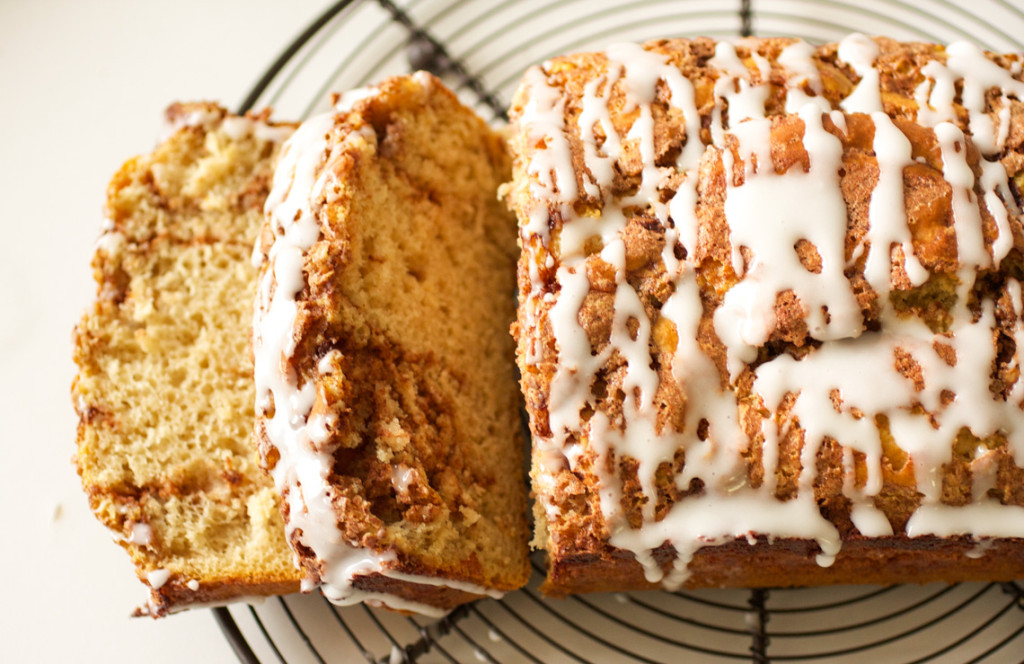
Cinnamon Roll Bread
2 cups all-purpose flour
1 tablespoon baking powder
1/2 teaspoon salt
1/2 cup sugar
1 egg at room temperature, lightly beaten
1 cup milk
2 teaspoons vanilla extract
1/3 cup sour cream
For the Cinnamon Swirl:
1/3 cup sugar
2 teaspoons cinnamon
1 1/2 tablespoons water
For the Glaze:
1/2 cup powdered sugar
1 tablespoon milk
Pre-heat our oven to 350 degrees and grease a 9×5 bread pan.
In a large bowl combine flour, baking powder, salt, and sugar. In a small bowl combine egg, milk, vanilla extract, and sour cream. Add the dry ingredients into the wet and stir to combine.
In a small bowl combine swirl ingredients together. Use a tablespoon to drop spoonfuls of the mixture over the bread, then use a knife to swirl the cinnamon mixture into the bread.
Bake for 45-50 minutes or until a toothpick inserted into the center comes out clean. Remove the bread from the oven and transfer it to a cooling rack to cool for 15 minutes.
Meanwhile, make the glaze. Remove the bread from the pan and allow it to continue cooling completely. When the bread has completely cooled, drizzle the glaze over the top. Serves 8.
Recipe source: Center Cut Cook

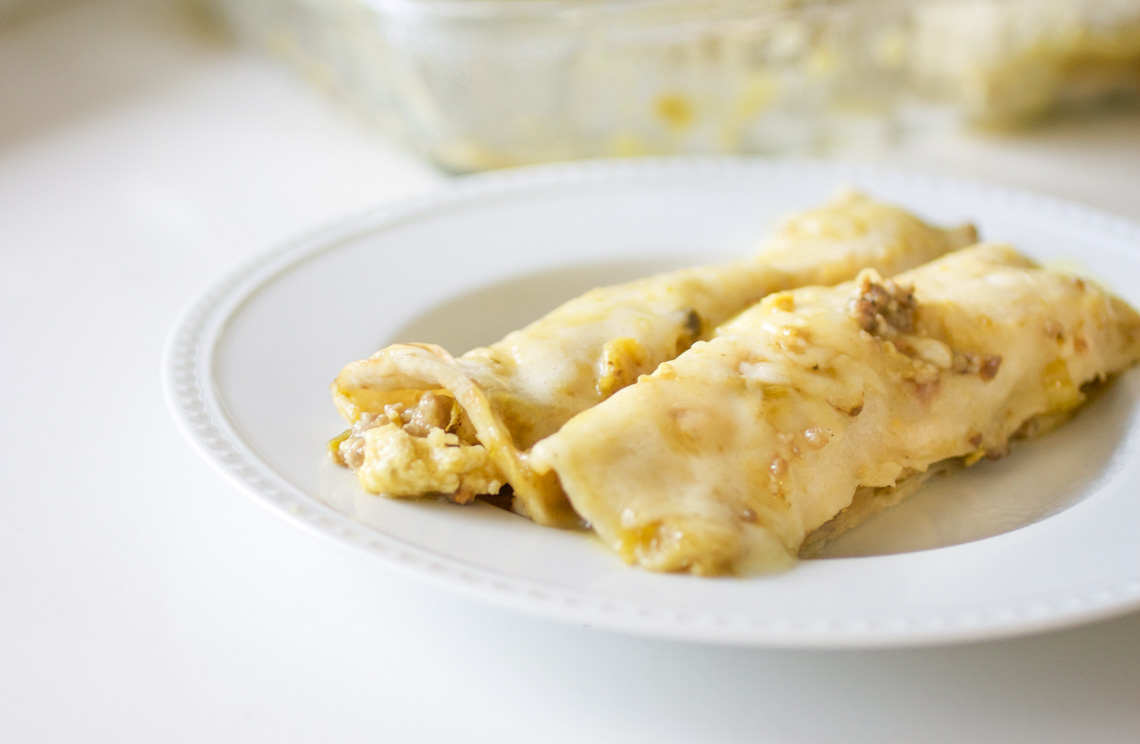
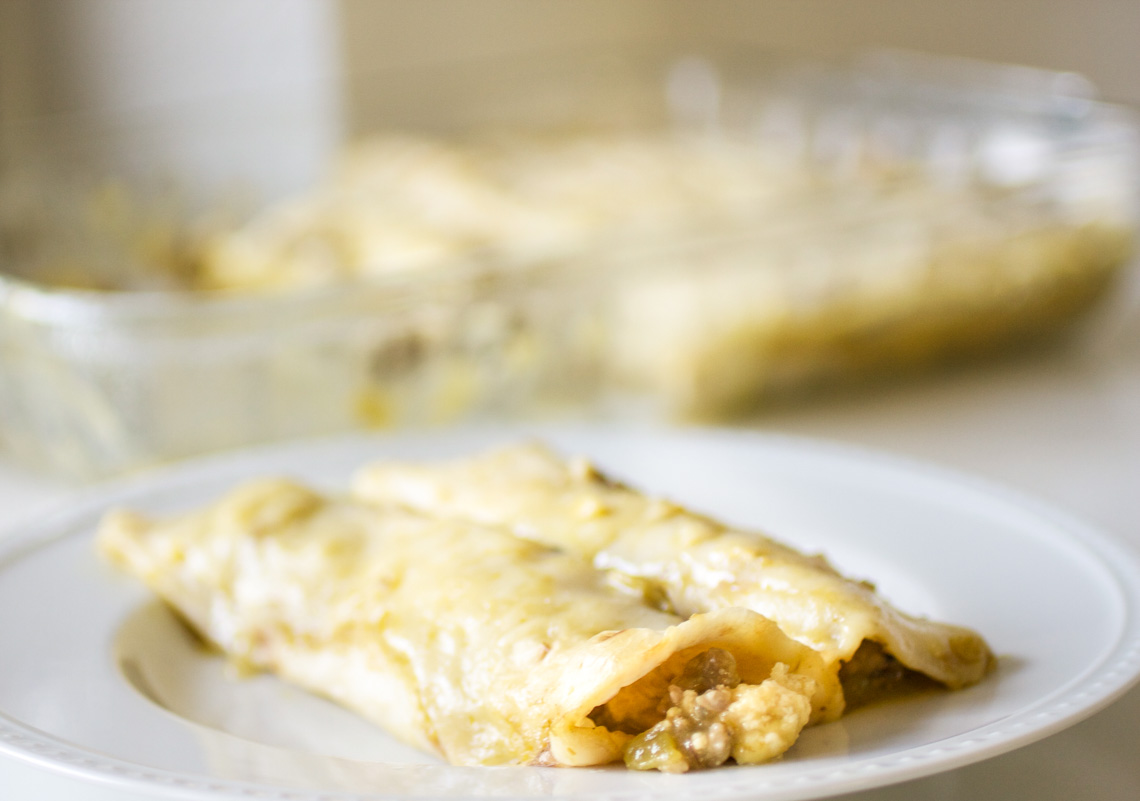
Alrighty! Here they are, as promised- breakfast enchiladas. Flour tortillas filled with sausage, egg, and green chiles, then topped with green enchilada sauce and monterey jack cheese. Sounds pretty great, huh? Well they are! I got the idea from my uncle Steve who happens to be an awesome cook.
As I mentioned before, we served these at Cassidy’s Birthday Brunch a couple of weeks ago and they were a big hit. I think they’re perfect brunch fare- just “breakfast-y” enough with the sausage and eggs, and the green chiles, cheese, and green enchilada sauce add tons of great tex-mex flavor. These can also be assembled the night before and baked in the morning. It doesn’t get much easier than that! Can’t wait to make these again!
Sausage and Green Chile Breakfast Enchiladas
1 pound ground breakfast sausage (I used mild, but hot would be great too)
6 large eggs
1 4-oz can green chiles
salt and pepper
1 19-oz can green enchilada sauce
1 cup shredded monterey jack cheese
flour tortillas
Preheat oven to 350 degrees. In a skillet over medium-high heat, cook the sausage and drain off grease. Scramble the eggs. Combine the sausage, scrambled eggs, and green chiles in a large bowl. Season with salt and pepper to taste.
Spoon 1/2 cup of the enchilada sauce in the bottom of a 9×13 baking dish. Spoon a little of the sausage/egg mixture in a flour tortilla, roll up, and place in the baking dish. Repeat with remaining filling/tortillas. Top with the rest of the enchilada sauce and sprinkle with cheese.
Cover with foil and bake for 20-25 minutes, until bubbly. Serves 6.
Sing For Your Supper original
Before I start talking food, I just want to give a giant thanks to those of you who were so sweet about my last post. I was mostly being cheeky (not surprising, really), but I’d be lying if I said that wasn’t completely based on truth. I really appreciate the encouragement and support from you guys. What a great group of people you are!
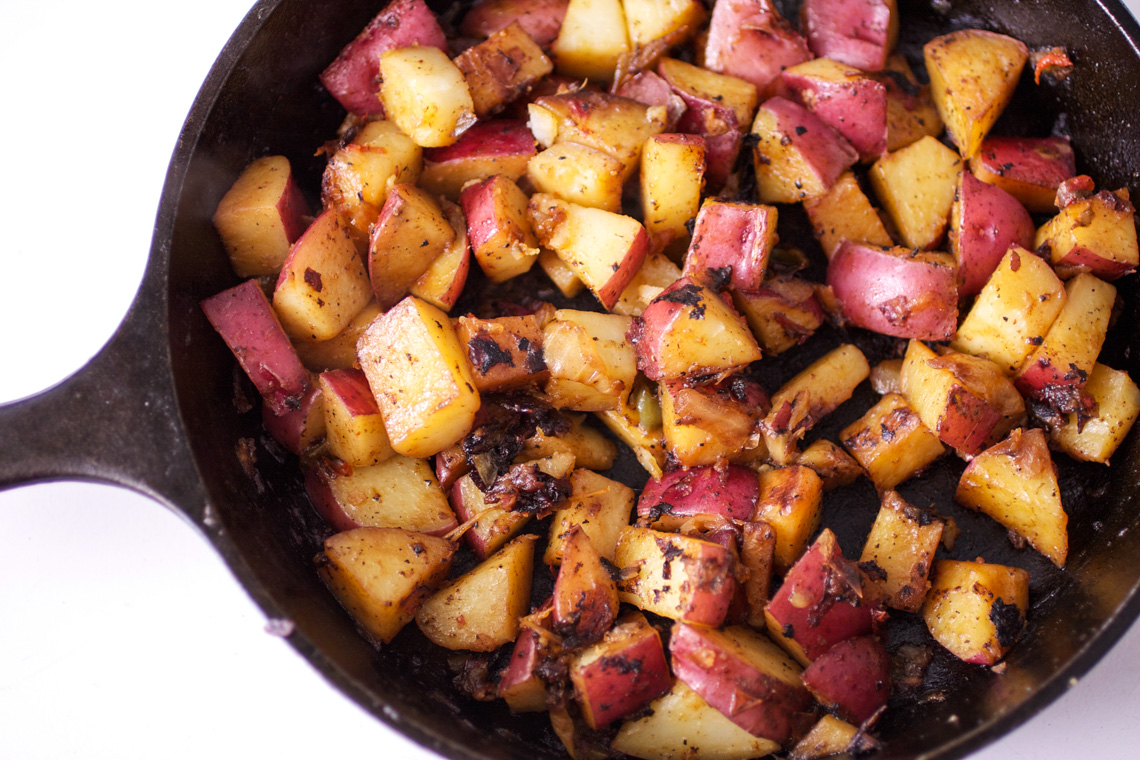
Now food. Potatoes are something I always have on hand. Always. I roast ’em, mash ’em, french fry ’em…let’s just say I think they’re pretty great. Something I love but never think to do is breakfast-style potatoes, aka skillet potatoes. So I just jumped right in and made some the other night to go along with ham and egg biscuits for dinner. They were so simple and had such a great flavor. I always keep chopped onions and peppers in my freezer, so throwing these together took hardly any effort. They’d also make a great base for a hash; just top them with any kind of meat (shredded roasted pork would be awesome), then a runny egg and you’ve got a meal! So versatile.
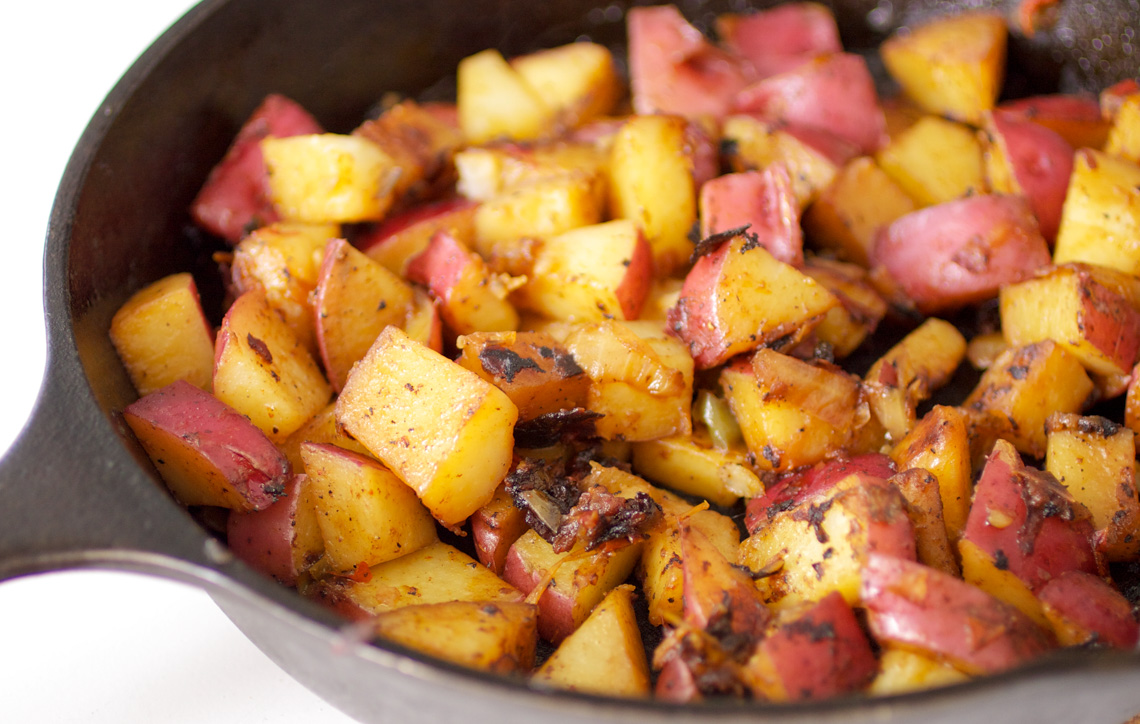
Skillet Potatoes
2-3 small/medium-sized red potatoes, cut into 1-inch chunks
1/2 a small onion, chopped
1/2 a bell pepper, chopped
1 tablespoon vegetable oil
salt and pepper
Heat the oil in a cast iron skillet over medium heat. Cook the onions and peppers for about 5 minutes, until beginning to soften. Add potatoes and season with salt and pepper. Cover and cook, stirring occasionally, for about 10-15 minutes, until the potatoes are soft. Keep an eye on them and make sure you stir them often so they don’t stick. Serves 3-4.
Sing For Your Supper original
Warm, gooey cinnamon rolls can be made in a snap by using crescent roll dough to save on time.

I always like to make something “splurge-y” for breakfast on the weekends; whether it’s donuts, pancakes, or biscuits and gravy. We all loooove cinnamon rolls, but there’s no way I’m messing with yeast and rising dough and all that craziness. I have enough craziness all on my own, thankyouverymuch. Some days, just getting cereal on the table is a struggle.
 I had a random can of crescent roll dough in my fridge that was just begging to be cinnamon-sugared up. All it took was 4 ingredients and about 5 minutes of prep work and we had warm, gooey mini cinnamon rolls in a jiffy! Cassidy was especially fond of them. You can make a glaze for these using a little powdered sugar and some milk if you want, but we enjoyed them plain. Great with coffee. And since these are “mini”, you can have like, 5 or 6 at a time, right? Right. [my postpartum self is not proud of this…]

4 Ingredient Mini Cinnamon Rolls
1 can refrigerated crescent roll dough
butter
2 tablespoons brown sugar
1 1/2 teaspoons cinnamon
Preheat oven to 350 degrees. In a small bowl, mix the brown sugar and cinnamon with a fork. Roll out crescent roll dough and press seams together to make one large rectangle. Spread with butter (as much or as little as you like; I probably used around 1/2 tablespoon. Just enough to make a thin layer.). Sprinkle generously with the cinnamon-sugar mixture.
Roll the dough lengthwise into a log; cut dough into 1 1/2 inch slices and place on a baking sheet. Bake for about 10 minutes, until golden brown. Makes around 10-12 mini rolls.
Recipe source: Sing For Your Supper original
Try this easy stovetop version of rich, velvety, homemade apple butter as a spread for toast and muffins, or enjoy it all by itself!
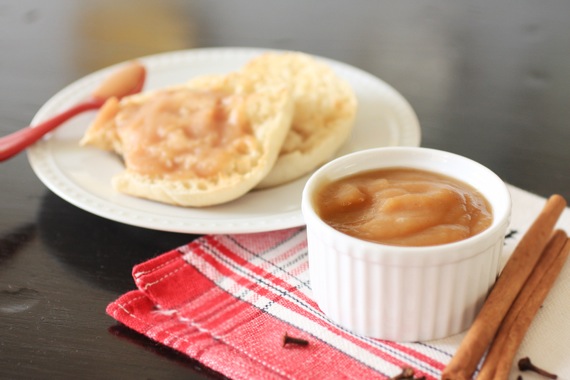
October had just begun, there was a slight chill in the air, and I wanted apple butter. I headed to the grocery store to find my favorite jarred variety. Not only did they not have my preferred brand, but the one kind they did have was insanely expensive. I stood there in the jams and jellies aisle shaking my fist at the apple butter people (whoever they were) and then realized, “apples are on sale! I’ll just…..MAKE MY OWN!” [cue hallelujah chorus]
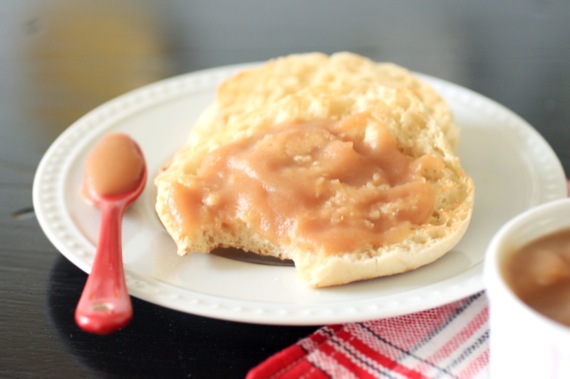
I really didn’t want to wait all day for the slow cooker versions (which is basically all I could find online), so I decided to try it on the stovetop and see what happened. Turns out, it works really well on the stovetop! And super tasty- I think the butter really gives it an extra richness that’s unbeatable!
Spreadable, velvety, rich apple butter…perfection on a piece of toast or even just by itself!
Stovetop Apple Butter
5 pounds apples, peeled, cored, and cut into chunks (I used Pink Lady, but Honeycrisp or Gala would work too)
2/3 cup brown sugar
squirt fresh lemon juice
1 1/2 teaspoons cinnamon
1/4 teaspoon ground cloves
pinch salt
1/2 stick butter (4 tablespoons)
1 teaspoon vanilla
Combine all ingredients except vanilla in a large pot and cook, covered, on low for 3 hours, stirring occasionally. Apples will be extremely soft. Stir in vanilla.
Using an immersion blender, puree the apples until completely smooth. You could also use a food processor, working in batches. I stopped the cooking process here because I was (very) satisfied with the taste and texture of the apple butter, but you could continue cooking it uncovered on low for another hour or so, if you desire a thicker, darker consistency. Let cool completely. Store in the refrigerator. Makes approximately enough for 3 pint-sized jars.
Recipe source: Sing For Your Supper original
Since Cassidy came along, I’ve done a few kid-friendly posts here and there and even some homemade baby food, but I still get lots of requests for more kid recipes. Honestly, since she’s still so young, I haven’t done all that many recipes just for kids; mainly because Cassidy just eats whatever we eat. If I cook kale, butternut squash, and quinoa soup for dinner, that’s what Cassidy eats. However, since my little bitty baby is quickly growing into a spunky, energetic, opinionated LITTLE GIRL (for heaven’s sake, I’m going to burst into tears just typing that!), I’ve been making more kid-friendly, fun meals for her.
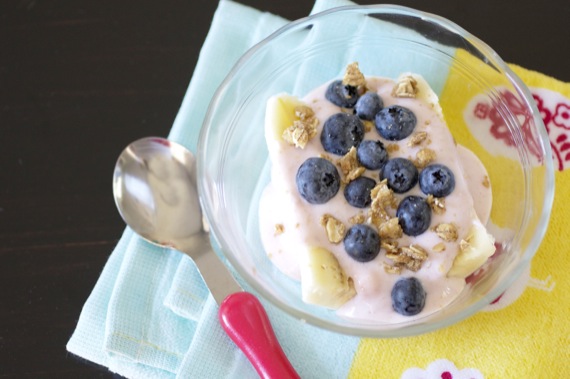
This week, I’ll share two such recipes with you. Starting with this breakfast banana split. How cute is that?! Last Christmas, my uncle and aunt sent Cassidy and me a cute little cookbook just for kids, which is adorable. Cassidy loves to flip through the pages and look at each picture and recipe and say, “mmm!!” as she takes a pretend bite with her chubby little fingers. I seriously adore this kid.

Anyway, it’s sort of easy for me to get into a breakfast rut with Cassidy. And when the same old things start getting old, recipes like this are a welcome, adorable change of pace! Just layer sliced bananas with your favorite yogurt, then top with blueberries and a bit of granola. You can use any fruits you like and as many toppings as you want! The sky’s the limit!
Let your kiddo choose what toppings she wants, then let her enjoy her own special creation for breakfast! Such fun!!
Breakfast Banana Splits
half a banana, sliced in half length-wise
1 4 or 6-oz. individual-size cup yogurt (we like strawberry greek yogurt)
blueberries
granola
Lay the sliced banana in a small bowl and top with yogurt, blueberries, and granola. Let your kids help you put it all together and create their own masterpiece! Serves 1.
Recipe source: adapted from Gooseberry Patch Kids in the Kitchen

Happy Friday!! To celebrate the coming weekend (woo!), I’m sharing a yuuuuummmmm-EEEE breakfast treat with you! These little gems are a family favorite that my sister and I enjoyed a lot growing up. There are a few steps involved, but really, they couldn’t be easier! All you need is a can of biscuit dough, oil for frying, and cinnamon-sugar. Easy.

Obviously, since these are deep fried, I don’t make them too often, but recently, the whole family got together for a birthday brunch celebration for my sister and grandmother, and I wanted to make something special for them. If you can’t eat fried dough on your birthday, then when can you, eh? 😉

Fried Cinnamon-Sugar Biscuits
1 8-piece can refrigerated biscuit dough
vegetable or canola oil for frying
1/2 cup sugar
2 tablespoons cinnamon
In a large dutch oven or deep cast iron skillet, heat about 2 inches of oil to around 350 degrees. To know when your oil is hot enough, you can either use a thermometer or put a drop of water into the oil; if the water sputters and pops, it’s ready. I kept my heat set on medium-low after reaching the desired temperature and was able to keep a pretty consistent 350 degrees.
Have a large platter lined with paper towels ready. Mix sugar and cinnamon together in a pie plate or platter; set aside. Cut each biscuit into quarters. Drop 6-8 pieces of dough in the hot oil (carefully) and cook until they begin to brown on one side and float. Turn them over and cook until the other side is lightly browned. Remove from the oil and drop into the cinnamon-sugar; roll to coat and set on the paper towel-lined platter.
Repeat with the remainder of the dough pieces. If your dough seems to be browning too quickly, your oil is too hot. Reduce the heat just a little. Each piece should take about 45 seconds to 1 minute on each side. Serve immediately. Makes 32 pieces.
Recipe source: an old family recipe, not sure of its origin

Raise your hand if you love breakfast for dinner. Me too. Something about getting to drink coffee at night is strangely fun for me. Speaking of that, isn’t it funny how old people always drink coffee with their dinner? In our little town, you’ll go to a restaurant and see an old couple eating mexican food and drinking coffee. Weird.
Anyway, about these biscuits. Now, normally, I would insist on making my great-grandmother’s biscuits, since that was her thing. Baba was a very gifted cook, but I think she would agree with me when I say biscuits were her specialty (well, it may be a tie with her peach cobbler.). However, I don’t exactly have the recipe. Once I tried making them from the cookbook my mom said Baba always used for her biscuits, but something wasn’t right. Honestly, for whatever reason, I’m too scared to make Baba’s biscuits. Just add it to the list of things I’m too chicken to make (my mom’s fried okra, chicken fried steak, anything involving yeast…the list, unfortunately, goes on).
So this time, I chose Deb of Smitten Kitchen’s recipe. And they were really, really good. So perfect hot from the oven and smeared with butter alongside a cup of coffee. And far too easy to continue making store-bought. Frankly, there’s just no comparison.
Buttermilk Biscuits
2 1/4 cups all-purpose flour
1 teaspoon sugar (to taste; you can use more or less. I don’t like mine to be overly sweet)
1 tablespoon baking powder
3/4 teaspoon salt
3/4 teaspoon baking soda
9 tablespoons chilled unsalted butter, cut into small chunks
3/4 cup buttermilk
Preheat oven to 400 °F and line baking sheet with parchment paper. Whisk flour, sugar, baking powder, salt and baking soda in large, wide bowl. Using fingertips or a pastry blender, work butter into dry ingredients until the mixture resembles a coarse meal, Add buttermilk and stir until large clumps form. Using hands, knead mixture briefly until it just holds together.
Transfer dough to floured counter and pat out until 1/2 to 3/4-inch thick. Using a round cutter (about 2 inches; I always use a small juice glass, like my great-grandmother did), press straight down — twisting produces less layered sides — and transfer rounds to baking sheet, spacing two inches apart.
Bake until biscuits are golden brown on top, about 12 to 15 minutes. Serve warm. Makes approximately 9 biscuits.
Recipe source: barely adapted from Smitten Kitchen
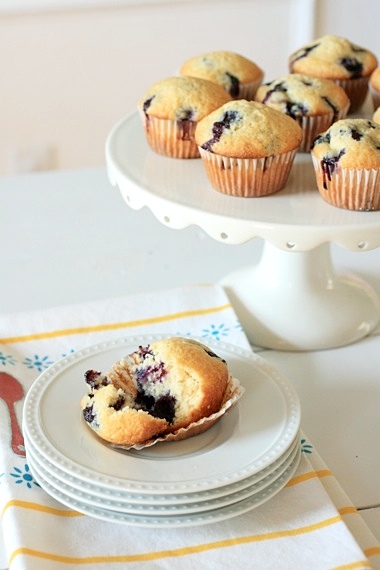
So…May is here. I don’t know how it happened but suddenly, out of nowhere, it’s almost mid-May. Which means…Mother’s Day is almost here! Yay! This holiday has a whole new life to it now that it applies to me and not just my mom and grandmothers (not that I didn’t love celebrating Mother’s Day before I had Cassidy…it’s just more fun now.) 😉 Now that I’m on “Team Mom” (golly, that just sounds lame, doesn’t it?), I realize just how important it is for mothers everywhere to have an entire day dedicated to them. A day to feel special and well-rested, pampered and praised, and tended TO instead of being the one doing all the tending. Moms are the hardest working people on the planet- we get spit-up on, pooped on, poked at, toes stomped on, pinched, bitten, screamed at, sat on, and food thrown on us all before 8 in the morning. I think we deserve a day of recognition for that, don’t you? 😉
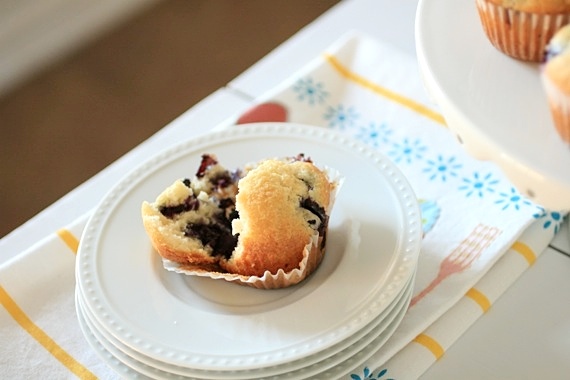
And maybe a lovely batch of muffins to wake up to with a hot cup of coffee…sipped in silence and peace. Really, that’s all I could ever ask for for Mother’s Day. A little rest, some peace and quiet, and maybe a muffin or two. Sounds heavenly to me. These muffins are no-frills, quick and easy, and taste absolutely perfect warm out of the oven with a cup of coffee. I’ve tried lots of blueberry muffin recipes, but frankly, these are my favorite. They’re everything a blueberry muffin should be. Tender, slightly sweet, and full of juicy blueberries.
I certainly wouldn’t mind if someone were to make these for me on Mother’s Day weekend… (wink, wink!) 😉

Classic Blueberry Muffins
1 1/2 cups all-purpose flour
3/4 cup sugar, plus 1 tablespoon for muffin tops
1/2 teaspoon salt
2 teaspoons baking powder
1/3 cup vegetable oil
1 large egg
1/2 cup milk
1 1/2 teaspoons vanilla extract
1 cup fresh blueberries
Preheat oven to 400 degrees F. and line 8 standard-size muffin cups with paper liners. Add 1 to 2 tablespoons of water to any empty muffin cups (this helps to make sure the muffins bake evenly).
Whisk together the flour, 3/4 cup of the sugar, baking powder and the salt in a large bowl. In a large measuring cup, whisk the vegetable oil, egg, milk, and vanilla extract until combined. Add milk mixture to the bowl with flour and sugar then use a fork to combine. Do not over mix. Batter will be thick. Carefully fold in blueberries with a wooden spoon.
Divide the batter between the 8 muffin cups and sprinkle the tops with the reserved tablespoon of sugar. Bake for 15-20 minutes until muffins are golden brown and a toothpick inserted into the middle comes out clean. Makes 8 muffins.
Recipe source: Inspired Taste
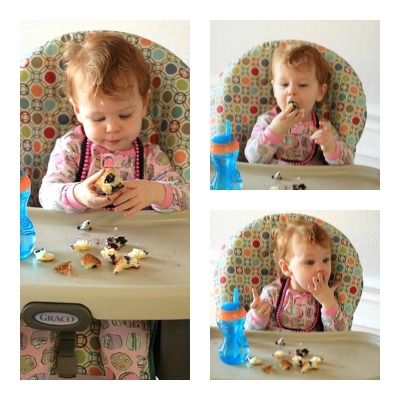
Cassidy liked them, too. 🙂
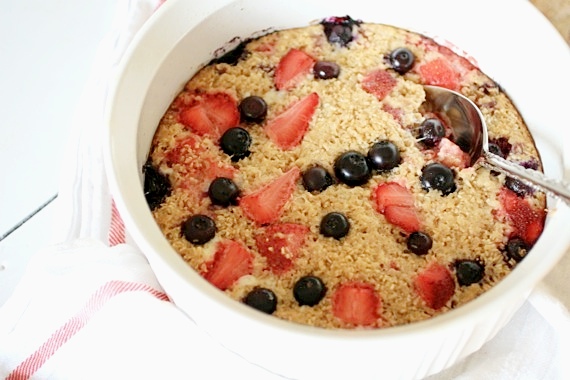
I’ve been wanting to make this baked oatmeal for SO long now! Almost every morning, I would pull the recipe up on my iPad and get ready to make it, only to have something interrupt me! Finally, I was able to spend a little uninterrupted time in my kitchen and make this for my family’s breakfast last week. Yay! We all loved it- it’s not too sweet, full of juicy strawberries and blueberries, and the texture is great. I’m dying to make it again this week! Breakfast truly is the most important meal of the day, and this recipe will start it off right!
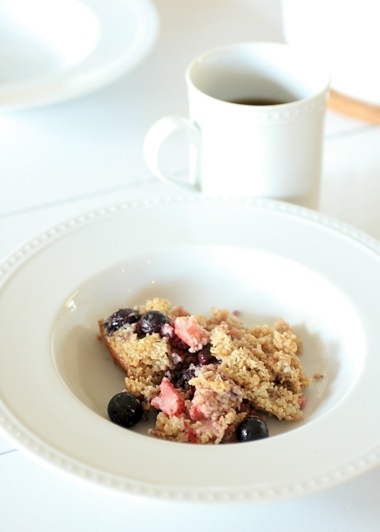
Baked Oatmeal
1 cup steel cut oats (feel free to use old fashioned oats)
¼ cup chopped walnuts or pecans, lightly toasted, divided
½ teaspoon baking powder
¾ teaspoon ground cinnamon
Pinch of salt
1/4 cup brown sugar
1 cup milk
1 large egg, lightly beaten
2 tablespoons unsalted butter, melted and cooled slightly
1 teaspoon vanilla extract
1 cup fresh strawberries, hulled and cut in quarters, divided
1 cup blueberries (fresh or frozen), divided
Preheat the oven to 375˚ F. Lightly grease a 2-quart baking dish. In a medium bowl, combine the oats, nuts, baking powder, cinnamon, salt, and brown sugar. Stir with a fork to combine. In a liquid measuring cup, combine the milk, egg, butter, and vanilla. Spread half of the strawberries and blueberries in a single layer over the bottom of the baking dish. Sprinkle the dry oat mixture over the fruit in an even layer. Pour the liquid ingredients evenly over the oats. Sprinkle the remaining berries over the top.
Bake for 35-40 minutes, until the top is browned and the oats have set. Let cool 10 minutes before serving. Serves 4-5.
Recipe source: adapted from Annie’s Eats