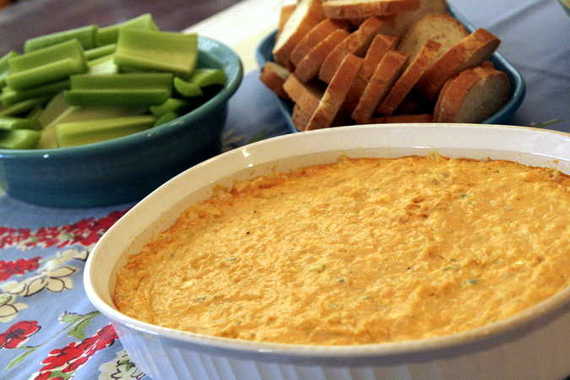
YEEEESSSSSS. Blame it on the pregnancy cravings (give me all things Buffalo!), or the Super Bowl season, but I am PUMPED about Buffalo Chicken Dip, aka, Crack Dip. I only make it once a year for the Super Bowl, but I crave it year round. Don’t forget to make some for your Super Bowl bash! It’ll be the hit of the party!
Here’s a few more of my favorite football foods that would be equally as awesome for your party:
Baked Tex-Mex Pimento Cheese Dip
Cheesy Pepperoni Bread
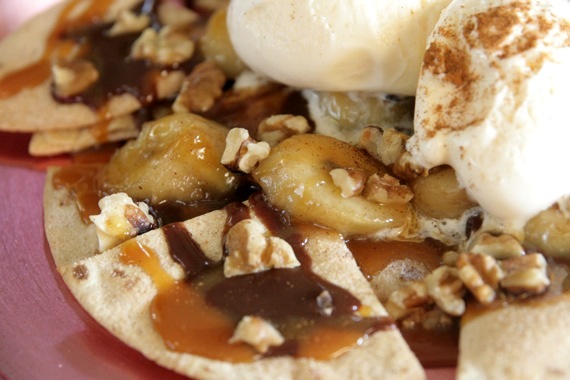
Bananas Foster Nachos. These are seriously AH-MA-ZING.
BBQ Bacon-Wrapped Jalapenos
Baked Chicken Empanadas
Chicken Enchilada Dip Roll-Ups
Happy Super Bowl party planning, everybody! May you enjoy your fatty dips, quesos, and deep-fried stuff as much as I will! 🙂

Here is the second of the two kid-friendly recipes I promised this week. I’ve actually been making these a lot, simply because we get tired of plain old sandwiches for lunch. Joel works from home, so I struggle with trying to think up tasty, quick lunches all week.
I don’t make these too often, because, clearly, they’re not the healthiest, but when you’ve got a teething toddler who doesn’t have any interest in eating all of the sudden, you’ll do what you can to make meals fun. However, I do use the reduced fat crescent rolls for these instead of the regular. Cassidy still hasn’t gotten past pulling her’s apart and eating the meat and cheese separate- but hey, whatever keeps her happy, I guess. 🙂

Ham and Cheese Roll-Ups
1 roll refrigerated reduced fat crescent roll dough, such as Pillsbury
mustard
8 slices deli ham
8 slices cheddar or swiss cheese
Preheat the oven to 350 degrees. Unroll the crescent dough and spread a little mustard on each triangle. Lay a slice of ham, then cheese on each triangle, then roll up, starting with the wide end. Place on a baking sheet and bake for about 11-13 minutes, until golden brown. Serves 2-3 as a lunch; or 6-8 as a snack.
Recipe source: Gooseberry Patch’s Kids in the Kitchen cookbook
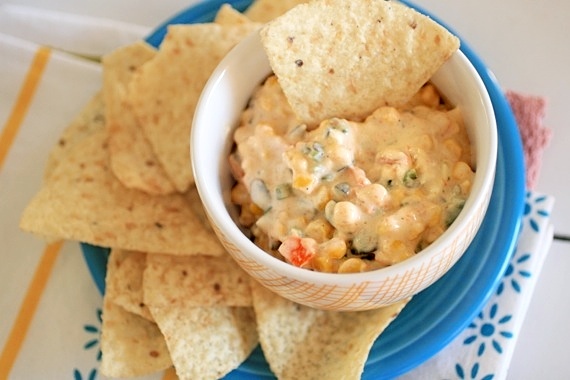
I know it may seem a little preemptive to post a recipe with “poolside” in the title (especially since we’re expected to have some more cold [ish] weather this week), but since a lot of people are gearing up for barbecues and outdoor parties, I decided I couldn’t wait to share this one with y’all! I pinned this recipe months ago and had been dying to try it until our friend Patty brought it to a baby shower I hosted. Everyone kept raving about the awesome dip and finally I asked her what it was- “I saw it on Pinterest. It’s called ‘skinny poolside dip'”. Every single one of us (no joke!) erupted with, “I pinned that recipe too!” Luckily, there was a little left over and I ate every last bit of it for dinner that night! It’s sooo good! I ended up making it for a cookout just a week or so later, with rave reviews. I love this stuff. Even if you don’t have a pool, you’ll definitely want to make it. It’ll be a favorite this summer for sure!
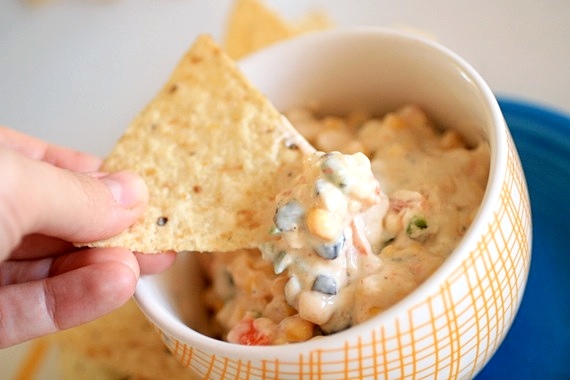
Skinny Poolside Dip
2 cans sweet yellow corn, drained
8 ounces fat free cream cheese, at room temperature
1/2 cup fat free Greek yogurt
2 jalapeños, seeded and chopped
1 red bell pepper, seeded and chopped
1 packet (1 ounce) dry Ranch seasoning
1 small can (2.25 ounces) chopped black olives
Mix all ingredients until combined. Chill until ready to serve. Serve with tortilla chips, triscuits, or crackers. Serves about 6-8.
Recipe source: adapted from Home Trends Utah
Happy New Year, friends!! I hope the holidays were as magical for all of you as they were for me. Our first Christmas with Cassidy was truly wonderful. In fact, I’d love for you to read all about it and see the pictures I took. I’ve written a Christmas Recap post over on my family blog and I hope you’ll check it out!
You’ll notice I didn’t do a ‘Best of 2012’ post this year, because, well, I kind of find those obnoxious anyway, and…all the best of 2012 involved a little diaper-wearing red head; not food. 😉
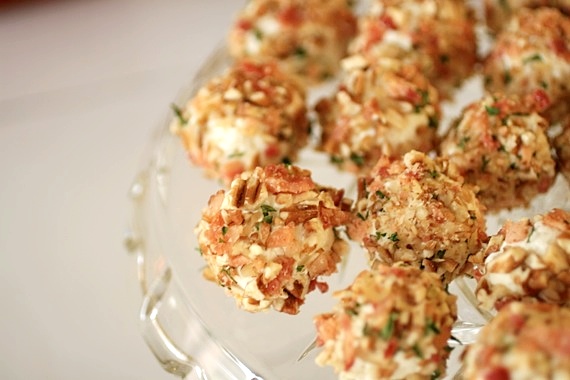
Now, onto the goods. I made these truffles with every intention of sharing them with you before the holidays were over, but better late than never, right? The fact is, these babies can be enjoyed any time of year! Any occasion! A Tuesday, perhaps! In fact, I may put them on the menu for Cassidy’s first birthday party. Because let me tell you- they’re goooooood. Better than good, really. Smooth, silky goat cheese mixed with a bit of honey and rolled in toasted pecans and crispy bacon. Yuuuuuummmm. Smear these bad boys on a toasted baguette and you’re well on your way to heaven, folks.

Goat Cheese, Bacon, and Pecan Truffles
8 ounces goat cheese, softened to room temperate
1 teaspoon honey
1 teaspoon half and half or milk
1/4 teaspoon salt
1 cup pecans, chopped
6 slices bacon, cooked until crispy and roughly chopped
2 teaspoons dried parsley
In a small pan, toast the pecans over medium-high heat until fragrant, about 5 minutes. Watch them carefully! Let cool completely. Combine the pecans, bacon, and parsley in a pie plate or large platter.
Line a baking sheet or large plate with parchment paper.
Combine the goat cheese, honey, half and half, and salt in a large bowl. Scoop out 1-2 inch balls and carefully roll in the pecan/bacon mixture. Set on the parchment paper-lined baking sheet or platter. Refrigerate for at least 30 minutes. Remove from the refrigerator 30 minutes before serving to take the chill off. Serve with toasted baguette slices or crackers. Makes about 35-40 truffles.
Recipe source: Sing For Your Supper original

Have you ever noticed how almost every single party dish revolves around cheese?? Dips, cheese balls, cheese logs, pinwheels….it seems almost every single holiday recipe starts with an 8 ounce package of cream cheese. Not that I’m complaining! However, since learning of my lactose intolerance (and my mom’s, and possibly my sister’s), I tend to pay more attention to these things nowadays. I try to cut down on the amount of cheese dishes I make when I host parties. Goat cheese doesn’t count, thank the Good Lord (I’m not affected by goat’s milk, just cow’s milk), so there’s ALWAYS plenty of that! 🙂 So, this year, instead of a cheese ball (or two) and a couple of cheesy dips, I chose only one cheesy dish. This Baked Pimento Cheese Dip. Josie debuted it first, then Annie. After drooling over it on both girls’ blogs, I finally decided it was time to make it! Perfect party food, easy to make, and definitely a crowd-pleaser. What more could you ask for?
Baked Tex-Mex Pimiento Cheese
1/4 cup mayonnaise
1/4 cup greek yogurt
8 ounces cream cheese, softened to room temperature (reduced fat is fine)
3/4 cup chopped roasted red bell pepper
1 jalapeno pepper, seeds and ribs removed, chopped finely
8 oz extra sharp cheddar, grated (about 2 cups)
8 oz Pepperjack cheese, grated
1/3 cup minced scallion (2-3 scallions)
1/3 cup minced fresh cilantro
1 tsp Worcestershire sauce
1/4 tsp red pepper flakes (more or less to taste)
salt and pepper to taste
tortilla chips, for serving
Preheat the oven to 350 degrees and lightly grease a 2-quart baking dish.
In a large bowl, combine all the ingredients for the dip, reserving 1 tablespoon of each cheese for topping. Mix well and spoon mixture into the baking dish.
Top with the reserved cheese and bake 20-25 minutes, until hot and bubbly. Garnish with additional cilantro, and serve with tortilla chips.
Recipe source: adapted from Pink Parsley; originally from Southern Living

Well, it looks like we all survived the Christmas hustle and bustle! I hope you all had as wonderful a Christmas as we did! Although there was lots of driving involved, we had so much fun with our families and ate SO much good food! Joel and I certainly enjoyed our last Christmas as a twosome, but we couldn’t help but dream of next year’s Christmas and how special it will be with Cassidy! 🙂
And now that Christmas is over, it’s time to start thinking about yummy New Year’s Eve snacks! Joel and I always have lots of different snack foods on New Year’s Eve instead of a big meal. We enjoy just staying home and enjoying a nice, quiet evening just the two of us (all that is sure about to change, huh?!). I’m thinking this year we’ll definitely be snacking on this appetizer for sure! I tried it just over a week ago when we had my parents and grandparents over for a nice meal (like we do every year before Christmas). I wanted a quick, easy, delicious appetizer that would require as little work as possible so I’d have more time for the rest of the cooking. I’ve had this recipe saved on Pinterest for weeks and weeks now and it turned out to be exactly what I was looking for. SO good! We all crowded around it and couldn’t stop eating it! The combination of the toasted pistachios and sweet cranberries was just ideal. I’ll be using this recipe again and again! If you’re headed to a party this New Year’s Eve or even just staying in like we do, this appetizer is just perfect! I hope you enjoy it as much as we did!
Goat Cheese Log with Pistachios and Cranberries
1 8-ounce log goat cheese
1/2 cup pistachios, shelled
1/2 cup dried cranberries, roughly chopped
sliced baguette or crackers for serving
In a small pan over medium-high heat, toast the pistachios until fragrant; about 3-5 minutes, stirring occasionally. Let cool.
Combine the pistachios and cranberries in a plate and roll the goat cheese log in the mixture until completely coated. Place on a serving dish and sprinkle the remaining pistachio/cranberry mixture around the log. Allow to sit out at room temperature for at least 15 minutes before serving so the cheese will soften nicely and become more spreadable. Serves approximately 6-8.
Recipe source: Real Simple


I guess this pregnancy has me really digging caramel, because I feel like I’ve been making lots of caramel-y treats lately even though I’m normally not a huge fan. Hey, there are worse things to crave! Last week I had a whole afternoon to myself and thought I’d try my hand at homemade caramel corn. I’ve made it once before, but with my mom’s help (in fact, I believe it was during the Halloween season and we munched on our homemade caramel corn while watching Halloween movies!) and lucky for me, she wrote the recipe down for me! Yay! So I got in the kitchen and whipped up this delicious caramel corn- man, oh MAN! What a TREAT! This was rich, buttery and most importantly, good ‘n crunchy! I took a big bag to work and none of us could stop munching on it! I will most definitely be making this again; probably on Halloween, in fact. A perfect snack to munch on while watching Hocus Pocus! 🙂

Caramel Corn
6 quarts popped corn (3 bags microwave popcorn- I used Tender White)
2 cups brown sugar
1 cup (2 sticks) butter
1/2 cup light corn syrup
1 teaspoon salt
1 teaspoon vanilla
1 teaspoon baking soda
Preheat oven to 250 degrees. Cook brown sugar, butter, corn syrup and salt in a large saucepan over medium-high heat. Bring to a boil and cook for 5 minutes, stirring constantly. Remove from heat and stir in baking soda and vanilla. Pour over popcorn and stir to coat. Place popcorn in a large roasting pan or spread out over two baking sheets lined with greased foil. Bake, stirring every 15 minutes for about 45 minutes. Caramel corn will be crunchy (with no sogginess) when done. Let cool and break into pieces. Makes enough to serve a large crowd- approximately 10-12 people.
Recipe source: my mom


This is one of those great, impressive easy-as-can-be appetizers that make you look like a rock star, but really took you less than 10 minutes to throw together. Aren’t those the greatest?! I like to keep a stack of fast, easy appetizer recipes handy for when I need to put something together in a hurry, and roasted shrimp cocktail is definitely one of them! It’s great for get-togethers, or if you’re hosting a nice dinner party, or maybe if you just want a nice, no-fuss appetizer for a quiet dinner at home for you and your sweetie. Everybody loves shrimp cocktail, but I feel like it gets a little tiresome after awhile; this is the perfect way to make it interesting again! Give it a try at your next party- your guests will love it!
Roasted Shrimp Cocktail
2 pounds (12 to 15-count) shrimp
1 tablespoon good olive oil
1/2 teaspoon kosher salt
1/2 teaspoon freshly ground black pepper
Preheat the oven to 400 degrees F.
Peel and devein the shrimp, leaving the tails on. Place them on a sheet pan with the olive oil, salt, and pepper and spread them in 1 layer. Roast for 8 to 10 minutes, just until pink and firm and cooked through. Set aside to cool.
Serve with cocktail sauce for dipping.
Recipe source: Ina Garten


When you think of baby showers or wedding showers, tell me, what’s the first food you think of? For me, it’s chicken salad, no doubt. I don’t know what it is about chicken salad, but it seems to be the honorary queen mother of shower food. Which is just fine by me, I adore chicken salad. Especially chicken salad with grapes and crunchy almonds….mmm. So naturally, when I was invited to take part in a little virtual baby shower for our fellow food blogging friend Annie, chicken salad was the very first thing to pop into my head! And to make it more accessible and “mingle-friendly”, I decided chicken salad bites would be perfect.
Annie will be having a sweet baby girl (little Caroline; What a sweet name!) in just a short while, and to show our support, a bunch of us bloggers are throwing her a virtual shower- how cool is that (and stay tuned, because I’m hosting a little shindig of my own in a few weeks!)?! My good friend Courtney, of Cook Like A Champion is our gracious shower hostess- she and Annie will have the entire round-up posted on their blogs, so be sure to head over for some beautiful dishes by a group of very talented bloggers!

Now, onto these chicken salad bites! I love a good crunch in my chicken salad, so this is full of crunchy sliced almonds and celery. There’s also green grapes and pineapple, and let me tell you, the pineapple really adds a delicious sweetness and flavor that compliments the chicken perfectly! The sauce is made up of non-fat yogurt and mayonnaise, so it’s a little lower in fat than most chicken salads. The salad sits in crisp little phyllo cups, which gives great texture and makes them easy to eat. Simply stated: this is really an easy, delicious dish to put together and it’s just perfect for parties (or showers!). 🙂 Don’t forget to head over to Courtney and Annie’s blogs to see everyone else’s beautiful dishes! Happy baby shower, Annie! Congratulations to you and your sweet little family!
Chicken Salad Bites
30 baked phyllo cups (you can find these in the freezer section of the grocery store- they usually come in packs of 15)
3 bone-in, skin-on chicken breasts
2 stalks celery, chopped
1 small can pineapple chunks (crushed would be fine as well)
handful green grapes, sliced into halves
1/2 cup sliced almonds
1/4 cup mayonnaise
1/2 cup plain, non-fat yogurt
1 squirt lemon juice
salt and pepper, to taste
parsley and thinly sliced radishes, for garnish, if desired
Place the chicken breasts in a large pot and fill with enough water to cover the tops. Boil on medium heat for approximately 1 1/2- 2 hours, until chicken is very tender. Remove the chicken and let cool.
Once the chicken is cool, remove the meat from the skin and bones and shred into small pieces. Place in a large bowl. Add in celery, pineapple, grapes and almonds.
In a small bowl, make the sauce. Stir together the mayonnaise, yogurt and lemon juice. Season with salt and pepper. Pour over the chicken mixture and stir until combined. Taste for seasoning.
If serving immediately, place a small amount of chicken salad in each phyllo cup. Garnish with chopped fresh parsley and thinly sliced radishes (optional).
If you’re making the salad ahead of time, keep it refrigerated until ready to serve. Don’t assemble the bites until right before serving, as the cups will get soggy.
Makes 30 cups.
Recipe source: Sing For Your Supper


I love just about anything with a cream cheese base. Cheese balls, dips, cheesecakes, spreads…I love it all. That’s why I went nuts for these little tortilla roll-ups that my friend Callie introduced me to (sorry the photos are so crummy- I had only a few seconds to snap a couple of pictures before my party!). She brought them to my house for a party and I pretty much ate half the platter by myself. Then I turned right around and made some myself to take to another party! I LOVE them! And the party guests loved them too- they got gobbled up in no time! The ranch seasoning really adds great zestiness and the green chiles give it a nice zing! These are SO good! Perfect for parties!
Zesty Tortilla Roll-Ups
-adapted from my friend Callie’s recipe
2 8-ounce packages cream cheese, softened
1 package (1 oz.) Hidden Valley Ranch salad dressing mix
2 green onions, chopped
1 4-ounce jar diced pimiento, drained
1 4-ounce can diced green chiles, drained
1 4-ounce can chopped black olives, drained
1 squirt lime juice
1 package large flour tortillas
Mix all ingredients together and spread in an even layer on tortillas. Roll them up and chill for at least 2 hours. Slice just before serving.
*These are best enjoyed the day they’re made. The tortillas will get a little soggy after a few hours, so if you need to make them ahead of time, just make the filling and keep in the refrigerator until needed, then assemble the day of.
**This would also be great by itself as a dip- just serve with Fritos or tortilla chips! Yum!!


