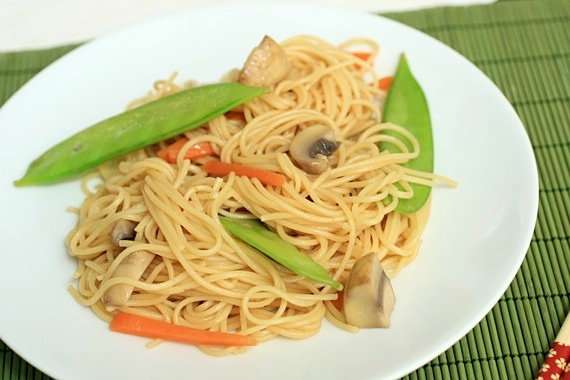
Quick and easy Asian Spaghetti made with angel hair pasta, crisp veggies, and a light sauce. The perfect side dish for any Asian-inspired meal!
Alright, folks. It’s a new year and I’m feeling good and ready to jump back in! Luckily, I’m no longer struggling with morning (aka: 24 hour) sickness and I’ve begun to regain a lot much of my energy that the first trimester robbed me of. I’m 16 weeks along, and we’ll find out in about 3 weeks if Cassidy will have a little sister or brother. We can’t wait! I’ve been getting back into the kitchen lots more and cooking healthy meals again (for awhile, Taco Bell was my only friend…). Now that I’m feeling better, I get to look forward to throwing Cassidy’s 2nd birthday party in a few weeks! She’ll be having a Curious George themed party and I’m soooo excited to put it all together!
I want to thank you all for being patient with me as I cope with the challenges of pregnancy and toddler-wrangling. I appreciate you all so much and can’t tell you what your readership means to me. So, before my hormones run wild and I start getting all teary-eyed (it happens a lot, really), I’ll go ahead and switch gears- let’s talk about food!
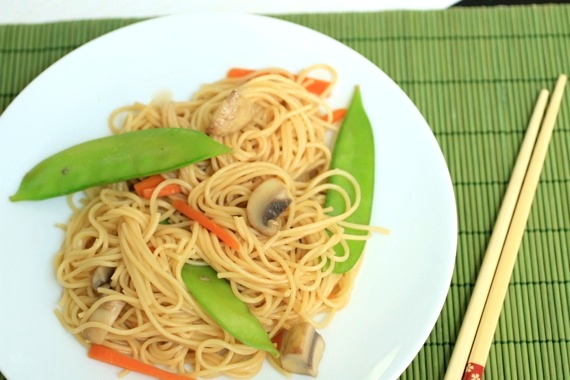
As I said before, I went through a phase where the only things I could stomach were junky, carb-y, really bad-for-you things. Don’t get me wrong, there is still a half-eaten chocolate cake and a package of Soft Batch cookies in my kitchen right now, but now that I’m feeling so good, I’m really focused on eating healthier foods, along with lots of fruits and vegetables. One of my favorite go-to meals is my Asian Glazed Salmon, and this Asian Spaghetti goes perfectly with it! Light, crisp, and full of flavor. I love the crunch of the snow peas and carrots, and the light soy sauce dressing is super quick and easy. Perfect for a healthy weeknight dinner!
Asian Spaghetti
8 ounces angel hair pasta
1 cup sliced fresh mushrooms
1 cup fresh snow peas
3/4 cup shredded carrots
4 green onions, chopped
2 tablespoons canola oil
1 garlic clove, minced
1/4 cup reduced-sodium soy sauce
1 teaspoon sugar
1/4 teaspoon cayenne pepper
2 tablespoons sesame seeds, toasted
Cook pasta according to package directions. Meanwhile, in a large skillet, saute the mushrooms, snow peas, carrots and onions in oil until crisp-tender, about 5 minutes. Add garlic; cook 1 minute longer.
In a small bowl, combine the soy sauce, sugar, and cayenne. Drain pasta. Add pasta and soy sauce mixture to skillet and toss to coat. Sprinkle with sesame seeds. Serves 4-6 as a side dish.
Recipe Source: Taste of Home

Oh man. Are you ready for a FANTASTIC meal?? This salmon surprised us in the best possible way. I found some bottled ginger-sesame sauce/glaze at the store along with some beautiful looking salmon and decided to throw together a quick Asian-inspired dinner. Wow and WOW. Not only did this meal come together in less than 30 minutes, it blew us away. The ginger-sesame sauce would have been nice on its own, but the addition of lime juice, brown sugar, soy sauce and cilantro really took it over the top. The glaze keeps the salmon nice and moist and the flavors of ginger and cilantro combined with the salmon was an excellent combination. I served it with some quick noodles with peanut sauce and it really was the perfect quick, delicious weeknight meal. You really need to try this one!
Asian Glazed Salmon
2 salmon filets
2 tablespoons ginger-sesame sauce (I used an organic brand called Full Circle, but any ginger sesame-based marinade or dressing [not salad dressing] will do. If you can’t find this, a teriyaki sauce will do)
1 tablespoon reduced sodium soy sauce
squirt of fresh lime juice
1 rounded teaspoon brown sugar
cilantro
In a small bowl, stir together the ginger-sesame sauce, soy sauce, lime juice, brown sugar and cilantro until combined.
Preheat the oven to 400 degrees. Place the salmon filets, skin side down, on a baking sheet lined with greased foil. Brush with half of the marinade and bake for 10 minutes. Brush with remaining marinade and return to oven for 10 minutes more until salmon is cooked through. Top with additional cilantro. Serves 2.
Recipe source: Sing For Your Supper original


You all know how much we enjoy sushi, and even though Joel and I found making sushi at home to be extremely easy, we opt for a slightly easier version every now and then. Like these sushi bowls. It’s the most ingenious idea ever and SO easy! Gather up all your favorite sushi fixin’s, pile it in a bowl and voilà– sushi bowl awesomeness! We used cucumbers, imitation crab meat, avocado, shelled edamame and our favorite spicy sauce- the mayo/sriracha sauce; and BOY did we love this! If you’re searching for a quick, delicious weeknight dinner, I highly suggest making these; for one thing, it’s a heck of a lot cheaper than going out for sushi and it’s ready in no time! Perfect!
Sushi Bowls
1⅓ cups rice, rinsed well
1⅓ cups water
3 teaspoons rice vinegar
2 teaspoons sugar
1 cucumber, peeled and cut into sticks
imitation crab meat (as much as you like), cut into sticks
1 avocado, sliced and cut into chunks
shelled, steamed edamame (as much as you like; you can find pre-shelled edamame in the freezer section of most grocery stores)
1/4 cup sesame seeds, toasted
1/4 cup mayonnaise
1/2-1 teaspoon sriracha hot sauce, depending on how spicy you like it
soy sauce and wasabi for serving
Rinse the rice. Place the rice and water in a medium saucepan and bring to a boil over high heat, uncovered. Once it begins to boil, reduce the heat to the lowest setting and cover. Cook for 15 minutes. Remove from the heat and let stand, covered, for 10 minutes.
Combine the rice vinegar and sugar in a separate small bowl and heat in the microwave on high for 30 to 45 seconds, until the sugar dissolves. Transfer the rice into a large bowl and add the vinegar mixture. Fold and cut thoroughly to combine and coat each grain of rice with the mixture. Allow to cool. Do not refrigerate.
In a small bowl, combine the mayonnaise and sriracha; set aside.
Pile the rice, cucumber, crab meat, avocado and edamame in individual bowls and top with sesame seeds, soy sauce/wasabi (if desired) and sriracha mixture. Serves 4.
Recipe source: adapted from The Way the Cookie Crumbles


I’ve been trying to broaden my horizons a bit in the kitchen lately. Ever since I made that delicious fish curry, I’ve wanted to delve deeper into curries and other ethnic flavors. That’s when my opera friend Meredith told me about one of her simple weeknight recipes she makes often that uses Thai red curry paste. I was totally intrigued, not only by the simplicity of the dish, but by how totally yummy it sounded. I’ve been waiting weeks for a free night to make this! Not only was it easy (and QUICK! It took less than 10 minutes!), it rocked!!! If you’ve never cooked with Thai red curry paste (or made your own), you’re missing out! If you’re looking for something different and simple for your weeknight dinner rotation, try this! You’ll love it!
Easy Weeknight Thai Stir Fry
1 package frozen stir fry vegetables (I used one with broccoli, cauliflower, carrots, snow peas, water chestnuts and red peppers but you can use anything you want. Fresh veggies would be ideal, obviously, but when you’re short on time, this is too easy!)
1 package vermicelli or rice noodles (rice also works great)
1-2 tablespoons Thai red curry paste (depending on how hot you like it)
3/4 cup coconut milk
1/4 cup water
Cook the noodles according to the package. In a large skillet over medium-high heat, cook the frozen vegetables in a little olive oil until thawed and hot. Whisk together the curry paste, coconut milk and water and pour over the vegetables. Add the cooked noodles and toss to coat.
Serves 2-4.
Recipe source: my friend Meredith


That’s right- Joel and I made sushi for our Valentine’s Day dinner, just like I said we would! And believe it or not, we didn’t screw it up! A miracle! In fact, we were so excited about it, we decided to make a little video, including YOU all in the fun! That’s right- this is a Sing For Your Supper first! My very first video tutorial (don’t worry, it’s very short- less than 3 minutes)!

Believe it or not, making sushi at home isn’t quite as scary as you’d think. I’ll be honest, we were both pretty pessimistic about our chances of making a decent California roll, and I fully expected to fail miserably. But it really was FUN and easy, and our rolls turned out super delicious! However, before I show you how we did it, there are a few things I’d like to make clear:
I am not a professional sushi maker.
I am fully aware that my “California roll” is not a real, honest-to-goodness, traditional California roll.
I realize that my knife-wielding skills are a little lack-luster.
Yes, I have an accent.

Sushi video tutorial:
[FMP autohide=”true”]/wp271/wp-content/uploads/2011/02/Sushi.m4v[/FMP]
What you’ll need:
Nori (seaweed)
bamboo mat
plastic wrap
sushi rice
rice vinegar
salt
sugar
water
crab meat
cucumber, thinly sliced
avocado, thinly sliced
soy sauce
wasabi
mayo/Sriracha mixture (optional- you won’t find this in a traditional California roll, but we really liked the flavor it added! Mix 1/4 cup mayonnaise with 2 or 3 splashes of Sriracha)
Mix 2 tablespoon rice vinegar, 1 tablespoon sugar and 1/2 teaspoon salt in a small saucepan over medium heat. Bring to a boil and remove from heat.
Cook your rice according to the instructions on the package. I made 2 cups, which gave us enough for 2 rolls (with a little leftover). You don’t have to own a rice cooker for this- I did mine on the stove top and it turned out just fine.
After your rice is cooked, spread it in a thin, even layer on a baking sheet, sprinkle with the vinegar mixture and let it sit out until it’s completely cooled (I laid down a sheet of wax paper before spreading my rice, just so it wouldn’t stick to the baking sheet).
When you’re ready to start filling your sushi, place a sheet of nori on the bamboo mat covered with plastic wrap. Have a small bowl of water mixed with a little rice vinegar nearby. Dip your fingers in the water and start spreading the rice in a thin, even layer over the nori. You’ll need to continuously dip your fingers in the water to keep them from sticking to the rice (and that rice is STICKY!). Leave a little bit of a border so you’ll be able to seal the roll later.
Place a few pieces of crab, cucumber and avocado at the top of the roll (closest to you), followed by the spicy Sriracha/mayo mixture, if desired.
Now it’s time to roll; carefully lift the bamboo mat underneath the top of the nori (where the filling is) and start to roll it over until you can tuck the top underneath. Keep using the mat to help you roll it as tightly as possible (this is actually a lot easier than it sounds). After you’ve finished rolling, dab a little water/vinegar mixture on the edge of the nori to seal the edges. Slice in 1 inch pieces and you’ve got SUSHI!
For dipping: Mix a TINY amount of wasabi into your soy sauce for a spicy kick. But be warned, wasabi packs a BIG punch- a little goes a long way! Dip your sushi and enjoy!
**If you decide to use any raw fish, definitely make sure it’s “sushi-grade” (extra fresh)!
References: Gimme Some Oven and Itsy Bitsy Foodie
Out Takes (enter at your own risk!):
[FMP autohide=”true”]/wp271/wp-content/uploads/2011/02/Out-Takes.m4v[/FMP]


Sorry about the ‘Yee Haw‘ in the title….I get a little excited sometimes and the Texan in me really comes out. Yeah, so WOW, I was lucky enough to advance to Round 2 of Project Food Blog!!! But only thanks to YOU. If it hadn’t been for your support, encouraging comments and votes, I totally wouldn’t even be here! So THANK YOU from the bottom of my heart!
In this round of Project Food Blog, our mission is to cook outside of our comfort zones and recreate a classic dish from another culture. The kicker? It can’t be French or Italian. They wouldn’t want to make it too easy on us, now would they? 😉 I knew this would be a challenging order, because when you get right down to it…..I’m boring. There, I said it. The majority of my food is American, Mexican, Italian and Cajun, with the occasional Greek thrown in to annoy my mother, who hates Greek food. In all honesty, it’s not often that I step outside of my comfort zone at all. I’m a “play-it-safe” kind of girl. But not anymore. Today I turn over a new leaf. I kick the old, “boring” Amy to the curb and let the new, adventurous, perhaps even slightly dangerous Amy in the kitchen. Who knows what that Amy will come up with! She’s pretty awesome. My husband digs her.

So, after lots of careful thought (I went down the Indian, Israeli, Greek and Moroccan paths, but ultimately, was left cold), I decided to do a Tong Sui (translation: ‘sweet water’), a delicious Cantonese dessert soup (sounds good, right? Well it is…trust me!). To be honest with you, the only “Asian” food I’ve ever made is Kung Pao Chicken…………….*cricket*, *cricket*…………….I know. I’m ashamed. Everyone knows that doesn’t count. So I thought, “what better culture to choose from?!” I was first introduced to this yummy, sweet soup 4 years ago at our friend Billy Wu’s house. Every year, he hosts a huge BBQ that my husband fondly refers to as “The WuBQ” (and looks forward to year round). There’s a plethora of every food imaginable, and I was lucky enough to sample a dish that would intrigue me for years to come. Billy’s mother is a wonderful cook and loves sharing her Chinese culture with everyone (she once convinced my poor husband to try a smoothie made with Durian, the funkiest, smelliest fruit known to man). She opened the lid to a large pot filled with a rich, coconuty soup and invited me to try a bowl. “Why not?”, I thought – it smelled good enough. One bite and I was hooked. It was sweet, creamy, slightly thick and filled with rich coconut milk, tapioca pearls and taro. I went home that night thinking about the soup. I’ve thought about it ever since.

Upon doing some research, I found out that Tong Sui is Asian comfort food. Like our chocolate pudding or macaroni and cheese, a nice big bowl of this is like a big, warm hug. Very common. Billy’s mom makes it all the time and his whole family loves it. I love it too. Which is why I’m diving in head-first and making my very own traditional Tong Sui! Billy’s mom was sweet enough to give me her own personal recipe and I’m honored to be able to recreate it here!

Tong Sui (Cantonese dessert soup)
-makes a large pot; enough for 6-8 people
**Kam Kwai gave me her list of ingredients and her method of cooking. Just like so many of my grandmother’s recipes, measurements are just approximations- you can add as much or as little of everything as you want.
3 cups water, plus more for boiling the tapioca and barley
approximately 3/4 cup small tapioca pearls
1/2 cup pearl barley
1 small sweet potato, peeled and diced into centimeter-sized cubes (Kam Kwai uses Taro- similar in texture to sweet potato- but the ones at the Asian market were big, long and furry and frankly, they scared me a bit so I used sweet potatoes)
1 12-oz. can coconut milk
1 12-oz. can evaporated milk
1/2 – 1 cup sugar (this isn’t meant to be too sweet, but if you prefer it sweeter, feel free to use the full cup of sugar)
1 teaspoon salt
pinch ginger
pinch cinnamon
1 teaspoon vanilla extract
*the cinnamon and vanilla isn’t traditional, but I wanted to put my own spin on it
In a medium pot over high heat, bring 1 1/2 cups water and pearl barley to a boil. Reduce heat to low and cook covered for 40-45 minutes, until the barley is tender.
In a separate pot, bring another 2 cups water to a boil. Add in the tapioca pearls and cook for 10-12 minutes, until clear and cooked through.
In a large stock pot, bring the 3 cups water and diced sweet potato to a boil. Cook for 10 minutes until the sweet potato is tender. Stir in the cooked barley, coconut milk, evaporated milk, sugar, salt, cinnamon, ginger and vanilla. Lastly, stir in the tapioca. Taste for sweetness and add more sugar and spices as needed. Remove from heat. Serve and enjoy!
*Tong sui can be enjoyed warm or cold.
I had lots of fun making this soup- it’s so different and unusual compared to the things I normally make. That’s why I’ve enjoyed this challenge so much. Not only have I succeeded in cooking a delicious dish from a completely different culture, I made my first ever trip to the Asian market! Now THAT was an experience! I’ve discovered so many wonderful ingredients and ideas that I would have never even considered trying before. Like I said, that was the old, boring Amy! Who knows what I’ll try next- Billy also gave me a great recipe for sweet dumplings to make for Chinese New Year! Bring it on! I’m a new woman!

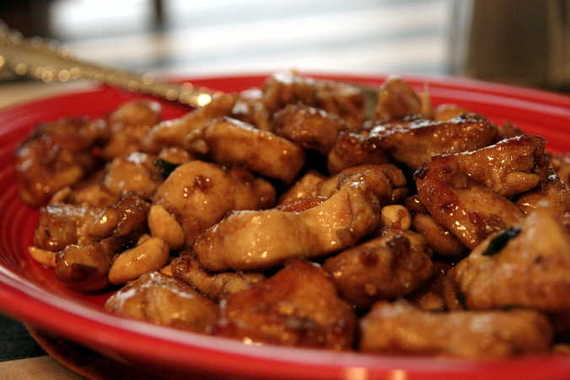
Big news everybody – BIG news! Last night, I had my first experience with cooking Chinese/Asian food!!! That deserves a big ‘ol freaking cookie! I know that sounds ridiculous, but for whatever reason, I’ve just never gotten around to cooking Chinese food – we usually just head over to Pei Wei or the local take-out place. But now that I’ve discovered these dishes, I think there will be a lot more Chinese food in the future! Yippee!
I’ve got a few of these type of recipes saved, but I chose this Kung Pao Chicken I saw on Pennies on a Platter recently because it has peanuts and I loooooove peanuts! It was super easy and took no time to put together. I paired it with a quick and easy recipe for Fried Rice that I found on Allrecipes.com. And voila! The perfect meal!
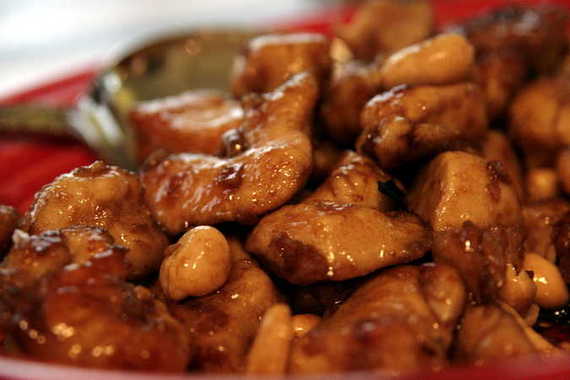
The sauce for this chicken was delicious and simple, and of course I loved the crunch of the peanuts. I think next time I’ll add a little more heat – maybe a little Cayenne pepper or a chopped chili- a little more “PAO”! Hehe…
Kung Pao Chicken
-Blog Chef
1lb boneless, skinless chicken breasts (cut into 1” pieces)
1 tablespoon cornstarch
2 teaspoons sesame oil
3 tablespoons green onions (chopped)
3 garlic cloves (minced)
½ teaspoon crushed red pepper flakes
½ teaspoon ground ginger
2 tablespoons rice wine vinegar
2 tablespoons soy sauce
2 teaspoons sugar
1/3 cup dry roasted peanuts
Combine chicken and cornstarch in a small bowl and toss to coat. Heat sesame oil in wok (or large deep-dish skillet) over medium heat, add chicken and stir fry 5-7 minutes or until no longer pink inside. Remove chicken from wok.
Add green onions, garlic, red pepper flakes and ginger to the wok and stir fry for 15 seconds.
Combine vinegar, soy sauce and sugar in a small bowl. Mix well and add the sauce to the wok.
Return chicken to the wok and coat with sauce. Stir in roasted peanuts. Heat thoroughly. Top with additional green onions if desired and serve over white rice. (Or fried rice, in my case!)
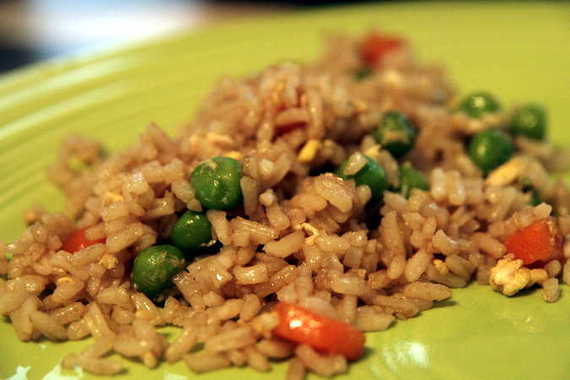
The fried rice took about 10 minutes total – I love recipes like this! I think next time I’ll add a little oyster sauce and a tad more soy sauce – other than that, it was perfect!
Fried Rice
-Allrecipes.com
2 cups enriched white rice (I used Minute Rice)
4 cups water
2/3 cup chopped baby carrots
1/2 cup frozen green peas
2 tablespoons vegetable oil
2 eggs
soy sauce to taste
sesame oil, to taste
Cook rice according to package directions. In a small saucepan, boil carrots in water about 3 to 5 minutes. Drop peas into boiling water, and drain. Heat wok over high heat. Pour in oil, then stir in carrots and peas; cook about 30 seconds. Crack in eggs, stirring quickly to scramble eggs with vegetables. Stir in cooked rice. Shake in soy sauce, and toss rice to coat. Drizzle with sesame oil, and toss again.