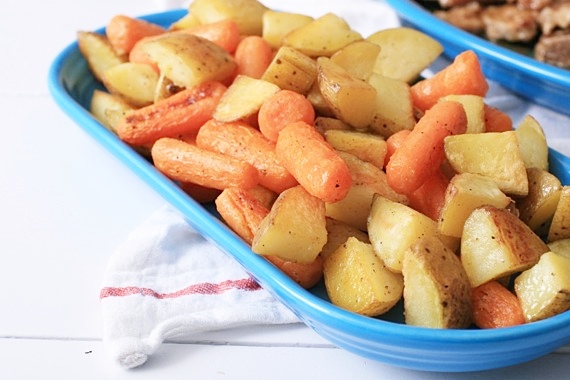
My all-time favorite, easy go-to side dish is roasted vegetables. Roasting just brings out all kinds of delicious flavor, and it’s just SO EASY! Toss your favorite veggie with some olive oil, salt, and pepper and pop in the oven. Done. My favorite vegetable to roast has got to be broccoli– something magical happens to broccoli when its roasted. Magical, I tell you.
However, when it comes to firmer vegetables like carrots and potatoes, I have a method for roasting that comes out perfect every single time. All it takes is one extra step- no biggie. Just boil them for about 5 minutes first, THEN pop them in the oven. It makes the vegetables almost creamy on the inside, with a nice brown crust on the outside. So perfect. I do it this way every time I roast potatoes or carrots, and every time Joel and I are like, “MAN. These potatoes (or carrots) are SO good!” Every time.
Perfect Roasted Vegetables
5-6 medium sized yukon gold potatoes, scrubbed and cut into chunks
1 small bag baby carrots (or 5-6 large carrots, peeled and cut into chunks)
olive oil
salt and pepper
Preheat oven to 400 degrees. Put the potatoes and carrots in a large pot and cover with water. Bring to a boil and cook for about 5-7 minutes, until they’re just beginning to soften. You don’t want to be able to poke a fork all the way through them; the centers should still be hard.
Drain and toss with olive oil (about 2 or 3 tablespoons). Spread on a baking sheet in an even layer and sprinkle with salt and pepper. Roast for 15-20 minutes, until fork tender and a nice crust has formed. Serves 4 as a side dish.
You could also use this method for rutabagas/turnips, butternut squash, sweet potatoes, and any other really firm vegetable.
Recipe source: Sing For Your Supper original

Mmmm, gooey, cheesy goodness. My mom always used to fix squash like this we when were growing up. It usually accompanied fried okra and potatoes, cornbread, and fresh, sliced tomatoes. One of my all-time favorite meals. I believe this recipe originally came from my dad’s grandmother. So simple and comforting…and only 5 ingredients! The BEST way to eat summer squash, in my opinion! 🙂
Cheesy Squash Casserole
5-6 summer squashes, sliced into 1/2-inch slices
half an onion, chopped
1 tablespoon butter
5 or 6 saltine crackers, crushed
1/3 cup shredded cheddar cheese, plus more for top
Preheat the oven to 375 degrees. Place the squash and onion in a pot and cover with water. Bring to a boil and cook for about 10-15 minutes, until squash is tender. Drain.
Stir in the butter, cracker crumbs, and 1/3 cup cheese. Pour into a greased baking dish and top with a little more cheese. Bake for about 10 minutes, until cheese is melty and gooey. Serves 4-6.
Recipe source: my great-grandmother
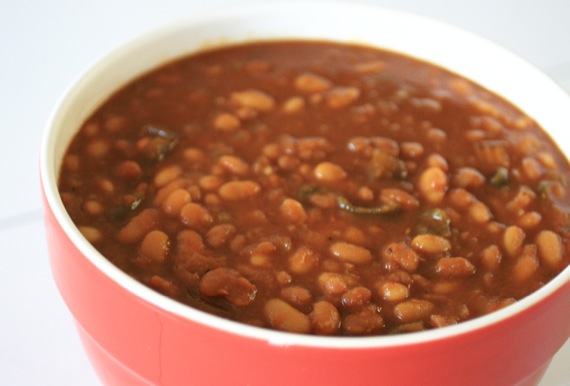
Just in time for Labor Day weekend, here’s a knock-out recipe for baked beans! I have a feeling these will make yet another appearance at our get together this weekend! Enjoy the holiday!
Crockpot Brown Sugar Baked Beans
3 (28 ounce) cans pork and beans
1 small onion, diced
1 bell pepper, diced
1/2 cup barbecue sauce
1/2 cup ketchup
3/4 cup brown sugar
2 tablespoons yellow mustard
5 slices bacon
Mix first 7 ingredients in a crockpot. Stir until combined and arrange the bacon strips on top. Cover and cook on low for 3-5 hours, stirring occasionally. Remove the bacon strips before serving.
Recipe source: a mixture of my mom’s recipe and a recipe from Six Sisters’ Stuff
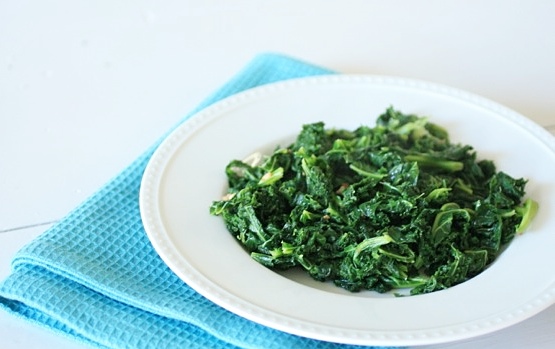
Are you scared of greens? Does kale or spinach send you running in the opposite direction? Well, fear, be gone, because I have news for you- there’s nothing easier or tastier if you know how to prepare them! I know a plate of soggy kale might seem unappealing to those of you who aren’t big into greens, but I promise it’s just the opposite! Joel and I both love kale (even Cassidy loves it!); in fact, it’s just about our favorite green. I keep a giant bag of frozen, chopped kale in the freezer and put it in soups, casseroles, smoothies, and much more. But my favorite way to prepare it is simply sauteed. It’s amazing how much flavor is packed in these amazingly healthy greens.
A church friend and neighbor of ours is going through some health issues and he and his wife have decided to completely change their lifestyle. They’re exercising and eating healthy- no processed or refined foods. I recently talked with them about their new diets and found out they’re trying to eat as many healthy vegetables as possible. So of course, I asked them if they’d tried kale yet. Since they hadn’t, and seemed a little hesitant, I decided to post this recipe for them. Getting healthy is serious business and I want to help them find some recipes that are super good for you, yet delicious as well.
The kale is blanched, then simply sauteed with a little pancetta (which could absolutely be left out), garlic, and a little red pepper for some heat. Ready in 7 or 8 minutes, full of flavor, and packed with nutrition! Say yes to kale!
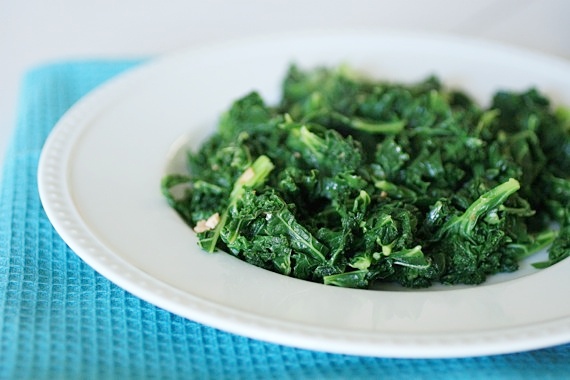
Sauteed Kale
1 pound fresh kale, washed, ribs removed, and roughly chopped
1 tablespoon diced pancetta
1 tablespoon olive oil
1 clove garlic, chopped
salt and pepper
pinch red pepper
Bring a large pot of water to a boil. Drop the kale in and cook for about 3 or 4 minutes, until it starts to wilt. Meanwhile, cook the pancetta in a skillet over medium heat for about 3 or 4 minutes. Add the olive oil. Add the garlic to the pan and cook for a minute or so.
Using a large slotted spoon, remove the kale from the boiling water and place directly in the skillet with the pancetta and garlic. Sautee for 3 or 4 minutes, stirring constantly. Season with salt, pepper, and red pepper. Serves 4 as a side dish.
Recipe source: Sing For Your Supper original
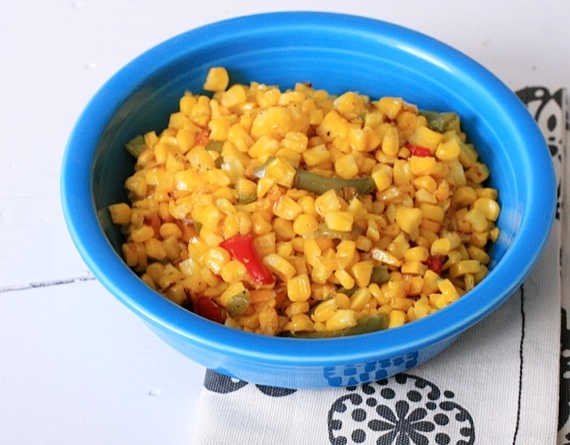
I don’t know about you guys, but one of my favorite things about summer is the fresh corn on the cob. Our grocery store will usually have them for around 5 for a dollar, so I stock up! We grill them, roast them, make salads, casseroles and all kinds of awesome dishes. But right now, fresh corn on the cob isn’t in season, so I’m stuck with frozen. Luckily, I found this tip about how to make oven roasted corn using frozen kernels. I was so intrigued I just had to try it.
I’m not going to say it’s as sweet and awesome as fresh-off-the-cob, but hey, in a bind, it works great! I added in some red and green peppers and my family gobbled it up!
[Short Cut] Oven Roasted Corn
1 bag frozen corn kernels
olive oil
salt and pepper
Preheat the oven to 400 degrees. Toss the frozen corn with olive oil, salt, and pepper and spread on a baking sheet in an even layer. Roast for about 10 minutes until corn begins to blister slightly. Serve immediately.
Recipe source: adapted from Bev Cooks

Being a Southerner, fried okra is a big deal to me. I love it. I grew up eating it every summer when okra was in season (my great-grandmother, both grandmothers, and my mom all made/make a MEAN plate of fried okra). When we eat at Chicken Express (Mmmm….), I always, always order fried okra as my side. Obviously, I like fried okra a little. So, then you’re probably wondering why I’m posting a recipe for BAKED okra, huh?
Because I’m a weenie. I’m too scared to fry okra. It’s intimidating. I just know I’d screw it up. So, I just don’t attempt it. And why should I have to, when all I have to do to get a rockin’ plate of fried okra is walk down the street to my mom’s house?! I’ll learn when I’m older…. 😉 (I have no doubt my mother is reading this post while shaking her head disapprovingly.)

Besides being a whooooole lot less messy, this is so much healthier for you! And the good news- while this doesn’t quite hit the bullseye (nothing but old fashioned fried okra will), it’s VERY close to the real thing. Still crunchy, crisp, and delicious! We absolutely love it.
Crunchy Baked Okra
1 bag frozen, cut okra (or fresh, if it’s in season)
2 tablespoons cornmeal
3 tablespoons panko breadcrumbs (if you don’t have panko, regular will work just fine)
1/2 teaspoon salt
1/4 teaspoon pepper
1/2 teaspoon grated parmesan cheese
2 eggs
Preheat the oven to 400 degrees. Combine the cornmeal, panko, salt, pepper, and parmesan cheese in a large plate or pie dish.
In a separate plate or pie dish, beat the two eggs.
Toss the okra in the eggs until evenly coated. Then dredge the okra in the cornmeal/breadcrumb mixture.
Place on greased baking sheets. Bake for 15-20 minutes, turning the okra halfway through baking. Serves 2-4.
Recipe source: Sing For Your Supper original, inspired by The Spotted Fox.

Recently, when I posted these pork chops, you may have noticed the yummy looking mashed potatoes on the plate. As much as I loved those pork chops, the potatoes were my favorite- they were mixed with lots of butter, tangy goat cheese and crisp, smoky bacon- a real winner! My mom likes to add cream cheese to her mashed potatoes when she wants a “fancier” feel, and we’ve always loved them, so when I had tons of delicious goat cheese to use up I thought it might be a nice spinoff of my moms’ idea. It certainly was! This is my new favorite way to eat mashed potatoes! Next time you have some goat cheese laying around just begging to be used, try this recipe- you’ll love it!
Bacon-Goat Cheese Mashed Potatoes
4-5 medium sized Yukon Gold potatoes, peeled and roughly chopped
2 tablespoons butter
3 ounces goat cheese
3/4 cup milk
salt and pepper
4 or 5 slices cooked bacon, crumbled
In a medium pot, cover the potatoes with water and cook over medium-high heat for 15-20 minutes until tender. Drain the potatoes and add in the butter, goat cheese, milk and salt and pepper. Using a potato masher, stand mixer or hand mixer, mash the potatoes until fluffy and free of lumps. Stir in the bacon and check for seasoning. If your potatoes are thicker than you’d like, add in more milk. Serves about 2.
Recipe source: Sing For Your Supper original

One of my very favorite things about fall is the smell of apples and spices cooking. It really puts me in the perfect “fall” state of mind…even if it is still 90+ degrees outside (we’ll get there, Dallas, we’ll get there!). The other night we had a nice “cold front” (86 degrees instead of the usual 97 or more), so I decided to whip up a quick pot of homemade applesauce. Joel and I both love applesauce, but when it comes to homemade, there’s no contest. The beauty of this recipe is, you can just throw it all in a big pot and leave it. And of course in the meantime, your house will smell amazing!
Homemade Applesauce
4 apples, peeled and cored (I used Red Delicious, but Honeycrisp or Pink Lady would be ideal)
1/2 cup brown sugar, packed
pinch salt
juice of one lemon
1/2 teaspoon cinnamon
1/4 cup water
Cut the apples into large chunks and put them in a heavy pot over medium heat; add the brown sugar, salt, lemon juice, cinnamon and water. Bring to a simmer and reduce heat to low. Cook, stirring occasionally, for about 45 minutes to 1 hour, until the apples are extremely soft and mushy. Using a potato masher or fork, mash the apples together until you have an applesauce-like consistency. Serves 4.
Recipe source: Sing For Your Supper

If you were to ask 10 people what the quintessential American side dish is, I’m betting at least 6 or 7 of them would say ‘mac and cheese’. I’m pretty certain it’s most people’s favorite comfort dish. Think about it, when you’ve had a rotten, tiring day and want something easy and comforting for dinner, what do you turn to? For me, no doubt, it’s mac and cheese. Something about that cheesy, gooey goodness makes me feel like a million bucks after just one bite. All my stress melts away. While I do, indeed love the stuff from the blue box, I have to admit, nothing beats homemade. This is a spin on how my mom used to make it, with cheddar and Velveeta cheeses. Yum, yum, yummy!

Classic Macaroni and Cheese
1 pound elbow macaroni pasta
2 tablespoons butter
2 tablespoons flour
1/2 teaspoon ground mustard
salt and pepper
1 12-ounce can evaporated milk (feel free to use reduced fat milk)
1 cup shredded cheddar cheese
8 ounces Velveeta cheese, cubed
Boil the pasta until al dente then drain and set aside.
While pasta is boiling, make the sauce. Melt the butter in a large pan over medium heat. Stir in the flour, ground mustard, salt and pepper and whisk for 1 minute. Slowly pour in the milk and whisk constantly until it thickens. Add the cheeses and stir until melted.
Pour the sauce over the macaroni and stir to coat. Serve immediately.
Recipe source: adapted from my mom’s recipe (I’m not certain where the original recipe came from)


WOOO! It’s Thanksgiving food time! Now is the time everyone is planning menus, gathering delicious new recipes to try and calling their grandmas for the old tried and true recipes they just HAVE to have. So in honor of all that, I’ve decided to share a couple of excellent, easy Thanksgiving recipes with you this week. Starting with stuffing. Now, let’s get one thing straight- I am a Southerner. We don’t do ‘stuffing’; we do ‘dressing’. Made with cornbread. And we don’t put anything snooty in it, either. None of this Yankee-fied “chestnuts and sausage” business. Very straight-forward and very, very delicious. BUT, that doesn’t mean I can’t experiment with some delicious ideas before Thanksgiving! I do realize that the majority of my reader enjoy what my family calls “Yankee Stuffing”, and I need to stretch my boundaries a little, SO I made you some Yankee stuffing. It’s pretty good, too….for Yankee stuffing. 😉
Sourdough Stuffing with Caramelized Onions, Apples and Cranberries
-by me
(this only makes one 9 inch pan- you may want to double or triple it for a large crowd)
1 loaf sourdough bread, crusts removed and cut into cubes
2 stalks celery, chopped
1 medium onion, sliced into thin rings
1 small green apple, peeled and chopped
1/3 cup dried cranberries
1 1/2 teaspoons dried, ground sage
1 teaspoon salt
1/2 teaspoon pepper
1 1/4 cups chicken broth
In a medium skillet over medium heat, cook the onions in a little olive oil for about 15-20 minutes, or until soft and caramelized. Stir in the apples and celery. Cook for about 5 minutes (you don’t want the apples to get mushy- just fairly soft).
In a large bowl, combine the bread, onion/apple mixture, cranberries, sage and salt and pepper. Pour into a greased 9×9 baking dish then pour the chicken broth over the mixture. Bake in a 350 degree oven for 45-50 minutes.


