I’m going to keep this short and sweet: dramatic 3 year old girls and teething 9 month olds are HARD, yo. Like, thank-the-Lord-and-pass-the-wine-and-xanax-we-survied-another-day HARD. These days, I can barely be expected to keep myself from getting in my car and driving to the nearest liquor store to buy out their entire inventory of tequila, let alone cook a decent dinner. Thank goodness for crockpots. Because, after my first cup of coffee and before the first meltdown of the day, there’s still a glimmer of hope. Like, I feel like I could accomplish anything right after that first cup of coffee. Got my energy; got my caffeine; I CAN COOK DINNER TONIGHT! Bring on those poopy diapers! Hit me with your best toddler tantrum! I GOT this! I’m gonna thaw that meat today, dangit!
Then it usually starts to go downhill around 9am. Clingy, crying baby. Whiny toddler. By the time naptime rolls around, I’m a shell of a human. Wishing I could crawl into the fetal position and pray for death.
Obviously, I’m kidding (sort of). My life is very full (sometimes). I’m a very happy mommy (except when I’m not). 😉 Really, though. If I’m being serious, of course life gets a little cray (ok, a LOT cray), but I wouldn’t have it any other way. On those freaking ridiculous days where I can’t be expected to function normally, this dinner is SO VERY EASY. And really, really good. Everybody will love it. And you can save yourself a little trouble. You deserve it. I know I do.
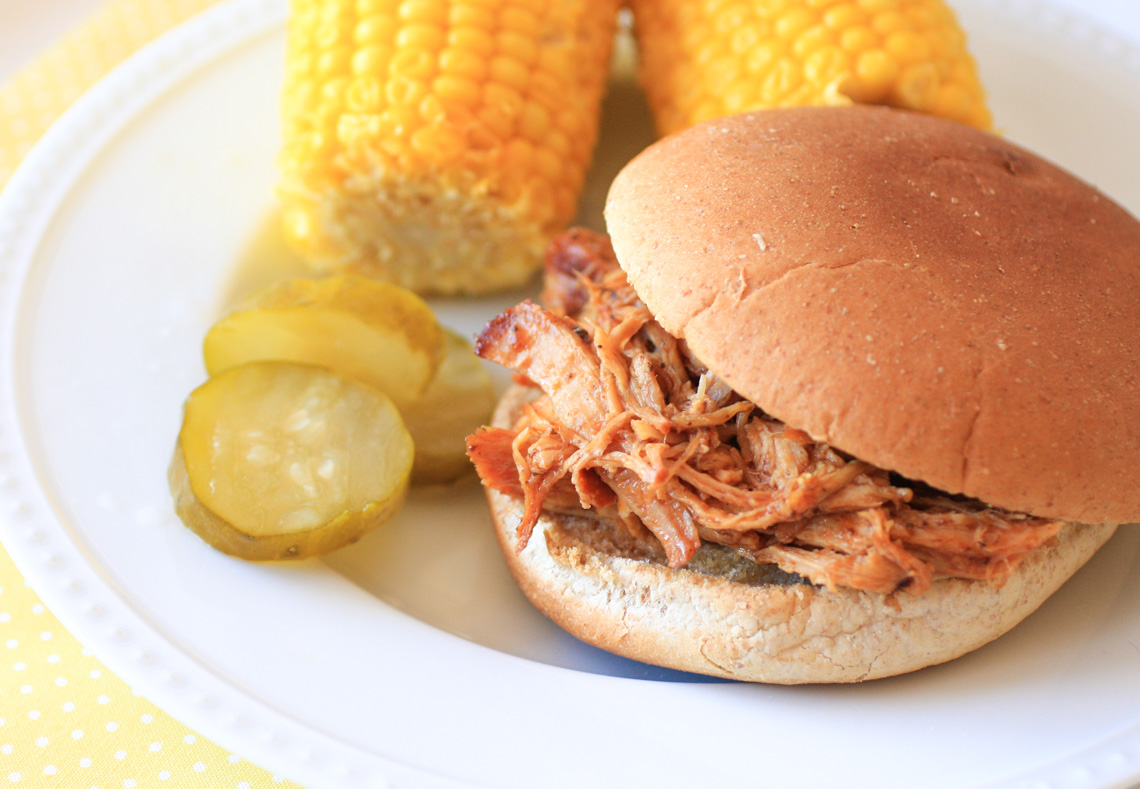
Pork. Dr. Pepper. BBQ sauce. Do it.
Dr. Pepper Pulled Pork
pork roast (about 2-3 pounds)
1 can Dr. Pepper
1/3 cup BBQ sauce
Put the pork roast, Dr. Pepper, and BBQ sauce in a slow cooker and cook on low for 6-8 hours. When the pork is very tender, shred with 2 forks and toss with the remaining cooking liquid. Serve on hamburger buns. Serves 4.

Until just recently, I had never had a tuna melt. Boy, was I missing out! Anything topped with gooey, melty cheese is a winner in my book; especially if it happens to be light, flavorful tuna salad! I use the word “light” because this tuna salad isn’t swimming in mayo- I use a combination of mayo and Greek yogurt. Not only is it better for you, it adds an extra tangy flavor that I just love. Oh, and a big bonus: this dinner came together in under 10 minutes. WIN!
Tuna Melts
1 12-ounce can tuna in water, drained
1 1/2 tablespoons mayonnaise
1 1/2 tablespoons Greek yogurt
splash lemon juice
salt
pepper
Kaiser rolls or Texas toast
butter
sliced cheddar cheese
Mix together the first six ingredients in a small bowl. Set aside.
Butter both sides of the Kaiser rolls (or whatever bread you’re using) and place on a baking sheet. Toast in a 350 degree oven for about 5 minutes, until the butter is melted. Spoon the tuna on two slices of the rolls, top with a slice of cheese and place back in the oven until cheese melts (about 5 minutes). Place the tops of the rolls on top and serve. Serves 2-3.
Recipe source: Sing For Your Supper

First off, let me (again…) apologize for my absence lately. I’ve simply been having too much fun with my little cupcake! She’s 11 weeks old now and constantly keeps us on our toes! She smiles SO much (freaking adorable!), eats a TON, and is growing like a weed- 12.75 pounds at her 2 month appointment! My little red-haired girl definitely has a personality all her own- I love it! Here’s a few other things that have been going on lately:
I won’t be singing with the Fort Worth Opera this season. It was a hard, hard, HARD pill to swallow, but being at home with my little girl is what matters most right now. I simply wouldn’t be able to give her what she needs being gone every single night and weekend for 2+ months. There comes a time when you have to make hard decisions in life; and while this was a very hard decision, I can say with total confidence, it was the RIGHT one.

We’ve decided to move back to our hometown. We’ve found the perfect house, put our house on the market, and turned our lives upside down. This decision literally came out of nowhere, as we never intended to move back there after getting married. But, when something is right, it’s right. Cassidy will be going to the same schools we went to (she’ll even be at the same elementary school I was at! Yay!), she’ll be in the same town as her grandparents, which I happen to think is very important, and we’ll be going to the same church both of us grew up in. Joel and I met there, were in youth together there, and got married there. My family has gone there for 4 generations. It’s a special church, and Cassidy will be a part of it.

And of course, getting used to being parents is still a big part of our lives (the biggest part, actually). Taking care of little miss Cass is a huge responsibility and a joy. Being parents is just awesome. 🙂


Ok, now that you’re up to date on all the happenings, let’s get back to food! The good folks at Tillamook asked me to whip up a grilled cheese sandwich recipe for them since April is National Grilled Cheese Month. They sent me 4 kinds of cheeses to try and asked me to create a delicious grilled cheese for them. Done and done! I love a good grilled cheese. Especially if it happens to have spicy pepper jack cheese, sliced avocado and cilantro butter on thick, buttery Texas toast. Yes sir.
Mexican Grilled Cheese Sandwiches
4 slices Texas toast (not the frozen kind- you can find this with the other sliced breads)
3 tablespoons unsalted butter, at room temperature
pinch salt
2 tablespoons cilantro, finely chopped
2 slices Tillamook Pepper Jack cheese
1 avocado, thinly sliced
salsa, for dipping
Stir the chopped cilantro, salt and butter together until spreadable and smooth. Spread the butter mixture on one side of each slice of bread. Place two slices of bread buttered side down on a preheated grill pan over medium heat. Top each with a slice of cheese and 2-3 slices of avocado. Place the remaining two slices of bread, buttered side up on top. Cook for 2 minutes, then flip, cooking until cheese is melted and bread is lightly browned. Serves 2.
Recipe source: Sing For Your Supper


Lunchtime at my work is always enjoyable. The other voice teachers, our accompanist, and the choir directors (including Albert, my boss) all get together to eat and chat. Always a fun time. Except for one thing: Albert ALWAYS out-lunches me! He always brings these beautiful, perfectly wrapped sandwiches with artisan bread, turkey, caramelized onions, apples, cheese, arugula and Lord only knows what else! They’re glorious! Week after week I have the worst sandwich-envy; even when I bring delicious leftover soup, casseroles, and a plethora of baked goods! I just CAN’T win!!
However, recently my luck changed when I was fortunate enough to score a gorgeous loaf of cranberry-walnut artisan bread at the store. Ideas starting filling my head and eventually I realized…..this was my chance to out-sandwich Albert! BWAHAHAHAHA!!! So today I managed to put together an absolutely delicious sandwich. One that I think will finally win me the title of “lunchtime champ” (ok so I just made that up, but it might happen!!). Since I was at home for lunch today, I went ahead and did an open face sandwich in the broiler, but when I take this to work, I’ll just eat it cold- don’t worry, it’ll still be awesome!
Harvest Sandwich
2 slices cranberry-walnut bread (sourdough or ciabatta would also work nicely)
mayonnaise
dijon mustard
smoked turkey breast
sliced gouda cheese
thinly sliced honeycrisp apples (pears would also be delicious!)
Spread each slice of bread with a small amount of mayo and dijon mustard. Top with a slice or two of the turkey breast and gouda. Place on a baking sheet and heat under the broiler for about 3-4 minutes, until the cheese is melted. Top with thinly sliced apples and enjoy!

Those of you who have followed me for awhile know how much I looooove Greek food. Anything even remotely “Greek-tasting” is a winner in my book! Especially Gyros (pronounced “yee-rohz”). Oh man, oh man…I could go on and on about Gyros. The first one I ever tasted (ever heard of, actually) was in Vienna. Street vendors were selling them everywhere and that giant, rotating slab of meat looked pretty good to me, so I tried it. The meat was juicy, spicy and ohmigosh-so flavorful, and it was topped with a cool, cucumbery yogurt sauce, called Tzatziki; all served up in a warm, soft pita bread with tomatoes, onions and cucumbers. Heaven in hand-held form. I was absolutely smitten from there on. Since then, I’ll eat a Gyro every chance I get! And now, luckily, I can make them at home anytime I like! I just happen to see this recipe over at Made By Mel, who saw it on Elly Says Opa! (the queen of Greek food!) and turned around and made it that night! Like I said earlier, typically, Gyros are made with lamb or beef or both, but this recipe calls for chicken, which makes it so quick and easy!
The Tzatziki is especially delicious- almost like a garlic-y (much, much lighter) Ranch dressing. If you have any left over, it makes a great dip for veggies or a nice sauce for grilled chicken or steak. It’s so versatile!
Chicken Gyros
-seen on Made by Mel, originally from Elly Says Opa!
2 Cloves Garlic, smashed
Juice of 1 Lemon
2 teaspoons Red Wine Vinegar
2 tablespoons Extra Virgin Olive Oil
2 heaping tablespoons Plain or Greek Yogurt
1 tablespoon Dried Oregano
1 pound boneless, skinless chicken breasts
Salt and Pepper
Tzatziki (see below)
sliced tomatoes
sliced red onions
Pita Bread
Whisk together the garlic, lemon juice, vinegar, oil, yogurt, and oregano in a bowl. Add the chicken and rub the marinade in. Cover and refrigerate for at least an hour.
Preheat the grill to medium heat (or broiler, or pan on the stove). Sprinkle the chicken with salt and pepper on both sides, and then grill until cooked through, about 5 minutes per side, depending what size/type chicken you are using. Allow the chicken to rest for a few minutes before slicing into strips.
Meanwhile, heat your pitas in a fry pan, in the toaster or spray with a bit of oil and place right on a gas burner. Top the pita with the chicken, tzatziki, tomatoes and onions. *I grilled my onions since I don’t really like them raw- it added a great layer of flavor! (I also added some thinly sliced cucumbers)
Tzatziki
16 oz. of plain or Greek yogurt (preferably not fat free)
1/2 hothouse cucumber or 1 regular cucumber, peeled and seeded
2-3 cloves garlic, minced
1/2-1 teaspoon white wine vinegar
salt and pepper
squeeze of fresh lemon juice
drizzle of extra virgin olive oil
Strain yogurt using a cheesecloth over a bowl for several hours or overnight to get out as much moisture as possible. (Since I was using Greek yogurt which was already quite thick, I skipped this step and it came out the perfect consistency)
Shred the cucumbers and then wrap in a towel and squeeze to remove as much moisture as possible. Don’t skip this step!
Mix together the strained yogurt, shredded cucumbers, garlic, vinegar and lemon juice. Add salt and pepper to taste. It’s best to refrigerate for 30 minutes or more before serving, so flavors can meld.
Drizzle a little olive oil over the top.


Sausage, pepper and onion sandwiches are something I’d never eaten before. Mainly because I grew up hating peppers and onions, and only recently overcame my hatred. These sandwiches just seem like something that wouldn’t be very tasty, yet everytime I see someone make them on TV or see someone blog them, they look SO good. I decided to put my fears aside and give these sandwiches a try once and for all. And boy, am I glad I did – they were great!! The peppers and onions are really sweet and soft, and the smokey, spicy sausage really balances it all out perfectly. And they’re cooked with beer, which my hubby really likes! These would be great for a whole number of occasions: weekend, tailgating, Olympic-watching, backyard barbeque….or even just a plain ‘ol weeknight!
Sausage, Pepper and Onion Sandwiches
-adapted from the Neelys
1 tablespoons olive oil
1 pound smoked sausage, sliced into quarters then lengthwise (I used turkey sausage)
1 red bell pepper, sliced
1 yellow bell pepper, sliced
2 medium yellow onions, sliced
1 garlic clove, chopped
1 teaspoon black pepper
2 tablespoons tomato paste
1 cup beer
1 tablespoon barbeque sauce
4 fresh hoagie rolls
Preheat the oven to 350 degrees.
Heat the olive oil in a large cast iron skillet or Dutch oven over medium heat. Add the sausages and brown on all sides, about 7 to 8 minutes. Remove from skillet and reserve.
Add onions and peppers to the skillet and saute until tender and golden brown, about 6 minutes. Add the garlic and saute until fragrant. Stir in the tomato paste, beer, and barbeque sauce. Cook for a few minutes, then add the sausages back to the pan. Reduce the heat and simmer until the sauce is nice and thick, about 10 minutes.
Slice the bread open, put on sheet tray, and toast in the oven while the sausage is simmering. Remove the bread from the oven and fill with the sausages and peppers.

This weekend, in honor of Mardi Gras in New Orleans (laissez les bon temps rouler!), I decided to make a whole Mardi Gras-themed meal to celebrate. We both loooove Cajun food and love the city of New Orleans, so we really enjoyed the whole ordeal! I started off with grilled shrimp Po’ Boys with a spicy remoulade and ended the meal with…wait for it……..a King Cake! Yep, that’s right, I made a King Cake, but more on that later! I found the recipe for the Po’ Boys on Closet Cooking, who found it on Ezra Pound Cake. Now, normally, you’d see a Po’ Boy sandwich with some form of fried seafood, but this recipe looked so good with the grilled shrimp that I had to give it a try. Plus, I’m not big on frying. I can’t tell you how simple and fast this whole process was – it takes mere minutes to grill your shrimp and the remoulade comes together equally as fast. Although I would (naturally) prefer mine with fried oysters, these were SO good – we literally devoured them in no time! Give these a try….you absolutely won’t be sorry!
Grilled Shrimp Po’ Boys
Makes 2
1 pound shrimp, shelled and deviened (I only used a 1/2 pound and it was perfect)
1 tablespoon oil
1 tablespoon creole seasoning (see below)
1 baguette
1 cup lettuce, shredded
2 large tomatoes, sliced
1/4 cup remoulade sauce (see below)
Toss the shrimp in the oil and creole seasoning to coat.
Grill the shrimp until cooked, about 2-3 minutes per side.
Assemble sandwich.
Remoulade Sauce
makes 1/2 cup
1/4 cup mayonnaise
1 tablespoon creole mustard
1 tablespoon ketchup
1 teaspoon horseradish
1 small clove garlic
1 tablespoon lemon juice
1 teaspoon capers
1 green onion, chopped
1/4 teaspoon cayenne pepper
1/4 teaspoon paprika
hot sauce to taste
Blend everything in a food processor until smooth.
Creole Spice Blend (I actually didn’t use this- I just used my Tony Chachere’s Cajun Spice)
makes 4 tablespoons
2 1/2 teaspoons paprika
2 teaspoons salt
2 teaspoons garlic powder
1 teaspoon onion powder
1 teaspoon black pepper
1 teaspoon cayenne pepper
1 teaspoon dried leaf oregano
1 teaspoon dried leaf thyme

And now…on to the King Cake!! Ok, for those of you who don’t know what a King Cake is, HERE is a little history. As far as the actual taste – the dough is almost identical to cinnamon roll dough – very light and chewy (yum). There is a layer of cinnamon and brown sugar in the center and it’s topped with a lemony glaze and colored sugars. Perfect for breakfast, really. The dough contains yeast, therefore it’s a total pain in the butt to make, especially for someone who has chronic problems with yeast. You let it rise, then punch it down…then let it sit for 2 hours, then punch it down…then roll out the dough and braid it…then let it rise again….*sigh*. Anyway, it’s completely delicious and worth every bit of the trouble. I mean, just look at it…

Yum. Isn’t that beautiful?? Only thing is….that isn’t mine. This….

….is mine. Yes, it’s in the trash. Yes, it’s completely disgusting-looking. Yes, it was a total and complete DIS-AS-TER. Welcome to my world. A world in which baked goods with yeast just don’t stand a chance. My kitchen is where yeasted treats go to die.
Now, I realize I could’ve just shown you the picture above (the beautiful, pristine store-bought version) and taken 100% of the credit – Lord knows I worked hard enough! – BUT, that’s what having this food blog is all about. My adventures and misadventures. Therefore, I choose to be honest and tell you that although I worked my rear end off on this stupid dough, and followed the instructions to a TEE, it just didn’t turn out (the dough didn’t rise. At all. It came out tasting like a really dense, hard biscuit). That happens. Especially to me. Of course I’ll keep trying, and eventually I’m sure I’ll make a darn beautiful King Cake…just not for a while. For now, that beautiful store-bought version is still in my kitchen, and it’ll do just fine for the time being. *sigh*……… Here is the recipe, for those of you who don’t have my problem.
Lemon-Glazed King Cake
seen on Peanut Butter and Julie
Makes 1 cake
For the dough
1/2 cup whole milk
2 1/4 teaspoons active dry yeast
1/3 cup plus 1 teaspoon sugar
3 1/2 cups flour
6 ounces butter, softened
4 large eggs
Zest from one orange
1/2 teaspoon ground cinnamon
1/2 teaspoon ground cardamom
1/2 teaspoon salt
For the filling
3 tablespoons butter, melted
1/3 cup light brown sugar
1 tablespoon ground cinnamon
1 whole almond or large dried bean
For the glaze
2 large egg whites
1 pound confectioner’s sugar
2 tablespoons light corn syrup
1/4 teaspoon pure vanilla extract
2 tablespoons fresh lemon juice
Green, yellow/gold, and purple decorative sugars
Prepare the dough: In a small saucepan, heat the milk to about 110F degrees. Pour the milk into a small bowl and sprinkle the yeast over the surface. Add 1 teaspoon of the sugar and stir to combine. Set the mixture aside until the yeast is foamy, 10 minutes.
In the bowl of an electric mixer fitted with the paddle attachment, cream the butter and the remaining sugar until light and fluffy, 2-3 minutes. Add the yeast mixture and mix for 1 minute. Add an egg and mix thoroughly; follow with a third of the flour. Repeat with the remaining eggs and flour. Add the orange zest, cinnamon, cardamom, and salt, and continue to mix on low speed for 7-8 minutes, until the dough is smooth, shiny, and elastic, and it starts to pull away from the sides of the bowl. If the dough is too soft, add up to 1/2 cup of flour.
Scrape the dough from the bowl and lightly knead to form into a ball. Butter or oil the inside of a medium size bowl and transfer the dough to the bowl, turning to coat with the butter. Cover with plastic wrap and set in a warm spot to rise for 1 hour, or until doubled in bulk.
When the dough has risen, turn it out of the bowl, punch it down, and knead it lightly to form a ball. Put the dough back in the bowl, cover, and refrigerate for 2 hours.
Form the cake: Flour a clean work surface. Roll the dough into a 10 by 20-inch rectangle, keeping the thickness consistent throughout. Cut the dough lengthwise into 3 strips. Paint each strip of the dough with the melted butter, leaving a 1/2-inch border clean along the length of each strip. Reserve any leftover butter. Sprinkle the strips with the brown sugar and cinnamon.
Line a large baking sheet with parchment paper. Fold each strip over lengthwise toward the clean edges to enclose the cinnamon sugar, and pinch the seam to seal the dough closed. Snugly braid the three pieces together. Transfer the braid to the baking sheet and form the braid into a wreath, pressing the ends together. Cover the wreath with a clean towel and set aside to rise for 40 minutes. Preheat the oven to 350F degrees.
Brush the cake with the reserved melted butter and bake for 18 minutes, until golden brown. Cover the cake loosely with foil and continue to bake for 20-25 minutes more, until baked through. Keep the cake on the baking sheet and allow to cool completely. After the cake has cooled, carefully tuck the almond into the underside of the cake.
Prepare the glaze: Place the egg whites and the confectioner’s sugar in the bowl of an electric mixer fitted with the paddle attachment. Mix on low speed until combined. Add the corn syrup, vanilla, and lemon juice, and continue to mix until smooth, adding more lemon juice if necessary to achieve your desired glaze consistency.
Drizzle the glaze over the cake, spreading with an offset spatula to coat. Cover with alternating colored sugars, and allow to set before serving.
Don’t be afraid to try this recipe after what happened to me. Really. I’m sure it will turn out just fine for you. Whatever you’re celebrating this week, be it Mardi Gras, the Olympics, or whatever – enjoy it! 🙂
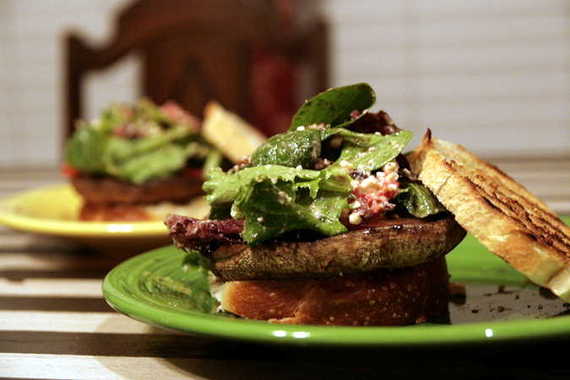
This is going to be a short post because I mean, how many different ways can you say how much you love something? I could go on and on, but I choose not to drive you crazy. I have found one of my new favorite meals. So satisfying, yet healthy – these Mediterranean Portobello Sandwiches are AWESOME. I mean, come on – feta, roasted red peppers, Kalamata olives…all on top of a delicious grilled portobello cap – Y.U.M.
Mediterranean Portobello Sandwiches
-Eating Well Magazine, June/July 2006 Issue
1 clove garlic, minced
1/2 teaspoon kosher salt
2 tablespoons extra-virgin olive oil, divided
4 portobello mushroom caps, stems and gills removed
4 large slices country-style sourdough bread, cut in half
1/2 cup sliced jarred roasted red peppers
1/2 cup chopped tomato
1/4 cup crumbled reduced-fat feta cheese
2 tablespoons chopped pitted Kalamata olives
1 tablespoon red-wine vinegar
1/2 teaspoon dried oregano
2 cups loosely packed mixed baby salad greens
Preheat grill to medium-high. (I used my indoor grill pan) Mash garlic and salt on a cutting board with the side of a knife until it’s a smooth paste. Mix the paste with 1 tablespoon oil in a small dish. Lightly brush the oil mixture over portobellos and then on one side of each slice of bread.
Combine red peppers, tomato, feta, olives, vinegar, oregano and the remaining 1 tablespoon oil in a medium bowl. Grill the mushroom caps until tender, about 4 minutes per side; grill the bread until crisp, about 1 minute per side. Toss salad greens with the red pepper mixture. Place the grilled mushrooms top-side down on 4 half-slices of the bread. Top with the salad mixture and the remaining bread.
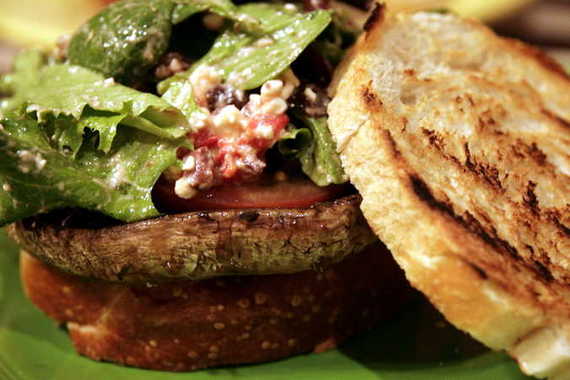
Now I’ll warn you, these are super messy – don’t expect to eat these without a little juice dripping down your hands and wrists. (Mmmm…portobello sandwich juice…..) But it’s definitely worth it. So as soon as Spring comes around, bust out your grills and give these babies a try! Or if you’re like me and you can’t wait until warmer weather – just use your indoor grill pan. Enjoy!
For some reason, I’ve never been a big fan of meatball subs. They’ve just never really appealed to me. That all changed when I was perusing one of my favorite blogs, Sweet, Savory, Southern and I saw a recipe for turkey meatball subs. The picture looked so good, I decided I had to try this recipe. Good thing I did, too – YUM, these were excellent!! Hubby loved them and I was pleasantly surprised, myself! And I loved that it uses groung turkey – I really prefer to use turkey in place of groud beef. These were juicy and flavorful – I’ve made them twice now and they sure don’t disappoint!

Turkey Meatball Subs
from Sweet, Savory, Southern
1 lb lean ground turkey
1/3 cup finely chopped onion
1 tsp Italian seasoning
1 clove minced garlic
1/2 cup bread crumbs
1/4 cup grated parmesan cheese
1 tsp each salt and pepper
1-2 Tbsp extra virgin olive oil
*1 jar marinara sauce
*sub rolls
*provolone or mozzarella cheese-2 slices per sub
Mix all ingredients in a bowl until just combined. Heat a skillet over medium heat with about 1-2 Tbsp olive oil. Form the turkey mixture into balls and place in the skillet. Turn the meatballs every couple minutes to brown on all sides. Add marinara sauce to the pan, cover and let simmer over low heat about 15 minutes to ensure the meatballs are completely cooked. Place 4 meatballs on each sub roll that has been sliced lengthwise and spoon the marinara sauce over the meatballs. Top with cheese (I used shredded mozzarella this time, but provolone is delicious as well) and place under the broiler for a couple minutes to toast the bread and melt the cheese.


