Sorry for yet another long hiatus. It’s really not my fault this time. Game of Thrones sucked me in and literally ALL my spare time went to getting caught up to the current season. Then we were so far behind on all our other shows I had to catch up on those. It’s just a never ending time-suck, television.
On top of that, Elliott has been sick SO much lately. Ugh. First he had RSV, then a few weeks later he caught Hand, Foot, and Mouth Disease from the church nursery. And let me tell you, THAT IS NOT FUN. Hopefully he’s done being sick for awhile. Poor baby.
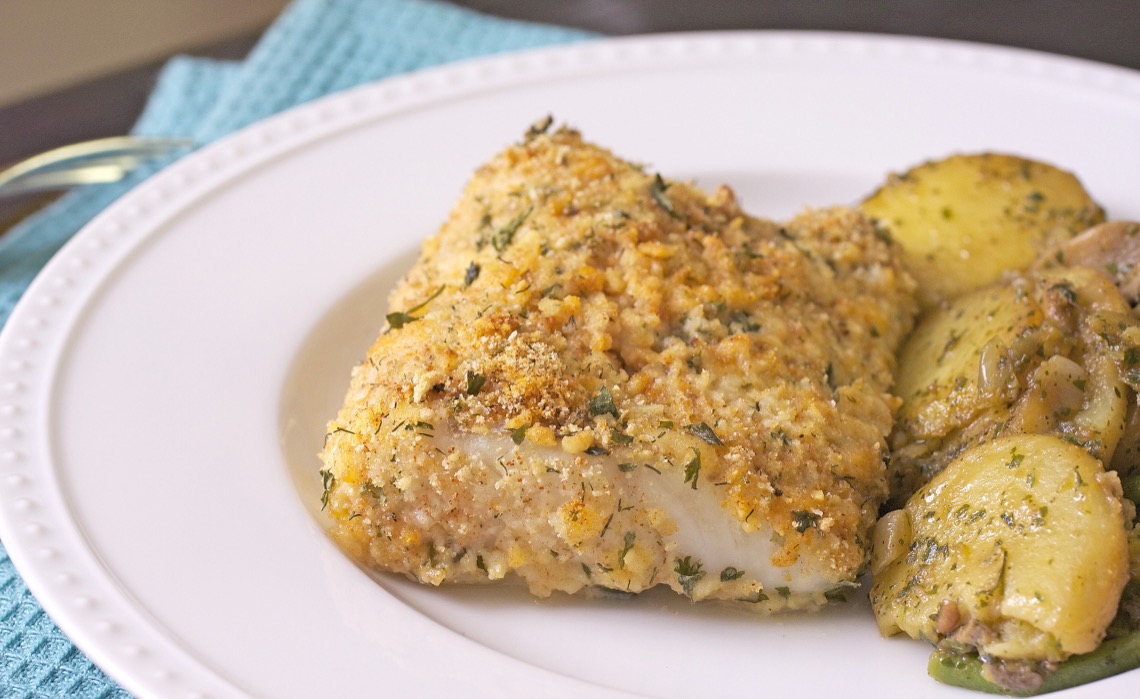
To make up for my time away, I made you some delicious fish! And it is so, so easy. I don’t know about you, but I get kinda bored with fish. I run out of interesting ways to cook it and get stuck in a rut. This recipe pulled me right out, though. The crust is so nice and crunchy with so much good flavor. A great healthy dinner option!
Parmesan Crusted Cod
4 Alaskan Cod fillets
1 cup panko bread crumbs
1/2 cup finely grated parmesan cheese (this really isn’t the time to use the powder in the green can, use fresh)
handful chopped parsley
1/4 teaspoon paprika
salt and pepper
1 egg
Preheat the oven to 400 degrees. Crack the egg into a pie plate or shallow platter and whisk. Set aside. Combine the bread crumbs, parmesan cheese, parsley, paprika, and salt and pepper in a separate pie plate or platter.
Dip both sides of the fillets in the egg, then dredge in the crumb mixture, making sure to coat the fish evenly. Place on a greased baking sheet. Bake for about 20 minutes, until the fish is flaky and no longer translucent. Serve with lemon wedges, if desired. Serves 4.

I don’t know about you, but when it comes to preparing fish, I usually find myself in a bit of a rut. I do the same things over and over again. For some reason, I have trouble thinking outside the box when it comes to fish. We do LOVE fish, though, so naturally, I was excited to find this recipe. It’s unusual (to us, anyway), quick, and super flavorful. Cassidy loved it and Joel and I loved it. This one will definitely stay in the dinner rotation for sure!
Tortilla-Crusted Tilapia
5 tilapia pieces
7 corn tortillas, torn into small pieces
1 teaspoon lime juice
5 or 6 tortilla chips
1 jalapeno pepper, seeded and chopped
1/4 cup cilantro
1/2 teaspoon chili powder
1/4 teaspoon paprika
1/4 teaspoon garlic powder
1/4 teaspoon ground cumin
1/4 teaspoon onion powder
1 teaspoon salt
1 egg, beaten
Preheat oven to 375 degrees.
Put all of the ingredients (except egg and tilapia) in a food processor or blender and pulse a few times, until you have a bread crumb-like consistency. Put mixture in a shallow platter or large plate.
Dip the fish into the beaten egg and then into the tortilla mixture.
Place each one on a greased baking sheet. Bake for 10-15 minutes, until fish is flaky and tender. Serves 5.
Recipe source: Raining Hot Coupons

Until just recently, I had never had a tuna melt. Boy, was I missing out! Anything topped with gooey, melty cheese is a winner in my book; especially if it happens to be light, flavorful tuna salad! I use the word “light” because this tuna salad isn’t swimming in mayo- I use a combination of mayo and Greek yogurt. Not only is it better for you, it adds an extra tangy flavor that I just love. Oh, and a big bonus: this dinner came together in under 10 minutes. WIN!
Tuna Melts
1 12-ounce can tuna in water, drained
1 1/2 tablespoons mayonnaise
1 1/2 tablespoons Greek yogurt
splash lemon juice
salt
pepper
Kaiser rolls or Texas toast
butter
sliced cheddar cheese
Mix together the first six ingredients in a small bowl. Set aside.
Butter both sides of the Kaiser rolls (or whatever bread you’re using) and place on a baking sheet. Toast in a 350 degree oven for about 5 minutes, until the butter is melted. Spoon the tuna on two slices of the rolls, top with a slice of cheese and place back in the oven until cheese melts (about 5 minutes). Place the tops of the rolls on top and serve. Serves 2-3.
Recipe source: Sing For Your Supper

Oh man. Are you ready for a FANTASTIC meal?? This salmon surprised us in the best possible way. I found some bottled ginger-sesame sauce/glaze at the store along with some beautiful looking salmon and decided to throw together a quick Asian-inspired dinner. Wow and WOW. Not only did this meal come together in less than 30 minutes, it blew us away. The ginger-sesame sauce would have been nice on its own, but the addition of lime juice, brown sugar, soy sauce and cilantro really took it over the top. The glaze keeps the salmon nice and moist and the flavors of ginger and cilantro combined with the salmon was an excellent combination. I served it with some quick noodles with peanut sauce and it really was the perfect quick, delicious weeknight meal. You really need to try this one!
Asian Glazed Salmon
2 salmon filets
2 tablespoons ginger-sesame sauce (I used an organic brand called Full Circle, but any ginger sesame-based marinade or dressing [not salad dressing] will do. If you can’t find this, a teriyaki sauce will do)
1 tablespoon reduced sodium soy sauce
squirt of fresh lime juice
1 rounded teaspoon brown sugar
cilantro
In a small bowl, stir together the ginger-sesame sauce, soy sauce, lime juice, brown sugar and cilantro until combined.
Preheat the oven to 400 degrees. Place the salmon filets, skin side down, on a baking sheet lined with greased foil. Brush with half of the marinade and bake for 10 minutes. Brush with remaining marinade and return to oven for 10 minutes more until salmon is cooked through. Top with additional cilantro. Serves 2.
Recipe source: Sing For Your Supper original


I feel like I live in my rocking chair these days. It’s where I feed, burp and rock Cassidy to sleep, so obviously, it gets used a LOT. Some days I feel like I don’t get out of that chair. Luckily, it’s in the living room so I can at least watch TV while I’m rocking. I pretty much keep it on the Cooking Channel, Travel Channel and History Channel. A couple of days ago I was watching a show on the Cooking Channel and the chef cooked fish and vegetables in a pouch in the oven. I know this is done a lot, but for some reason I never think of this. So last night I tried it. I found some beautiful Alaskan Cod at the grocery store, seasoned it very simply with olive oil, salt, pepper and lemon, and baked it with zucchini and squash. I took it a step further by topping it with a cucumber/pepper relish. What a fantastic meal! Not only that, but it came together in less than 45 minutes total! Perfect for a busy mom with a very slim window of time to get dinner cooked! Make this! You’ll love it!

Baked Alaskan Cod with Cucumber Relish
2 filets of Alaskan Cod (or any white fish you prefer)
1 zucchini, thinly sliced
1 squash, thinly sliced
1 lemon, thinly sliced
salt
pepper
olive oil
Cucumber Relish
1/2 a Hothouse (seedless) cucumber, diced (you can use a regular cucumber, you’ll just need to peel it and deseed it)
1/2 a red bell pepper, diced
1 jalapeño pepper, seeded and diced
1/4 teaspoon salt
dash pepper
Make the relish: toss cucumber, red pepper, jalapeño pepper and salt and pepper together in a small bowl. Refrigerate until needed.
Preheat the oven to 350 degrees. Place zucchini and squash in two large pieces of greased foil (large enough to fit the vegetables and fish when you make a pouch). Season with salt and pepper. Season the fish with olive oil, salt, and pepper and place on top of the vegetables. Place 2 or 3 lemon slices on top of the fish. Fold the foil down on the top and sides to make a pouch (be sure it’s sealed up tight on the sides so no liquid escapes during cooking). Place on a baking sheet and cook for 20 minutes until fish is flaky. Top with the cucumber relish. Serves 2.
Recipe source: Sing For Your Supper original


WAIT!! Before you stomp out of here thinking, “eww! That doesn’t sound appetizing at all!”, just hang on! Fish curry is delicious, I promise! Don’t be afraid of the title- all it is is fresh, beautiful catfish filets simmered in a rich, thick sauce of coconut milk, chicken broth and warm Indian spices. Sounds pretty good after all, huh? My coworker, friend, pianist extraordinaire, and awesome home cook, Janna introduced us to fish curry. She served it to Joel at a Christmas party and he hasn’t shut up about it since. So, being the sweetheart that I am, I emailed Janna and asked her for her recipe so I could recreate it for Joel as a surprise. Believe it or not, this was my very first attempt at Indian food. And I have to admit I was pretty proud of myself after this one. I nailed it.

Joel was SO impressed with this dish- he said I could certainly make this as often as I wanted! Yay me! Yay Janna! 🙂 If you’ve never really tried curries or Indian cooking, I strongly encourage you to step out of your comfort zone and give this a try. Not only is it ridiculously easy, it’s extremely delicious. I can’t wait to make this again and again!
Fish Curry
2-3 fish filets (I used catfish but flounder, tilapia, or any other white fish will do), cut into 2-inch pieces
1 large onion, chopped
3 cloves garlic, minced
2 tablespoons olive oil
2 cups chicken broth
1/2 teaspoon cayenne pepper
salt and pepper
1 teaspoon turmeric
1 1/2 teaspoons garam masala powder
1 teaspoon curry powder
1/2 teaspoon cumin
1/2 cup coconut milk
squeeze of fresh lemon juice
1 tablespoon tamarind paste (if you can’t find this, just omit)
fresh cilantro, chopped
Heat the oil in a large pot over medium heat; saute the onion for about 5-7 minutes, until softened then add the garlic and saute for a few seconds more. Add the salt, pepper, cayenne pepper, turmeric, garam masala, curry powder, and cumin, chicken broth, coconut milk, lemon juice, tamarind paste and cilantro.
Bring to a simmer then reduce heat to low and add the fish, being careful not to over-stir (the fish will break apart). Cook for 10-15 minutes, stirring occasionally (very carefully) until the fish is cooked through. Serve over basmati rice. Serves 4.
Recipe source: adapted from my friend Janna


This is one of those great, impressive easy-as-can-be appetizers that make you look like a rock star, but really took you less than 10 minutes to throw together. Aren’t those the greatest?! I like to keep a stack of fast, easy appetizer recipes handy for when I need to put something together in a hurry, and roasted shrimp cocktail is definitely one of them! It’s great for get-togethers, or if you’re hosting a nice dinner party, or maybe if you just want a nice, no-fuss appetizer for a quiet dinner at home for you and your sweetie. Everybody loves shrimp cocktail, but I feel like it gets a little tiresome after awhile; this is the perfect way to make it interesting again! Give it a try at your next party- your guests will love it!
Roasted Shrimp Cocktail
2 pounds (12 to 15-count) shrimp
1 tablespoon good olive oil
1/2 teaspoon kosher salt
1/2 teaspoon freshly ground black pepper
Preheat the oven to 400 degrees F.
Peel and devein the shrimp, leaving the tails on. Place them on a sheet pan with the olive oil, salt, and pepper and spread them in 1 layer. Roast for 8 to 10 minutes, just until pink and firm and cooked through. Set aside to cool.
Serve with cocktail sauce for dipping.
Recipe source: Ina Garten

I totally would’ve posted this 5 days ago (when it actually was our anniversary), but a few unexpected things have happened this week and I haven’t had a chance to even get to my computer! Anyway, our 3 year anniversary was this past Wednesday – sometimes I can’t get over that we’ve been married 3 years. It seems like it wasn’t that long ago that we were on our honeymoon! On top of having our anniversary to celebrate, my hubby just accepted a new job (yay!), so we decided to go out for a fancy dinner a couple of days early, then on our actual anniversary have a nice quiet dinner at home. I was trying to think of something different that we haven’t had at home a lot, and jambalaya kept coming to mind. Since we both looooove Cajun food, I decided jambalaya would perfect (with a glass or two of champagne, of course!)!

And oh my gosh, it was SO good! I kinda-sorta followed a recipe, but mostly just threw stuff in. We absolutely loved it- I’ll definitely be making this over and over again. We had a wonderful, relaxing evening and this was a perfect meal to go with it! Who knows, maybe 50 years from now I’ll be serving this same jambalaya to my sweet hubby for our anniversary dinner!
Jambalaya
-(very loosely) adapted from Allrecipes.com
1 pound smoked sausage, sliced (I like to use turkey sausage)
1/2 pound peeled, deveined shrimp
2 bell peppers, diced
1 onion, diced
2 cloves garlic, minced
1 (14.5 ounce) can peeled and diced tomatoes
3 cups chicken broth
1 tablespoon vegetable oil
Cajun seasoning to taste
1/2 teaspoon hot pepper sauce
1/2 teaspoon ground cayenne pepper
1 teaspoon Worcestershire sauce
2 bay leaves
2 cups white rice
In a medium pot, bring 2 cups of the chicken broth to a boil and cook the rice as directed. In a large pot over medium heat, cook bell pepper, onion and garlic in the oil until onion is translucent.
Stir in tomatoes, pepper sauce, cayenne, Worcestershire, Cajun seasoning and bay leaves; reduce heat and simmer 10 minutes.
Stir the shrimp and sausage into the spiced vegetables. Continue to simmer until flavor is as spicy as you like, adding the leftover chicken broth as needed to thin. Add the cooked rice and continue to cook for 10 minutes more.
*You may not need the entire amount of leftover chicken broth – just use as much as you need to get the jambalaya the consistency you want.

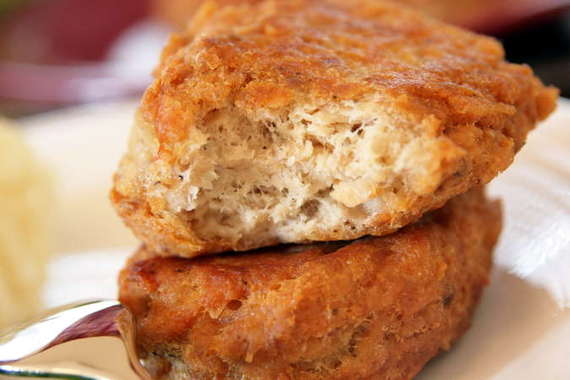
My mom used to make these a lot for us when I was growing up. They’re good, crunchy little salmon patties mixed with egg and flour and fried. I loved them with lots of ketchup – and mashed potatoes on the side was a must (and still is!)! I hadn’t had these in years, but finally decided to try my hand at making them for my hubby (he loves fish sticks, so I knew he’d go nuts for these!). They’re so simple to make – all you need is a can of salmon and the rest, you probably already have in your kitchen. I was so pleased with how these turned out – hubby loved them, and I know I’ll be making them a lot in the future!

Salmon Croquettes
1 15oz can pink salmon
1 egg
1 heaping tsp baking powder
1/2 c flour
chopped onion and garlic powder (optional. I used garlic powder and onion powder)
oil for frying
Heat a few tablespoons of vegetable oil in a large skillet. Reserve 1/4 c salmon juice in a measuring cup and set aside. Place salmon in bowl, add egg and mix well. Add flour, mixing thoroughly. Batter will be thick. Add baking powder in the salmon juice and beat with a fork until foam forms; measuring cup should be about 3/4 full (if it doesn’t foam, baking powder is old). Pour into salmon mixture and mix well. Form into small patties and drop into frying pan 4 at a time. Cook until golden brown on each side (only a couple of minutes per side). Let drain on paper towls. Serve hot with ketchup.
Last week, hubby and I enjoyed our first al fresco meal by the pool. It was heaven. A nice breeze, pretty flowers all around, and a big, blue, beautiful pool…not a bad view! When we lived in our apartment, we had a tiny little balcony that left barely enough room for a little bistro set and a couple of hanging plants – and it was sandwiched between buildings, so there was no breeze to speak of. We loved to eat outside, but it was just too cramped and HOT, so we didn’t get to do it much (plus, it’s hard to enjoy a nice, quiet meal when your neighbors are sitting right across from you out on their balconies and people are walking their dogs, scooping poop about 6 feet away from you…). So, needless to say, we enjoy our new back yard….a LOT.
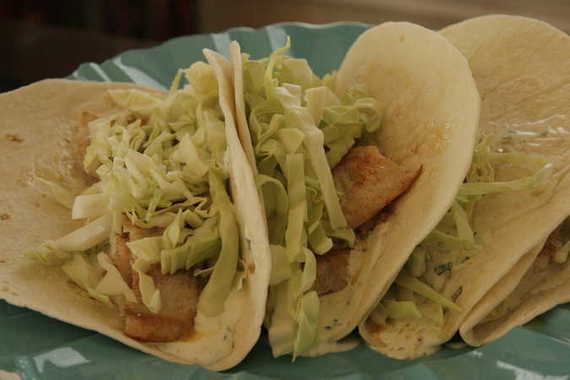
Since the weather was so nice and “summery” the other night, I decided to make our favorite summertime meal – fish tacos. I love these! The fish isn’t fried, so it’s nice and light, and the white sauce is just delicious. I make this all the time in the summer – it’s perfect. Now for those of you who think you “hate fish tacos” – you should give these a try, because my parents were the same way and they quickly changed their tune after trying them. They’re good! I promise!
Fish Tacos
For the Fish:
2 Tilapia fillets, or any white fish you like (this is for two people)
half a head of cabbage – thinly chopped
paprika to taste
salt to taste
dill to taste (I used dried because it’s what I had on hand, but fresh would be better)
Cayenne pepper to taste
juice of one lime (or lemon)
Extra Virgin olive oil to coat the pan
flour tortillas (you’ll probably need around 4)
White sauce (recipe follows)
For the White Sauce:
-recipe from The Way the Cookie Crumbles by Bridget
1½ tablespoon minced cilantro
3 tablespoons mayonnaise
1 tablespoon sour cream
1 tablespoon lime juice
Heat a couple of tablespoons of olive oil in a skillet over medium heat; season fillets with salt, paprika, dill, and Cayenne and place in skillet. Cook for about 3 minutes on each side or until cooked through and flaky. While the fish is cooking, squeeze the lime juice over each fillet.
To make the white sauce, mix all ingredients in a small bowl and refrigerate until needed.
To assemble tacos: spread a generous amount of white sauce on each tortilla, top with fish (you can break the fillets into small pieces if you want, or leave them whole) and cabbage. Serve with a big pina colada and enjoy! 🙂