
Doesn’t that title just draw you right in? 😉 Ok, ok – it might not sound too appealing to you, but you’ll just have to trust me on this one, ok? Should you ever find yourself with leftover BBQ – you’re going to want to try this…..trust me.
In my home town, there’s a restaurant that serves something called “Texas Trash”; it’s essentially a taco salad of sorts, but with BBQ instead (and lots of other yummy things!). It’s so good, most of the time I don’t even wait until I have leftover BBQ to use up – I’ll just run by a good BBQ joint and pick up some brisket, beans and sauce just for the sole purpose of making Texas Trash! Start with a bed of Fritos, top it off with some chopped brisket, a little BBQ sauce, pinto beans, cheddar cheese, sour cream, black olives (yes, black olives!), jalapeno peppers (lots of ’em), lettuce, cherry tomatoes and a drizzle of ranch dressing and you’ve got yourself one tasty pile of food! I swear, my mouth is watering just thinking about it! This is seriously one of my favorite things to eat! Tired of the same old chef salads and taco salads, but still don’t want to cook?? Make this! I *promise* it’s delicious!!
Texas Trash
(there are no measurements because you just pile it on your plate according to how much you feel like eating!)
Fritos
Chopped BBQ brisket (if you’re using leftover, make sure to heat it first)
pinto beans
BBQ sauce
shredded cheddar cheese
sour cream
black olives
pickled jalapenos
ranch dressing
cherry tomatoes, sliced in half
lettuce, chopped
Place the Fritos on a plate and top with remaining ingredients (however much you want!). Enjoy! (Wasn’t that simple?!)


I always, always, always have cans of black beans, diced tomatoes and Mexi-corn in my pantry (Mexi-corn is just canned corn with chopped red and green peppers). They can transform pretty much anything into a spicy, fun, Tex-Mexy meal- which we just love. The other night I had some leftover grilled chicken breasts that were really tasty and I wanted to use them up. This dish was born. It started out just a way for me to use up leftovers and pantry staples, but ended up being one heck of a delicious meal- we couldn’t get enough of it! In fact, I can’t wait to make it again- it was SO easy and really, really delicious. The Ranch dressing really give it a fantastic flavor! If you find yourself in need of a recipe to use up leftover chicken, steak, ground beef, or whatever you have- this is for you! Give it a try!
Southwestern Skillet
2 fully cooked chicken breasts, diced into small pieces
1 can black beans
1 can Mex-corn (regular corn would work just fine too)
1 can petite diced tomatoes
1/2 red onion, diced
handful chopped cilantro (reserve some for the top)
1 packet taco seasoning (I didn’t use the entire packet, but if you feel like you want more spice, add the whole thing)
1/2 cup sour cream
1/2 shredded cheddar cheese (reserve some for the top)
2 large or 4 small tortillas
Ranch dressing
jarred pickled jalapenos
*Feel free to add in any additional vegetables you have on hand- bell peppers would work great, or even zucchini or potatoes.
Preheat the oven to 400 degrees. In a large skillet over medium heat, cook the diced onion until translucent; add the chicken, beans, corn, tomatoes, cilantro, taco seasoning, sour cream and cheese. Stir to combine. Cook for 4-5 minutes, until the cheese melts.
Spray the tortillas with cooking spray and place on a baking sheet; bake for 5 minutes or until golden brown and slightly crisp.
Top the tortillas with the skillet mixture then drizzle with ranch dressing. Top with jalapenos, cilantro and cheese. Serves 2-3. Enjoy! We sure did!


There’s a store near our house that sells locally grown fresh fruits, vegetables and grains (and organic groceries) and every summer they’re literally bursting with ripe, delicious summer fruits and veggies. I go all the time and stock up on berries, peaches, corn on the cob, watermelons, etc. Every summer, I’m up to my ears in fresh berries and I love it! Luckily, I just happen to have some delicious blueberries, raspberries and blackberries and immediately, Ina Garten’s recipe for Tri-Berry Muffins pop into my head. What a fantastic way to use all three berries!
Unfortunately, my sweet hubby has been in Miami for two days training for a new software. Big time bummer (thank heavens he comes home tonight! Yippee!!). I had been planning all week to bake him something delicious to take on the plane (besides his travel-size bag of mini-Oreos), and these muffins were the perfect thing! Great for a snack and breakfast!
Tri-Berry Muffins
-adapted from Ina Garten, Barefoot Contessa At Home cookbook
3 cups all-purpose flour
1 tablespoon baking powder
1/2 teaspoon baking soda
1/2 teaspoon kosher salt
1 teaspoon ground cinnamon
1 1/4 cups milk
2 extra-large eggs, lightly beaten
2 sticks unsalted butter, melted
1 cup fresh blueberries
1/2 cup fresh raspberries
1/2 cup fresh blackberries, sliced in half
1 1/2 cups granulated sugar
Preheat oven to 375°F. Line muffin tins with paper liners.
Sift flour, baking powder, baking soda, salt and cinnamon together in a large bowl. Stir with your hand (or a whisk) to be sure the ingredients are combined. In another bowl, combine the milk, eggs and melted butter.
Make a well in the middle of the dry mixture, pour the wet mixture into the well, and stir until just combined. There will be some lumps but don’t overmix the batter. Add the blueberries, raspberries, blackberries and sugar and stir gently to combine (*be really careful when you do this, otherwise the batter will turn blue!)
Using a large spoon or scoop, spoon batter into the muffin cups to fill the liners. Bake for 20 to 25 minutes, until a cake tester comes out clean and the tops are nicely browned.
Yield: 16 to 18 muffins


In the Summertime, you grill. Period. If you don’t know how to grill, you better learn, because as far as I’m concerned, it’s not Summer without grillin’. Of course, that’s just my own personal opinion; I have lots of them. Probably way too many. Just ask my hubby. Or my mom. Or my second grade teacher.
Honestly, one of my favorite grilled things to eat is chicken breast marinated in my favorite marinade, Lime Ponzu. It’s so amazingly simple, and the chicken turns out so sweet and juicy. We were having company recently and I thought the Ponzu marinated chicken would be great to serve along with my grilled corn salad and pineapple rice. Then I took it a step further and thought, “why not do a Ponzu shish-kabob with red peppers, red onions and pineapple?” Perfect! So that’s what we did and boy am I glad! Those kabobs were amazing! The chicken was perfectly tender and juicy, and the peppers, onions and fresh pineapple paired so well with the Ponzu- almost kind of a “Hawaiian” flavor. Totally delicious! We’ve made them twice since then! If you’re looking for a great grilling meal- look no further, because these are as easy as they come, yet really, really flavorful and delicious!

Easy Grilled Chicken Shish-Kabobs
4 boneless, skinless chicken breasts, cut into 1 1/2-inch cubes
1/2-3/4 cup Lime Ponzu (You can find this in the Asian section of the grocery store, next to the soy sauce)
3 red peppers, cut into 1 1/2-inch pieces
1 large red onion, cut into 1 1/2-inch pieces
1 fresh pineapple, cut into 1 1/2-inch chunks
freshly ground black pepper to taste
skewers (wooden or metal- if you use wooden, make sure to soak them in water for at least 30 minutes before grilling so they won’t catch on fire)
Place the cut up chicken in a large ziploc bag with the marinade. (*Save 2 or 3 tablespoons of the Ponzu for later use.) Refrigerate for at least 1-2 hours.
Take out the chicken and dispose of the marinade. To assemble the kabobs, place the red pepper first, then the chicken, then the pineapple, then the onion, then repeat with the same order. Try to fit two of everything on each skewer. You’ll end up with around 12-14 skewers.
Grill the kabobs over medium-high heat for about 8-11 minutes, turning 3 or 4 times, until the chicken is cooked through. Occasionally brush with the reserved marinade and season with the pepper. Remove from heat. Serve with rice and a cold salad and enjoy! Serves 4-6.

First of all, let me state, for the record that I do not consider this dish to be “authentic” or “homestyle” in any way. Although these are very delicious and have that slow-cooked taste, I do not count them as real chicken and dumplings. (There, Nana – that’s for you)
I found this recipe on one of my favorite food blogs – The Bitten Word and knew I wanted to try it. But first let me tell you – REAL, honest-to-goodness chicken and dumplings (or chicken-n-dumplins, as it is pronounced down here) are something I don’t cook. I won’t. I have no desire to. Because no matter how hard I try, or how delicious they may turn out to be, they’ll never be half as good as my Nana’s. That’s a recipe you just don’t mess with – it’s been around for…forever. All my grandmother has to do is pick up the phone to any one of us, be it my parents, my sister’s family, my family or my uncle’s family, and say, “I’m making chicken-n-dumplins..” and we’re THERE. Hubby and I live an hour away from Nana and Grandaddy, but we’ll gladly make the drive on any given day, in a moment’s notice for her chicken and dumplings.
So with that being said, I’ll go on with this recipe. These are what I like to think of as “Yankee” chicken and dumplings (no disrespect to you northerners out there), because they have carrots, onion, celery and white wine. The ultimate recipe (i.e. Nana’s) are made with just chicken, broth and dumplings. Also – they’re not “real” because the dumpling part is made with frozen biscuits, instead of a homemade dough. But, sometimes you need just such a recipe for nights when you want that home-cooked taste without standing over the stove for hours and hours. And these are PERFECT for that.

After making these – I’d have to say that they’re some of the best chicken and dumplings I’ve ever had. Hubby couldn’t say enough good things about them – he went on and on about how amazing they were. And the whole meal (minus the time it took to cook my chicken all day in the crockpot) took about 20 minutes to make!! You can’t beat that! I added some cornstarch to make it extra thick and creamy and a little butter – because Nana told me to – and it really added to the richness and creaminess. I cooked 1 pound of boneless, skinless chicken thighs for about 4 hours on high in my crockpot and they were so tender and moist. The only seasonings I used were salt and pepper – and lots of it. That’s all you need.
Easy Homemade Chicken and Dumplings
-The Bitten Word
1/4 cup olive oil
4 chicken thighs, bone in (or 4 bone-in or boneless chicken breasts)
2 medium onions, diced
2 cups diced carrots
2 cups diced celery
1 cup dry white wine
1/2 tablespoon salt (plus more to taste)
1/2 tablespoon fresh ground pepper (plus more to taste)
6 cups chicken stock
4 frozen biscuits (such as Pillsbury Grands Frozen Biscuits), thawed enough to cut into pieces
Pat the chicken dry and season with salt and pepper. Heat half of the olive oil (1/8 cup) in a large pot or Dutch oven over medium-high heat. Sear the chicken, turning the pieces so that all sides are slightly brown, about 3 to 4 minutes for each side. Remove the chicken pieces and place on a paper towel-lined plate. Add the remaining 1/8 cup of olive oil to the pot, along with the onions. Saute the onions until they’re soft, about 6 minutes. Add the carrots, celery, and white wine. Scrape up any brown bits from the bottom of the pot. Saute, stirring frequently, for another 6 minutes. Add the chicken back to the pot. Cover the meat and vegetables with chicken stock. Bring to a boil. Reduce heat to medium-low and simmer, partially covered, for 90 minutes. (This step is especially flexible. If your liquid is reducing too much, you may need to add more chicken stock. If the dish is too liquidy, turn up the heat and to reduce the stock more. The idea is to end up with a consistency of a very thick stew.) If the broth is not as thick as you would like, remove one cup of the broth into a measuring cup and whisk in 1 tablespoon of corn starch. Return the broth to the pot and stir. Remove chicken pieces with tongs and allow them to cool. Debone the chicken and shred the meat into small pieces. Return to the pot. Cut the frozen biscuits into thirds. Drop the pieces onto the top of the chicken and vegetable mixture. Cover and cook on medium-low heat for 8-10 minutes, until the dumplings are cooked through. Serve immediately.
*NOTE: I did mine a little differently – since I cooked my chicken in the crockpot, I just added it (with all of its juice) to the broth and cooked vegetables, then dropped my biscuits in. Much easier, I think!
We both thought these were excellent. I would make these again in a heartbeat. I just hope Nana doesn’t disown me…
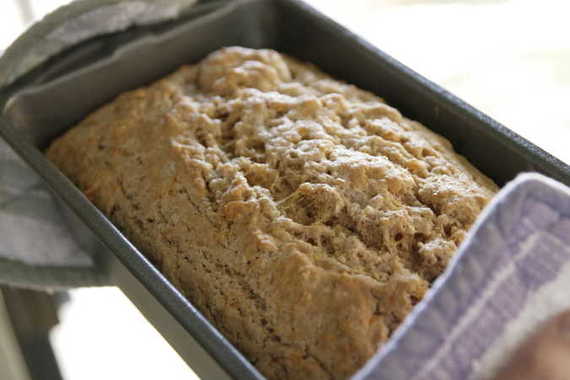
For my WC girls, this bread needs no introduction…in fact, this recipe has very quickly become everyone’s favorite on our cooking board! Let me just break it down for you: beer+cheese+bread= pure heaven in loaf form!! And one of the best things about it – its SUPER easy…and I mean it! I’m one of those weenie-cooks who runs away screaming from anything involving yeast…so this was perfect for me! No yeast – just beer!! And for those of you non-drinkers, don’t worry, the alcohol cooks out…no worries. I’ve made it twice in one week since discovering the recipe on Katie’s blog (ok, see how I did that just now? I made “Katie’s blog” a link….do us all a favor and click on it! You’ll find tons of wonderful, delish recipes!). This bread went great with our broccoli soup…and I have a feeling it’s going to go great with lots of my meals in the future. 🙂
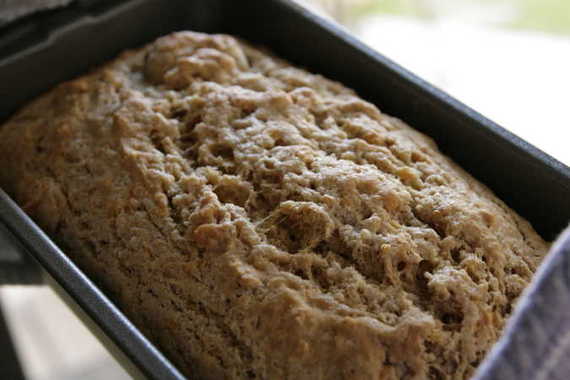
Mmmm, look at all that cheesy, beer-y goodness!!!
Easy Cheesy Beer Bread
–Katie @ Good Things Catered
Ingredients:
2 c. all purpose flour
1 c. whole wheat flour
1/3 c. packed brown sugar
4 1/2 tsp baking powder
1 tsp salt
1 tsp garlic powder
1 c. shredded sharp cheddar
12 oz. bottle of lager or stout (I used Sam Adams Oktoberfest because Katie told me to) 🙂
2 Tbsp butter, melted
Directions:
-Preheat oven to 350 degrees and prepare loaf pan for baking.
-In large bowl, combine flours, sugar, baking powder, salt, and garlic powder.
-Whisk to combine well.
-Add cheese and whisk to combine.
-Slowly add beer to dry ingredients and stir lightly until combined.
-Knead dough lightly until it just comes together.
-Place into prepared loaf pan and pour melted butter over top.
-Place in oven to bake for 55-60 minutes, or until toothpick inserted into center of loaf comes out clean.


