I hope everyone had a wonderful, happy Christmas! We certainly did – we witnessed our very first White Christmas (in Texas!)!! It was totally wonderful (except the part where we had to drive home on frozen highways…not so much fun…). The weather lately has been totally unbelievable and completely wonderful – I’m sitting here typing this post watching the snow fall outside again! It’s SO cool! And this time I’m very thankful to be watching it snow from the comfort of my home, instead of driving in it.
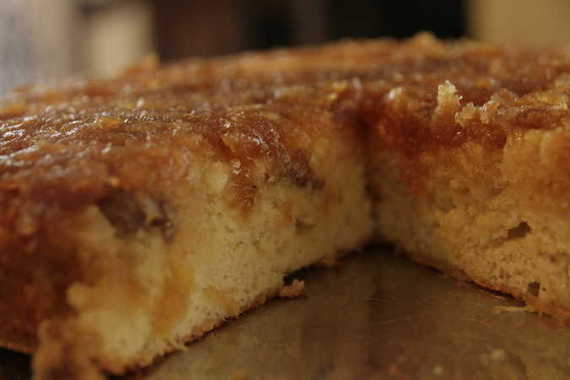
Anyway, this post is all about a wonderful tradition. Coffee cake. The coffee cake my family has eaten for breakfast every Christmas morning since the 80’s (at least!). It absolutely wouldn’t be Christmas without it. Yuuuuummmm. And yes, I realize Christmas is over, but I wanted to share the recipe because really, there’s nothing “Christmasy” about this cake. It’s just a simple, normal coffee cake that can be enjoyed any day of the year – we just choose to eat it on Christmas. But that doesn’t mean you have to!

(If you’re wondering why only half of it has pecans, hubby hates nuts, so I made it half and half….silly boy!)
This couldn’t be easier to make – 5 ingredients total. Just assemble the night before, let it sit out overnight and bake it the next morning, and you’ve got delicious, gooey, coffee cake! Too easy! You’ve got to try this one!
Overnight Coffee Cake
1 package frozen white dinner rolls (I use Rhodes brand)
1 package butterscotch pudding (not instant!)
1 cup chopped pecans
1 stick butter, melted
1/2 cup brown sugar
Spray a bundt pan with cooking spray and sprinkle chopped pecans over the bottom of the pan. Arrange the frozen rolls in the pan and sprinkle with the butterscotch pudding mix. Mix the melted butter and brown sugar together in a small bowl and pour over the frozen rolls. Grease a piece of foil and cover the pan; let sit out overnight (do not refrigerate).
The next morning, preheat the oven to 350 degrees. Bake the coffee cake for 30 minutes, covered loosely with foil. Let sit out for 10 minutes before inverting on to a platter and serving.

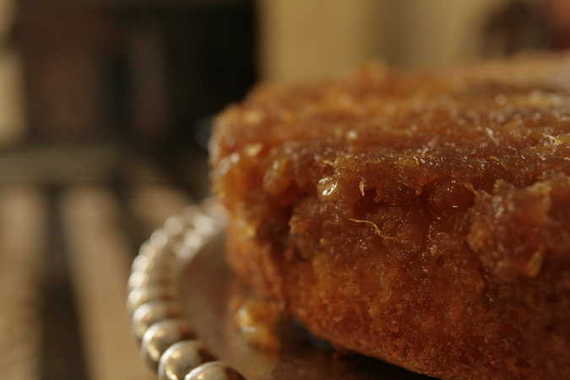
I really don’t recommend omitting the nuts – it just doesn’t turn out the same (as you can see on the left side of the cake…) – they’re really necessary, in my opinion. This is a wonderfully delicious breakfast treat – give it a try this weekend! It would make a great New Year’s Day breakfast!

This is such a great cake – there’s pumpkin, pecans, fresh cranberries, and lots of spice. SO full of yummy holiday flavors! Dorie’s All In One Holiday Bundt Cake was chosen by Britin of The Nitty Britty. I absolutely loved it – this reminds me a lot of the Cranberry Orange Bread I make every year at Thanksgiving…in fact, now that I think of it, this cake would be delicious with a bit of orange zest/juice! Next time, definitely!

The texture is nice and chunky, and the cranberries give so much extra flavor. I left out the apples because I just didn’t feel like apples in my cake that day. I will most definitely be making this cake again and again. It really is perfect for the holidays! Thanks, Britin, for a great pick!
All-In-One Holiday Bundt Cake
-Dorie Greenspan
2 cups all purpose flour
2 tsp baking powder
1/2 tsp baking soda
2 tsp ground cinnamon
1/4 tsp freshly grated nutmeg
pinch of salt
1 tsp ground ginger
10 tbsp unsalted butter, room temp
1 cup sugar
1/2 cup (packed) light brown sugar
2 large eggs, room temp
1 tsp vanilla extract
1 1/4 cups canned unsweetened pumpkin puree
1 large apple, peeled, cored, and finely chopped
1 cup cranberries, halved or coarsely chopped
1 cup pecans, coarsely chopped
Whisk together the flour, baking powder, baking soda, cinnamon, nutmeg, salt, and ginger, set aside.
Beat butter and both sugars until light and fluffy. Add the eggs one at a time, and beat for 1 minute after each addition. Beat in the vanilla. Reduce mixer speed to low and add pumpkin and chopped apple, don’t be concerned if the mixture looks curdled. Still on low speed, add the dry ingredients, mixing only until they are incorporated. With rubber spatula, stir in the cranberries and pecans. Scrape the batter into the pan and smooth the top with the rubber spatula.
Bake for 60 minutes or until a thin knife inserted into the center of the cake comes out clean. Transfer the cake to a rack and cool for 10 minutes before unmolding, then cool to room temperature. Dust with confectioners’ sugar.


This time of year I find myself making nothing but “holiday-type” treats; which is by no means a bad thing, I just think it’s good to sort of mix things up a bit every now and then. There are a lot of “summery” flavors in this dessert, like coconut and pineapple. We were having some friends over last night for Mexican food and I thought this cake would be great for dessert. Not only is it super quick and easy (almost embarrassingly easy!), it’s always so delicious – you can’t possibly mess it up! Everybody really enjoyed it! I’ll most likely go back to my pumpkin-y, spice-y, holiday-type desserts now, but it was a nice change of pace to have a cool, tropical-tasting dessert for a night!
Pina Colada Cake
1 boxed yellow cake mix
1 can Coco Lopez Cream Coconut
1 regular sized tub Cool-Whip
1 small can crushed pineapple, drained (make sure to get out as much liquid as possible)
Make the cake as directed on the box, baking it in a 9×13 pan. While the cake is still warm, using the back of a spoon or wooden skewer, poke holes all over the top of the cake. Pour the Coco Lopez over the cake, spreading as you go along, so it will soak into the cake evenly. Let the cake cool completely. Meanwhile, stir the pineapple into the Cool-Whip. Spread over the cooled cake. Refrigerate until ready to serve.


Well, today is the first day of November, and I’m super excited! November holds lots of happy, joyous occasions for me – I start listening to Christmas music about two weeks in, Thanksgiving, of course, the 5:00 AM Black Friday shopping, and the most joyous of all – our Christmas tree goes up! Wheeeeee!!! The day we put our tree up is by far, the happiest day of the year for me – I absolutely love it! But I need to brace myself…that’s not for another 26 days.
Since today is the first day of a very happy month, I thought I’d post a very yummy, Fall-y cake to start it off right. A delicious Pumpkin and Maple Gingerbread Bundt. I saw this on a blog called Tongue-n-Cheeky and couldn’t wait to try it! I think the flavors of pumpkin, gingerbread, cinnamon and maple go beautifully together; they certainly made a delicious cake. Very simple, not too sweet, and full of flavor – a perfect Fall cake!

I’m going to post the recipe exactly how she posts it on Tongue-n-Cheeky, since it’s a very simple layout and easy to follow.
Pumpkin and Maple Gingerbread Bundt
-Tongue-n-Cheeky
In One Bowl, Mix:___________________In Another Bowl, Mix:
3 eggs 3 eggs
1 c. canned pumpkin 1 1/2 c. brown sugar
1 c. sugar 1/4 c. molasses
1/2 c. oil 1/2 c. oil
1 T. cinnamon 1 T. ginger
1/2 tsp. baking powder 1/2 tsp. baking powder
1/2 c. milk 1/2 c. milk
2 c. flour 1 3/4 c. flour
1/2 tsp. salt 1/2 tsp. salt
1 tsp. vanilla 1 tsp. maple extract
Preheat oven to 350 degrees. Beat all ingredients together. Pour each batter in rotating layers into a well greased & floured bundt pan. Run a knife through the layers to marble the batters together. Bake bundt for 52-55 minutes or until top of cake springs back when touched.

Happy November, everybody!

Yep, today is my Sweetie Pie’s birthday! I won’t mention exactly how old he is, but I will say he’s getting pretty close to 30! 🙂 Birthdays aren’t really a huge deal for him – he doesn’t ever want anything fancy or extravagant – just simple and low-key. Usually we stay home and I make him a nice dinner, or we go out to his favorite restaurant….nothing big; just the two of us having a great evening together. But no matter what he chooses to do, year after year, one thing always remains the same – a big ‘ol birthday cake! Two years ago, he had a chocolate cake covered with Hershey Kisses (his favorite candy), last year, a Chocolate Overdose cake filled with chocolate mousse and topped with chocolate ganache, and this year, since Oreos are pretty much his favorite food on the planet…a Chocolate Oreo Cake. Yum.

I got this recipe from Katie over at Good Things Catered; it looked so amazingly perfect, I knew I had to make this for hubby’s birthday. It uses Hershey’s Perfect Chocolate Cake recipe, which I have now decided is my favorite chocolate cake and frosting (seriously, this frosting is the BEST!), and it’s filled with a light cookies & cream filling, then topped with lots of Oreo cookies…see? Perfect for my husband, the Oreo addict. Needless to say, he absolutely loved it (I presented it to him a couple of days early)! Of all the birthday cakes I’ve made for him, I’d have to say, this one is probably the one I’m the most proud of, considering cakes are definitely not one of my strong suits. So happy birthday, sweetie – and here’s to many more!!

Chocolate Oreo Cake
-Good Things Catered
For cake:
2 c. sugar
1-3/4 c. all-purpose flour
3/4 c. Hershey’s Cocoa
1-1/2 tsp baking powder
1-1/2 tsp baking soda
1 tsp salt
2 eggs
1 c. milk (I used buttermilk)
1/2 c. vegetable oil
2 tsp vanilla extract
1 c. boiling water
10-15 oreos twisted to separate cookies and reveal cream center
More oreos for decorating
For icing:
1/2 c. (1 stick) butter, melted
2/3 c. Hershey’s Cocoa
3 c. powdered sugar
1/3 c. milk
1 tsp vanilla extract
For filling:
1/3 c. whipping cream
2 tsp powdered sugar
small dash vanilla extract
1/8 c. oreo cookie crumbs, made from reserved oreo sides
Directions:
-Preheat oven to 350 degrees and prepare two 9-inch round baking pans, lining with parchment.
-On one layer of cake, place cookie halves that have been separated into the bottom of one pan, cream side up.
-Stir together sugar, flour, cocoa, baking powder, baking soda and salt in large bowl.
-Add eggs, milk, oil and vanilla; beat on medium speed of mixer 2 minutes.
-Stir in boiling water (batter will be thin).
-Pour batter very carefully into prepared pans.
-Bake 30 to 35 minutes or until wooden pick inserted in center comes out clean.
-Cool 10 minutes; remove from pans and place onto wire racks.
-Remove parchment and cool completely.
-Meanwhile, make frosting: stir melted butter into cocoa.
-Alternately add powdered sugar and milk, beating to spreading consistency.
-Add small amount additional milk, if needed.
-Stir in vanilla.
(About 2 cups frosting.)
-Meanwhile, make filling: In the bowl of an electric mixer, whip the cream, sugar and vanilla until stiff.
-Gently fold in the cookie crumbs.
-Scoop the mixture into a piping bag (or gallon sized ziploc bag).
-When cake is completely cooled, make icing dam around the top edge of the layer of cake that has oreos baked into it.
-Fill icing dam with a layer of cream filling.
-Place other cake layer on top, and frost with chocolate frosting.
-Place oreo halves around bottom edge and top of cake.
-Serve or store in refrigerator.

I’ve been taking the Wilton Cake Decorating classes over the past month (Course 1) with a good friend of mine; we really enjoyed it and learned a lot! I didn’t know how to even do a simple flower, so this course was especially helpful to me. In the first course we learned things like roses, sweet peas (my personal favorite!), hearts, clowns (eww), shell border, stars, dots and lots of other things! I managed to get some pretty good pictures of my last cake, but the clown cake didn’t get photographed, and my friend Andrea took a picture of the first cake with her little p&s camera – here are some of the pictures.

This was my first cake….not the greatest, I know. My writing skills are really lacking…(Sorry it’s blurry…I had to resize it and it sort of looks like crap. Plus, it was taken with a point and shoot…).

The last cake of the course.


Sweet peas….my favorite!

I’m planning on taking the other two courses, which include fondant, royal icing and a wedding-style cake! Hopefully I’ll get pretty good..eventually! 😉

Mmmm, look at this moist, chocolatey cake; so full of deep chocolate flavor, covered with sticky dark chocolate ganache….and filled with….zucchini…?!?! Yep, you read correctly – zucchini. I know it sounds disgusting, but you’ve all had or heard of zucchini bread, right? Well, there’s really not much of a difference – using it in a sweet, spiced quick bread or baking it into a chocolate cake – it’s all the same! And believe me when I tell you you can’t even tell the zucchini’s in there; no, seriously! I first saw this on The Repressed Pastry Chef and it looked so good I had to get the recipe. And then I saw it again…and again…food bloggers all over the place have been making this cake lately! I figured I needed to make it ASAP and see what all the fuss was about. I’m so glad I did, too! This was an amazing cake – the most moist (moistest??) chocolate cake I think I’ve ever had…and like I said before, there isn’t even the slightest hint of anything out of the ordinary. I know what you’re thinking – if you can’t even tell it’s there, why put it in?? Am I right?? 😉 I wondered the same thing, but Em over at The Repressed Pastry Chef told me that it adds a ton of moisture – boy was she right! And the great thing is, you don’t use all that much butter – the zucchini makes it plenty moist. You might still be thinking “eww..”, but you’re just going to have to trust me when I say that this cake is absolutely and completely delicious.

Chocolate Zucchini Cake
-The Repressed Pastry Chef
For the Cake
1/2 cup (1 stick) butter
1/2 cup vegetable oil
1 3/4 cups granulated sugar
1 teaspoon vanilla
1 teaspoon baking soda
1/2 teaspoon baking powder
1/2 teaspoon salt
2 large eggs
1/2 cup sour cream or yogurt
2 1/2 cups All-Purpose Flour
3/4 cup Dutch-process cocoa
2 teaspoons espresso powder, optional but tasty
2 cups shredded zucchini (about one 10″ zucchini, about 12 ounces)
1/2 cup chocolate chips
For the Icing
3/4 cup heavy cream
9 ounces chocolate chips
Preheat the oven to 325°F. Lightly coat a 9″ x 13″ pan with baking spray.
In a large mixing bowl, cream together the butter, oil, sugar, vanilla, baking soda, baking powder, and salt. Beat in the eggs.
Stir in the sour cream or yogurt alternately with the flour. Then add the cocoa and espresso powder, mixing until smooth. Finally, fold in the zucchini and 1/2 cup chocolate chips.
Spoon the batter into the prepared pan. Bake the cake for 35 – 40 minutes or until a cake tester inserted in the center comes out clean. Remove the cake from the oven and cool on a rack.
To prepare the frosting, heat the heavy cream in a saucepan over medium heat until simmering. Remove from heat and pour over the chocolate chips. Wait 3-5 minutes then stir to combine. It will thicken as it cools… when warm (but not hot) pour over cake and smooth with offset spatula. Allow frosting to set for about 30 minutes before serving… or not 😉

This week’s dessert was certainly a nice change of pace from all the chocolate desserts and cakes I’ve been making lately. Something with apples sounded perfect to me…I was really looking forward to making these bars. Thanks to Karen of Something Sweet by Karen for choosing these Applesauce Spice Bars…they hit the spot! The cake (or bars, I should probably say) itself is really moist and light with dark rum, pecans and chunks of apples baked in, and the glaze…oh man, the glaze…sweet, sticky and caramel-y; the glaze made these bars. I followed a few fellow bakers’ advice and doubled it, and was very glad I did – that glaze was by far my favorite part! My hubby really liked these; needless to say, they didn’t last long! 🙂

See that glaze??? Oh boy….it’s just calling my name!! And look at those nice, big chunks of apples and pecans…and the flecks of spice…beeeeautiful!! If you’re looking for a nice change of pace – head on over to Karen’s blog and get the recipe; you’ll love ’em, I promise!

I didn’t get a chance to make this in time for last week’s TWD, but I sure wasn’t going to let this recipe pass me by! I knew as soon as I got the chance, I needed to make this cake. Luckily, my friend Courtney was coming to visit last week, which gave me a great excuse to bake it. Honestly, I wasn’t expecting much more than a regular old banana bread out of this cake – and it was, actually, very similar to banana bread…but SO much better! This will be my go-to recipe for banana bread now (I thought it was closer to a bread than a cake). Courtney, hubby and I all loved it. It was so good, I’m making it again for my mother, who is coming to house sit and dog sit for us while we’re out of town this week. I know she’ll love it with her coffee!

This cake was chosen (last week) by Mary of The Food Librarian. She has a great blog – be sure to check it out and get the recipe for this! You won’t be sorry! Come back tomorrow for my (regularly scheduled and on time!) TWD post – Brownie Buttons. So cute!!
Here’s a useless, random fact that you might not know about me – I love to read. I’ll pick up a good book and finish it in less than a week, or even a couple of days, depending on how long it is. And, I read super fast, which drives my hubby crazy… My favorite books are Pillars of the Earth, by Ken Follet, the Stephanie Plum novels, by Janet Evanovich and my all-time, absolute favorite – the Outlander series by Diana Gabaldon; but the Stephanie Plum books are what I’m focused on today. I pretty much read these books (there are 13 of them as of right now, but a new one is coming out in a couple of weeks) every year – they’re totally hilarious. Stephanie Plum is an unorthodox, accident-proned bounty hunter in Jersey with a wacky family and really funny sidekicks. Her 80-something year old grandma is particularly hilarious (there’s lots more to the stories, but I won’t go into it right now). Anyway, her mother always lures her over for family dinners with her homemade pineapple upside down cake. In the books, Stephanie is always talking about how delicious her mother’s cakes are – especially the pineapple upside down cake. Everytime I read these, I always end up craving it – even though I’d never even tried one! I decided a couple of weeks ago to put an end to my cravings and give one of these famous cakes a try. So here is my very first Stephanie Plum-inspired pineapple upside down cake.
I did a lot of searching before deciding on the best sounding recipe – a fellow food blogger‘s 70-year old recipe that belonged to her grandmother. And boy am I glad I picked this one – talk about delicious! This was seriously some of the best cake I’ve ever had in my life. I left out the maraschino cherries (blech!) and used crushed pineapple – I’m telling you – this was miiiiiiighty tasty. Hubby and I both loved it. So, thank you, Stephanie Plum, for inspiring me to make this delicious cake (even though you’re a fictional character..)!

This was delicious with a big dollop of whipped cream – I can’t wait to make it again! If you don’t try the cake, at least do yourself a favor and read the Stephanie Plum novels – they’re a good, quick read and totally hilarious (with a touch of romance). Make yourself a cake this weekend! Happy baking!
Pineapple Upside Down Cake
–Food Blogga
1/2 cup butter (8 tablespoons)
1 cup brown sugar
1 (20-ounce) can sliced pineapple
6 maraschino cherries
a few whole pecans
1 cup flour, sifted*
1 teaspoon baking powder
1/8 teaspoon salt
3 eggs, separated
1 cup granulated sugar
5 tablespoons pineapple juice
1 teaspoon pure vanilla extract
Position a rack in the center of the oven, and preheat to 350 degrees F.
Add butter to a 9-inch-round baking pan, and place inside of a warm oven until melted, about 5 minutes. Remove from oven, and sprinkle brown sugar evenly over the butter. Add 6 pineapple slices and place a cherry inside of each one. Fill in the nooks and crannies with whole pecans.
In a medium bowl, combine sifted flour, baking powder and salt, and stir.
Using a hand mixer, in a metal or glass bowl, beat egg whites at high speed until fluffy. Set aside.
In a separate bowl beat egg yolks with sugar at medium speed until creamy. Add pineapple juice, and vanilla extract, and beat well. Add the flour mixture to the creamed mixture, and beat until well combined. Fold in the egg whites with a rubber spatula. Pour cake mixture evenly over the fruit, and smooth with the spatula.
Bake for 40 minutes, or until cake is golden and a toothpick inserted into the center comes out clean. Place on a wire rack to cool for 10 minutes. Run a blunt knife around the edges of the pan to loosen the cake. Invert carefully onto a plate. Serve warm or at room temperature.
*Note: Sifting the flour creates a lighter cake.