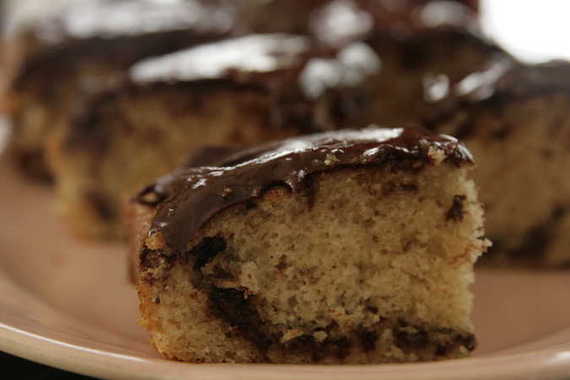
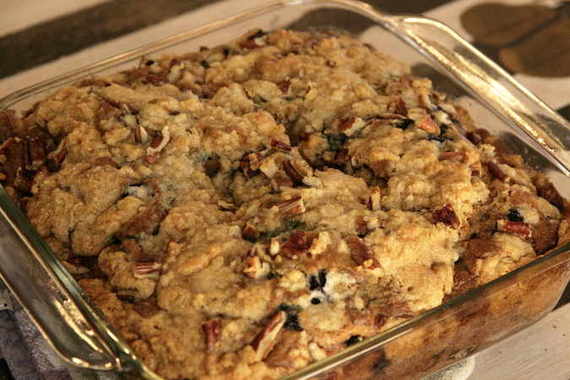
I know – no clever title this week – it’s late and my brain just isn’t feeling clever tonight. Oh well – that won’t stop me from sharing these yummy cinnamon squares with you all! Here we go!
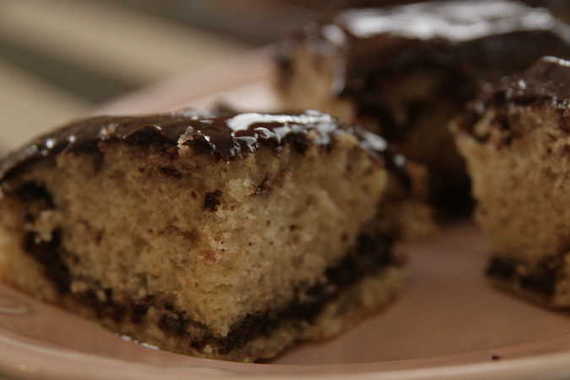
This week’s recipe is Dorie’s Cinnamon Squares, chosen by Tracey at Tracey’s Culinary Adventures. I have to admit (with no disrespect to Tracey!), I was NOT looking forward to baking these this week. It’s hot here and we’ve been eating lots of fresh fruits and summery desserts – cinnamon and chocolate isn’t something I really want to eat in the hot summertime (I’m weird like that). But, since I missed last week (oops), I knew I had no choice but to make them. And good thing I did! I ended up really loving these – I mean really, really. The frosting was by far the best part – a little chocolate, a little butter – YUM. I also love the thin layer of cinnamon, sugar, chocolate and espresso powder hidden in there! I cut the recipe in half and baked it in a loaf pan (it seems like I’m doing that a lot these days- the trusty old loaf pan has been getting a lot of action lately!) and still got eight squares. Just enough for the hubby and me to enjoy!
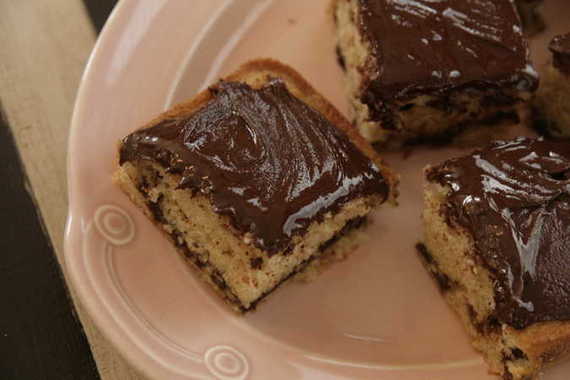
I’m really glad I didn’t flake out and skip this week – these were a very nice surprise. I know I’ll be making them again and again. Thanks, Tracey, for picking a winner! Head on over to Tracey’s blog if you’d like the recipe – which, you should, because it’s as simple as can be and totally yummy!
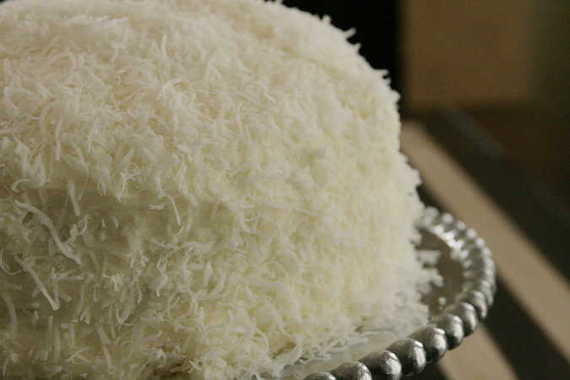
Ok, I realize saying something is “the best [fill in the blank] ever” is quite a statement. You’d better be darn sure it’s the best ever, or else everyone will start thinking you say that about everything. Well I’m sure! I’m 100% sure! This was probably the best slice of cake I ever put in my mouth – and I don’t even LIKE coconut in my baked goods!!! That’s big, ya’ll.
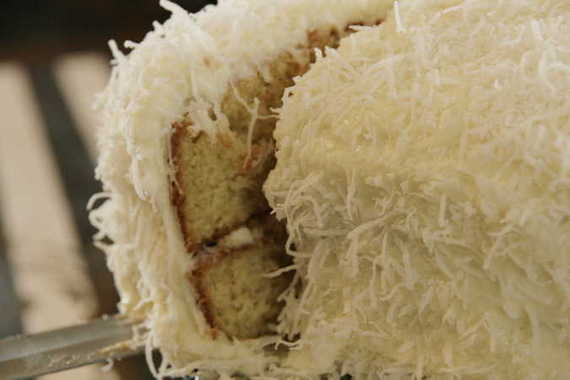
My parents were coming over for Memorial Day weekend and I wanted a yummy, summery, fun dessert to make for them. I was originally going to go with a good ‘ol stand-by chocolate cake (everybody loves a chocolate cake, right?), but then this recipe for coconut cake jumped out at me from Ina Garten’s Barefoot Contessa at Home cookbook and I immediately changed my mind. Although I don’t much care for coconut, I knew both of my parents love it, so I figured I’d just make the sacrifice and please everyone else – I’d just have a little taste of it. Well, that little “taste” ended up being two giant pieces – I LOVED it and so did everyone else. The cake is moist and slightly dense, the cream cheese icing is light and fluffy, and the coconut adds a flavor and texture that just send this cake over the top. It was amazingly delicious. And best of all, I have finally made my peace with coconut.
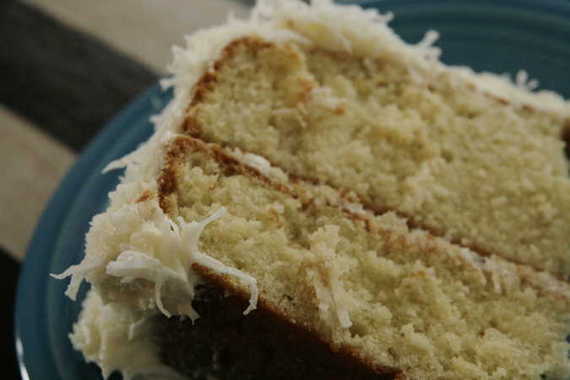
The only thing is, you might not want to make this cake all that often – it’s pretty heavy on the fat. You might as well just hand out sticks of butter to your guests, but still – once or twice a year never hurts. And even though I may develop a few extra dimples on my backside (what? Don’t act like you don’t have them…) just from those two slices of coconut cake – it was worth it. I’ll just get one of those grandma swim suits with the extra long skirt. Nothing could separate me from this cake…not now that we’ve come to love each other so.
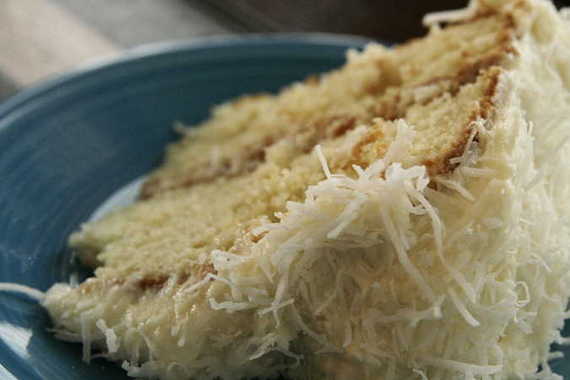
I think this cake would be perfect for a 4th of July party or your grandma’s birthday, or a Tuesday night…it’s just perfect, really. So what are you waiting for? Get out there, put your grandma swim suit on and have a big ‘ol slice of coconut cake!

Coconut Cake
-Ina Garten, Barefoot Contessa
For the Cake:
3/4 pound (3 sticks) unsalted butter, at room temperature, plus more for greasing the pans
2 cups sugar
5 extra-large eggs, at room temperature
1 1/2 teaspoons pure vanilla extract
1 1/2 teaspoons pure almond extract
3 cups all-purpose flour, plus more for dusting the pans
1 teaspoon baking powder
1/2 teaspoon baking soda
1/2 teaspoon kosher salt
1 cup milk
4 ounces sweetened shredded coconut
For the frosting:
1 pound cream cheese, at room temperature
1/2 pound (2 sticks) unsalted butter, at room temperature
3/4 teaspoon pure vanilla extract
1/4 teaspoon pure almond extract
1 pound confectioners’ sugar, sifted
6 ounces sweetened shredded coconut
Preheat the oven to 350 degrees F. Grease 2 (9-inch) round cake pans, then line them parchment paper. Grease them again and dust lightly with flour.
In the bowl of an electric mixer fitted with a paddle attachment, cream the butter and sugar on medium-high speed for 3 to 5 minutes, until light yellow and fluffy. Crack the eggs into a small bowl. With the mixer on medium speed, add the eggs 1 at a time, scraping down the bowl once during mixing. Add the vanilla and almond extracts and mix well. The mixture might look curdled; don’t be concerned.
In a separate bowl, sift together the flour, baking powder, baking soda and salt. With the mixer on low speed, alternately add the dry ingredients and the milk to the batter in 3 parts, beginning and ending with dry ingredients. Mix until just combined. Fold in the 4 ounces of coconut with a rubber spatula.
Pour the batter evenly into the 2 pans and smooth the top with a knife. Bake in the center of the oven for 45 to 55 minutes, until the tops are browned and a cake tester comes out clean. Cool on a baking rack for 30 minutes, then turn the cakes out onto a baking rack to finish cooling.
For the frosting, in the bowl of an electric mixer fitted with a paddle attachment, combine the cream cheese, butter, vanilla and almond extract on low speed. Add the confectioners’ sugar and mix until just smooth (don’t whip!).
To assemble, place 1 layer on a flat serving plate, top side down, and spread with frosting. Place the second layer on top, top side up, and frost the top and sides. To decorate the cake, sprinkle the top with coconut and lightly press more coconut onto the sides. Serve at room temperature.
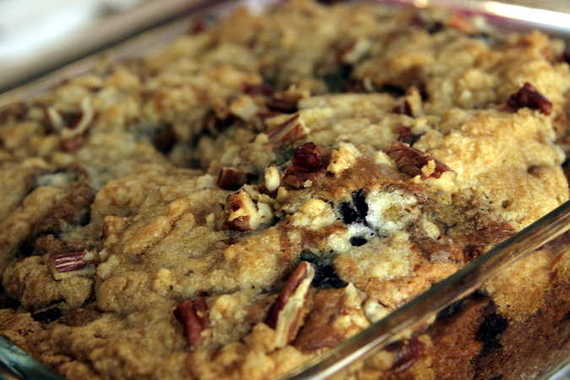
This week’s TWD recipe was Blueberry Crumb Cake, chosen by Sihan of Befuddlement. I was really excited when I saw this week’s choice – I’ve been eyeing this cake for a while now, plus, I have a delicious-smelling “Blueberry Scone” Yankee Candle that makes me crave any kind of blueberry baked goods whenever I burn it. I try not to burn it when I know I’m having company because I don’t want someone to walk into my house thinking I’ve made them some sort of yummy blueberry treat, when I really haven’t. But this weekend worked out perfectly because I was having company and got to burn my yummy-smelling candle because I was indeed baking a blueberry treat for them! Yippee!
I had the most beautiful frozen blueberries for this cake – usually anytime I buy any kind of frozen berries, they’re all clumped together and sort of squished and not all together great-looking. But these blueberries were just perfect. Unfortunately, they didn’t have much flavor….at all. The lemon zest helped some, but not much – in fact, I couldn’t really even taste blueberries. Sad, yes, but it was still really tasty. The crumb topping is really the star of this cake – it’s buttery, slightly crunchy and sweet – I loved it! I can’t wait to try this recipe again, but with fresh blueberries or maybe some raspberries or blackberries. I give it two thumbs up!
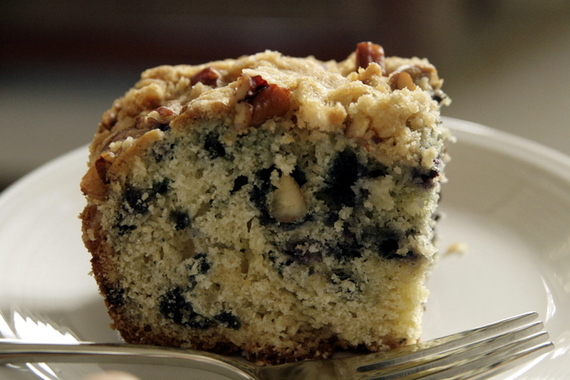
If you want the recipe, head over to Sihan’s blog. This is a great cake and tastes best in the morning with your coffee (at least in my opinion!) – give it a try this week!
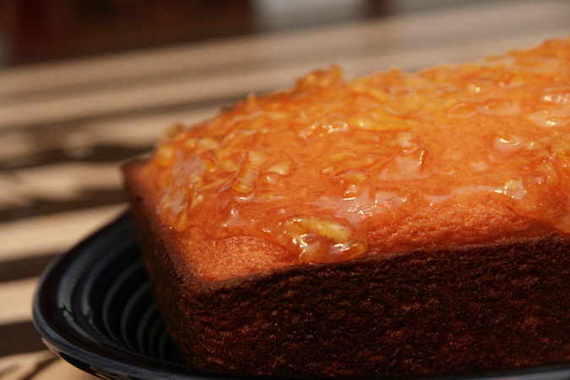
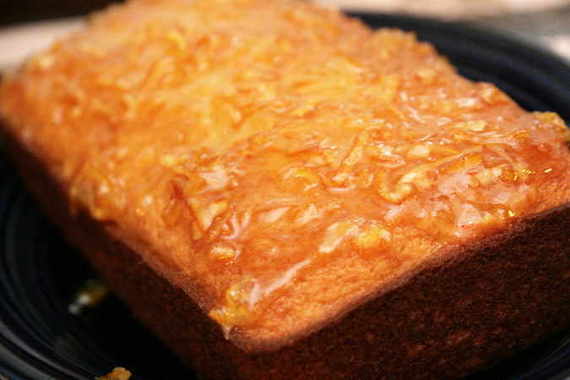
According to Dorie, this cake is as French as it gets. Apparently over in Paris, no person’s cooking repertoire is complete without this type of cake. Personally, I love the idea of baking something that is a favorite in people’s homes from another country and culture – it makes me feel special in a way. This French Yogurt Cake with Marmalade Glaze was chosen by Liliana of My Cookbook Addiction. It’s basically a lighter pound cake flavored with fresh lemon zest and topped with a lemon marmalade. Unfortunately, none of my grocery stores carry lemon marmalade, so I had to use orange. Boo. This was my first time using orange marmalade and I have quickly come to the conclusion that I don’t like it. The cake was still really good, but I just sort of scraped off the marmalade topping – bummer, because that’s probably supposed to be the best part. Honestly, this cake reminded me a whole lot of my most favoritest lemon cake – Ina’s Lemon Yogurt Cake, (but not near as good, in my opinion). I’m still really glad I tried this – I’ve been looking forward to this recipe for a long time now! I think next time I’ll try topping it with a little lemon curd…mmm, lemon curd.…..
If you want to feel really authentic and French-like, go over to Liliana’s blog and get the recipe for this cake! Perfect for Springtime!

Oops, how’d that get there?! Oh well…Izzy wishes everybody a happy St. Patrick’s Day!!
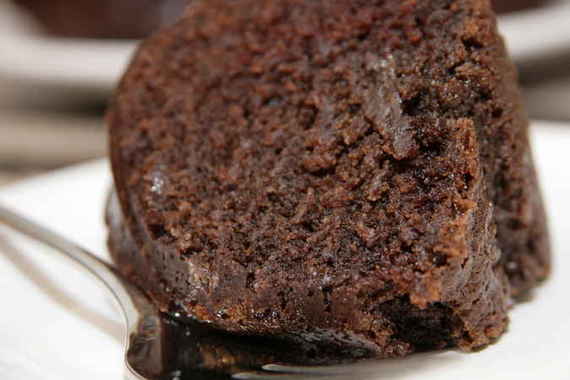
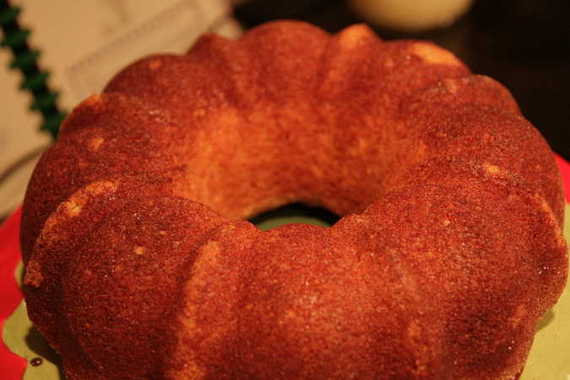
Ooops. Yeah, I know – today is Tuesday and there is no TWD entry. No mouth-watering recipes from our beloved Dorie. No commentary with me falling all over myself trying to put into words how deep my love is for a certain dessert. Yeah none of that. I just didn’t get around to making the recipe this week. I know, I know – how very irresponsible of me. BUT – I did make this cake. A good ol’ chocolate bundt cake. Nothing fancy, or complicated – just tasty.
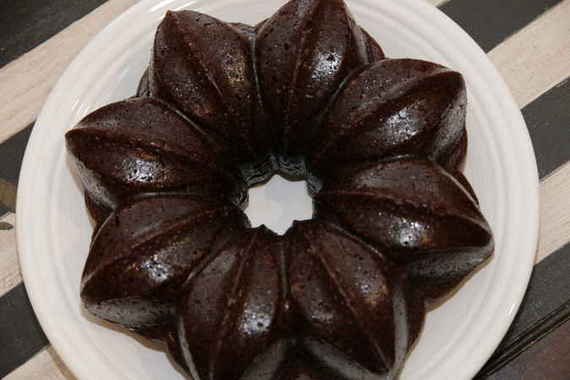
I got the recipe from Laure of Vintage Victuals the other day when I was searching for a good bundt cake recipe. I just bought a pretty new bundt pan – you know, one of those wobbly silicon ones, and wanted to put it to immediate use. This cake is chocolatey with a hint of cinnamon (which I love!), and really nice and moist. Although it’s mighty tasty eaten as is, I think it would be excellent with a glob of gooey chocolate frosting on top.
Thanks to Laure for sharing her family’s recipe with me!
Cinnamon Chocolate Cake
-Vintage Victuals
1/2 cup butter
1 cup water
1/2 cup vegetable oil
5 tablespoons cocoa powder
2 cups flour
2 cups sugar
1/2 teaspoon salt
1/2 cup buttermilk
1 teaspoon baking soda
2 eggs, lightly beaten
1 1/2 teaspoons cinnamon
1 teaspoon pure vanilla extract
Preheat the oven to 375 degrees. Grease a large bundt pan with cooking spray. Put butter, water, oil, and cocoa in a medium saucepan. Bring to a boil.
Meanwhile, whisk together flour, sugar, and salt in a mixing bowl. Pour the chocolate mixture into the bowl with the dry ingredients and mix well. Then, add the buttermilk and baking soda. Mix together the eggs, cinnamon, and vanilla in a small bowl, and add to the batter. Pour batter into prepared pan.
Bake 25 minutes. Allow cake to cool completely in the pan.

Well, I hope everybody had a really nice Valentine’s Day! I know I did – hubby sent me these beautiful tulips (my favorite flower) and took me to the museum – it was a great day…except the part where hubby started choking on the cheese fondue that I screwed up in the first place thus scaring the crap out of me and really grossing me out to the point of not being able to finish my meal which made us both go into hysterics from laughing so much yet still kinda grossed out so we thought we’d just open the second bottle of champagne and try to forget everything….yeah, except for that. Good times. Note to self: next time you’re making cheese fondue, try not to double the amount of cheese you’re supposed to put in. Oops.

So anyway, let’s move on to this cake – the Devil’s Food White Out Cake, chosen by Stephanie of Confessions of a City Eater. This is the gorgeous black and white cake on the cover of Dorie’s book, Baking From My Home To Yours. The cake itself was totally easy to make – it took no time. It sort of reminded me more of a brownie or the Chocolate-Chocolate Cupcakes we made back in October than a normal chocolate cake – it was definitely rich and chocolatey. The icing is what sort of scared me, though – it’s a fluffy, marshmallowy icing, and it starts with a simple syrup that has to reach a specific temperature before being added to egg whites, which eventually all gets whipped up together. You have to use a candy thermometer. I don’t have a candy thermometer and didn’t really feel like buying one…so I used a meat thermometer and a prayer. Thank the good Lord (and my meat thermometer) it worked! I know – it’s sort of a “back-woods” way of doing things (“you might be a redneck if…”), but hey, it worked didn’t it? Don’t judge.

Personally, I’m not a big fan of this icing -it’s just a wee bit too sweet, if you ask me. Give me buttercream or cream cheese anyday! However, it still made for a very delicate, pretty cake – I enjoyed taking pictures of this. You’re supposed to slice the two layers of cakes into four and crumble the fourth layer to top your cake with – but somehow my layers ended up pretty scrawny, so I just sliced a tiny bit off of one layer and made do with only a few crumbs. So normally, this would be a tall, fluffy looking cake…..just use your imagination, hm?

I think this would be a perfect birthday cake for a kid – it’s really chocolatey and way too sweet….that’s what they like, right? That’s what I liked, anyway.

If you want the recipe for this cake – head on over to Stephanie’s blog. She’s got lots of other great stuff on there, too!

Aaaaaaand, one more picture…..then I’ll go. I swear.

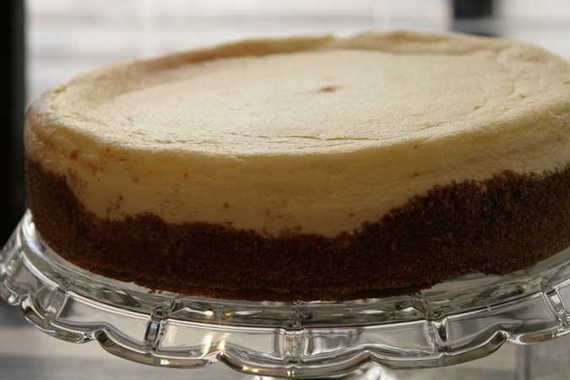
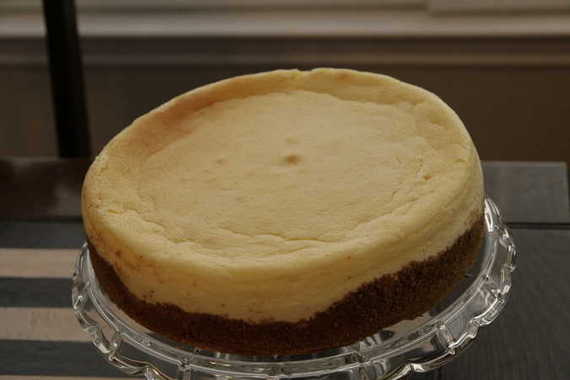
First of all, I hope everyone had a fantastic Christmas and enjoyed time with family and friends! Me, I had a great Christmas – I got new silverware! And my thoughtful hubby bought me some really fancy vanilla paste for my stocking, which I am SUPER excited to use! Not to mention, we had a great time with our families and both decided this was our best married Christmas so far! So, all-in-all…great Christmas. But now onto more important things like MY VERY FIRST CHEESECAKE!!! YIPPEEEE!! (Can you tell I’m just a wee bit proud of myself here?).
I want to give Anne of Anne Strawberry a HUGE thanks for picking this week’s TWD recipe: Tall and Creamy Cheesecake, and forcing me to get over myself and finally make a cheesecake! That’s right – I’ve never in my life made one. Everyone has told me how simple and no-fail they are, but for some reason, cheesecake has always been one of those things I’ve always been scared to death to attempt. I know, dumb, right? So now I can say that I’ve MADE ONE and it was a HUUUUUUUUUUGE success!! I took it to my hubby’s family Christmas and everyone seemed to really enjoy it (brownie points for me!). This was not only simple to make, but the best freaking cheesecake I’ve ever put in my mouth…I’m so glad I followed the recipe totally as is, because this was perfect as Dorie makes it. Perfect, I tell you!! I can’t wait to make another one of these….I feel so big and powerful now – like I’ve conquered something deep inside of me….who knows, maybe I’ll give brioche another try soon (or maaaaaybe not…). Anyway, go check out Anne’s blog and get the recipe for this FREAKING AWESOME CHEESECAKE. Do it. Right now. Go.
(sorry there are no pictures of the actual slices of cake….I couldn’t take a hacked up cake to family Christmas)
This is probably going to be a short post because I still have a tiny bit of shopping left to do today!
Here are just a couple of little things I wanted to share with you because they’re simple, take practically no time to prepare, and they’re darned TASTY! They are: my great-grandmother’s gingerbread and quick and easy saltine toffees. So good!! So here we go!
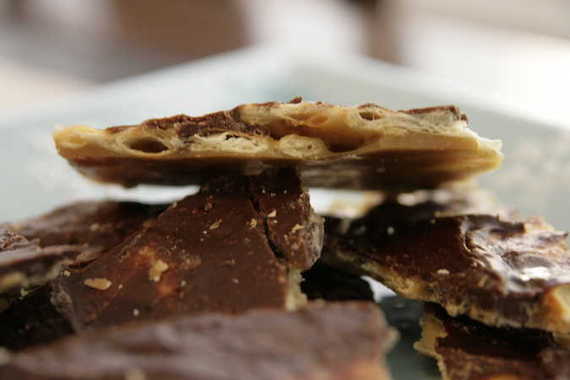
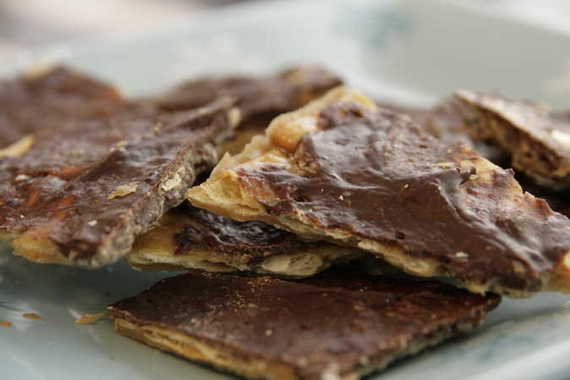
These toffee squares are just about the easiest snack/dessert to make and they’re oh-my-gosh delicious to boot! Perfect for parties or homemade gifts! I had some unexpected company this weekend and decided to whip these up for a little snack and they were a huge hit! It took literally about 10 minutes to make. I know it sounds weird because you make it with saltine crackers, but I’m telling you, it works!
Saltine Toffees
1 cup unsalted butter
1 cup brown sugar
2 cups semi-sweet chocolate chips
40 saltine crackers
Preheat oven to 350 degrees. Line cookie sheet with foil and spray with non-stick spray. Lay a flat layer of crackers out on the foil. In a medium saucepan, melt the sugar and butter until it starts to boil. Reduce the heat and simmer until mixture is thickened and sugar is completely dissolved. Pour this mixture over the crackers and spread to coat evenly. Bake for 2-3 minutes, or until the toffee becomes bubbly. After removing the pan from the oven, let it sit for 3-5 minutes. Sprinkle on the chocolate chips, let them soften and melt, and then spread them into an even layer. Refrigerate to harden, then break into chunks for serving. (These are soooooooooo good!!)
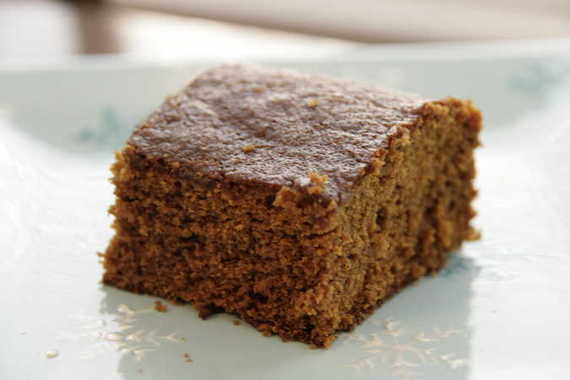
Ok, next up is my Baba’s gingerbread – I had been searching everywhere for a good gingerbread recipe to make for hubby one night (and coming up sort of empty handed). I should’ve known that all it took was one phone call to my mother to fix everything! She gave me this recipe – my great-grandmother, Baba’s recipe; and it’s DELICIOUS! It has just the right amount of spice and molassess….it was so good served warm with a (big ‘ol) dollop of whipped cream on top! Hubby loved it! Thanks again Baba, for yet another perfect recipe!
(Unfortunately, I was in a big hurry and didn’t have time to take very good pictures of this – I would’ve liked to top it with a little powdered sugar and some whipped cream so you could get the real effect of how good this is…but you’ll just have to use your imagination!)
Baba’s Gingerbread
1/2 cup sugar
1/2 cup butter, softened
1/2 cup molassess
1 egg
1 teaspoon ginger
1 teaspoon cinnamon
1 teaspoon baking soda
1/2 teaspoon salt
1 1/2 cup flour
1/2 cup boiling water
Mix together the butter and sugar, then add the egg and molassess, mixing well. In a separate bowl, combine the flour, spices, soda and salt, then add to wet mixture. Stir to combine, then add the boiling water and mix. Pour batter into a greased square pan and bake at 350 for 35-45 minutes or until springy.
I hope you enjoy these recipes….they’re perfect for the holidays! Merry Christmas and happy baking!
**There is an updated post on this recipe- if you’d like to see it, click here
I like to think of myself as sort of a “fancy” girl – I really love big, elaborate, overdone things….nothing gets me excited like getting a big fat present, or being on stage and getting one heck of an applause. Big, elaborate stuff is great…really; but honestly, it’s the simple little things that make me really happy. Simple things like my hubby getting home from work everyday (I get so excited when I hear the garage door opening); or having a fire going in my fireplace; my mom loading me up with all of her leftover Christmas decorations; watching my favorite Christmas movie with a mug of hot chocolate; the hot guy on Lost. It’s all about the simple things.
This cake is definitely one of those simple things that puts a big ‘ol smile on my face and a “mmmMMM!” on my lips. My mom’s Cinnamon Pound Cake.
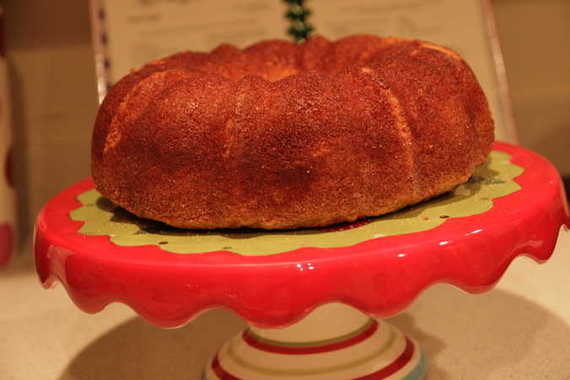
I didn’t really have that much of an appreciation for this cake when I was a little younger. My mom would make it (usually around Christmas, or in the winter) and everybody just scarfed it up (um, yeah, ‘scarfed’ is a word) and went on and on about how good it was. I personally didn’t think it was all that great- I mean, I liked it alright…I just didn’t get the “wow” factor. Don’t know why. I was in high school…I had to be difficult – otherwise everybody would’ve been bored. It wasn’t until after I was married, and was having my parents and in-laws over for a nice dinner before Christmas that I ever made this cake on my own. I was searching for a really good dessert – something that would make everybody know in their heart of hearts that I was the best little wife and cook there ever was (I don’t think such a dessert exists…) and I kept coming up empty handed. Either it was too difficult or too simple. Finally I somehow decided on the cinnamon pound cake, and as it turned out, that cake was the perfect end to a mediocre dinner (I had only been married like, 2 months…I was still working on the whole “company over for dinner” thing. I think I served a casserole…hehe). It was so delicious with a big cup of strong coffee – everybody loved it. Including me! Somehow, my tastes had changed and I grew to love that cake in just one evening! Now I make it every single year….and it’s SOOOOOO good! And SOOOOOO simple!! And the best thing is, it tastes best in the morning with your coffee…I love cake for breakfast. This cake always gets rave reviews, no matter where I take it. I sent some to work with hubby and he said his coworkers went nuts over it. Try it! I promise you’ll love it!
Cinnamon Pound Cake
4 tablespoons sugar
2 tablespoons cinnamon
1 yellow butter cake mix (don’t use white cake mix – it has to be butter!)
1 package instant vanilla pudding
1/2 cup canola oil
1 – 8 oz. container sour cream (you can use reduced fat, but in my opinion, it doesn’t taste the same)
4 eggs
Preheat oven to 350 degrees and grease a bundt pan.
Mix the sugar and cinnamon together in a small bowl and sprinkle half of the mixture in the greased bundt pan – shake it all around to coat the entire pan. Mix cake mix with pudding, oil, sour cream, eggs and other half of cinnamon/sugar mixture. Pour into pan and bake for 45 – 50 minutes until springy. Cool for 20 minutes before taking out of pan.
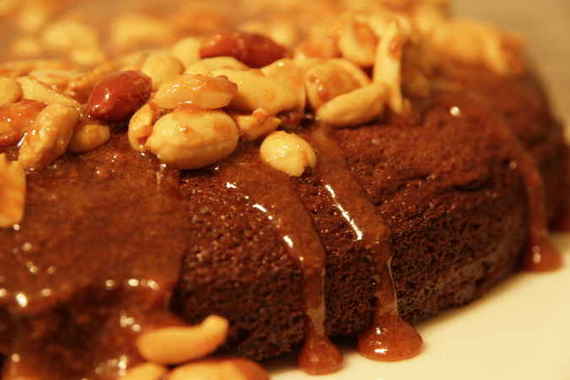
As I sit here, listening to my husband’s rantings about the “dadgum @#%$%^&*# round cake pan thingie (springform pan) that is impossible to clean” (hey, but its nice to have help in the kitchen, right?), I’ve come to the conclusion that I really dislike caramel…and peanuts….on top of a brownie cake. In fact, I hate it. It was so bad, I threw the whole thing in the trash – there’s no way I would’ve sent that to work with hubby tomorrow – nuh-uh, no way. However, it was most likely completely my fault. I think I overbaked my cake – thus making it dry; I think I over cooked my caramel, thus giving it a funky kind of flavor. Not a tasty cake. I’m very glad I made it, though – I almost skipped TWD this week…again. I’m glad I didn’t, though – I’ve been dying to make the Caramel-Peanut Topped Brownie Cake (chosen by Tammy of Wee Treats by Tammy), and now I know that I don’t like it – which is really disappointing, but at least now I know!
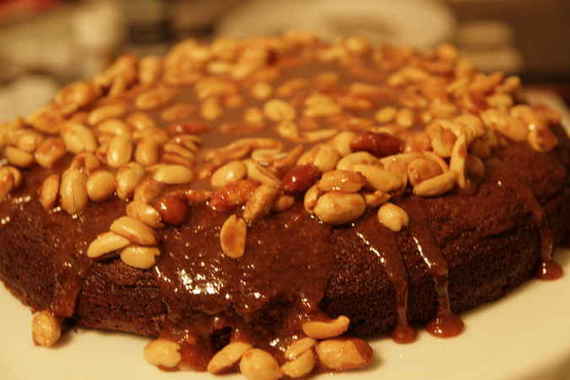
And yes, I know, once again my pictures are total and utter doo-doo. I waited until the last minute to make this and had to take my pictures at night….again. All these hideous photos are starting to really bum me out….
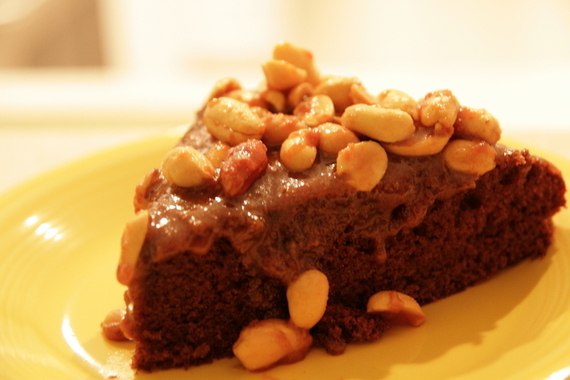
If you would like the recipe (don’t worry – I’m sure yours will most definitely turn out better than mine), go visit Tammy’s blog. Maybe next week I’ll be more responsible and not wait until 8:00 the night before to start baking….maybe.


