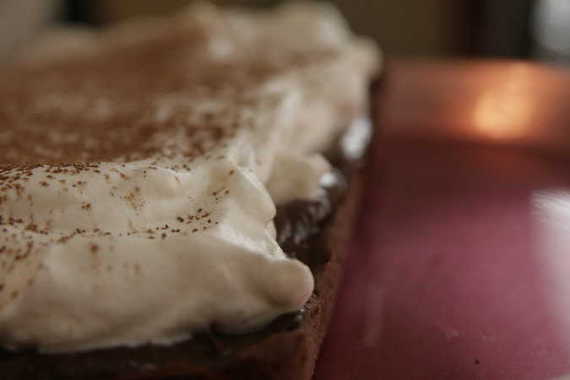
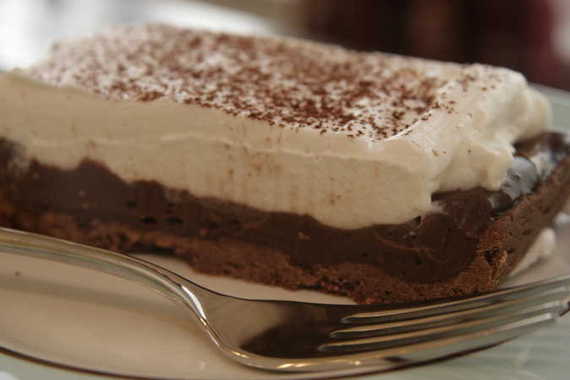
Here’s another perfect example of Dorie taking a classic, well-loved recipe and tweaking just slightly to make it extra fancy and extra special. You might say she “Dorie-fies it”. Gosh, I’m so clever. Anyway, this is Dorie’s Chocolate Cream Tart, chosen by Kim of Scrumptious Photography, one of my very favorite food blogs. Do yourself a favor and check out her blog – her pictures will make you drool all over your keyboard. I was really glad to see this recipe chosen because I’m a biiiiiiiiiiiiig fan of chocolate cream pie, especially, ESPECIALLY my mama’s. She doesn’t waste time with that meringue stuff – she whips up some heavy cream to pile on top. Now that’s how pie should be done, folks. So of course, I was pleased to see that Dorie does the same thing with her Chocolate Cream Tart – so basically, this is just my mom’s chocolate cream pie, but with a tart crust instead of a pie crust. Perfect!
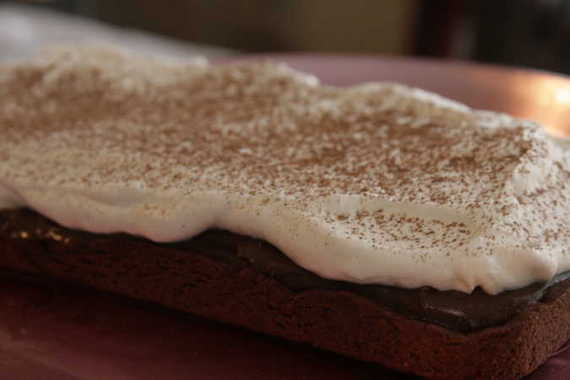
I came *this* close to using Dorie’s Sweet Tart Dough (the most heavenly crust ever known to man), but decided to follow the rules and use the chocolate tart dough that’s called for instead. I was kind of sorry I did, actually – it was a little too bitter for me, plus I felt like it needed something non-chocolate to balance out the chocolate filling. It was still good, though. I also cut the recipe in half and baked it in a loaf pan lined with parchment so I could just pull it right out and spread the filling and whipped cream on it. Ok, so let me get to the verdict – this was GOOD. I mean really good. So good I stood there in the kitchen licking every last bit of the chocolate filling off of spoons, whisks, bowls, and fingers. I added a little sour cream to the whipped cream topping (just like in the banana cream pie a couple of weeks back) and it really added a lot of extra flavor. All in all, this was a DELICIOUS dessert. We both loved it. Was it as good as my mom’s? Well, no, but I never really expected it to be, either. 🙂
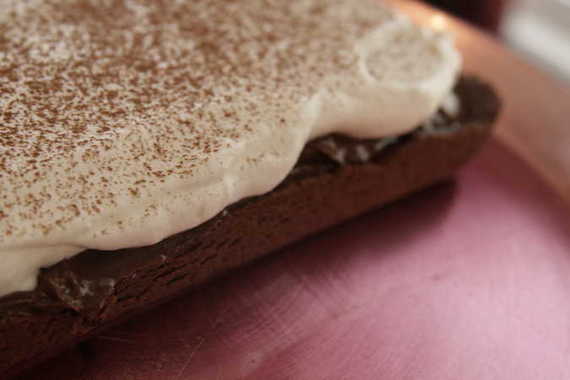
This would be absolutely perfect to serve for company – its tart status brings it up a couple of notches in “fanciness”, but it tastes like something out of your grandma’s comfy kitchen. Perfect! Head on over to Kim’s blog and get the recipe – your spouse will thank you.

Yummy, yummy, yummy!! Thanks, Kim, for choosing a WINNER!
I love bread. I love chocolate. I love soggy, chocolatey bread. So you can imagine I thoroughly enjoyed this week’s TWD recipe chosen by Lauren of Upper East Side Chronicle (soon to be A Baking Blog), 4-Star Bread Pudding. I’m sure you all know how bread pudding works, basically you soak stale bread cubes in a milk mixture and bake it – deeeelicious. Dorie boils milk and cream together and mixes it together with eggs, sugar and chocolate; she pours it over stale Challah or Brioche and raisins or dried cherries and voila, chocolate bread pudding.
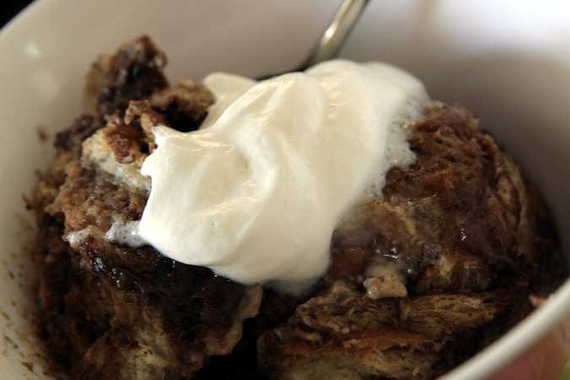
Now, I didn’t do excactly as Dorie told me to. I decided to pass on the option of the raisins or dried cherries (I don’t believe in fruit/chocolate mixtures- you know that!), I added a dash of cinnamon, and I also tossed in some semi-sweet chocolate chips with my bread. I ended up using twice the amount of chocolate called for and still could’ve used a tad more….I know..it’s a sickness. We’re looking into it. I used Challah bread, which was perfect – I love Challah. Especially the smooth, shiny crust – beautiful.
I personally think this recipe would be perfect at breakfast/brunch. To me, it seems to fit in somewhere in the family of my personal breakfast favorite, chocolate chip pancakes (with the whipped cream smiley face, thankyouverymuch!). I was really glad I added the extra chocolate chips – it really added to the “gooeyness” and in my opinion helped a lot with the taste and texture.
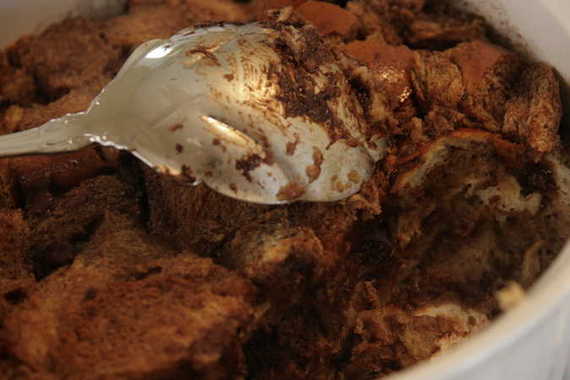
If you would like the recipe, head on over to Lauren’s blog and make yourself a chocolate bread pudding this weekend!
Ok, maybe not so much “Queen” – that would probably be Dorie, huh? Ok how about Princess?? Lady-In-Waiting? Court Jester?……..No? Ok fine. Just forget it, then….
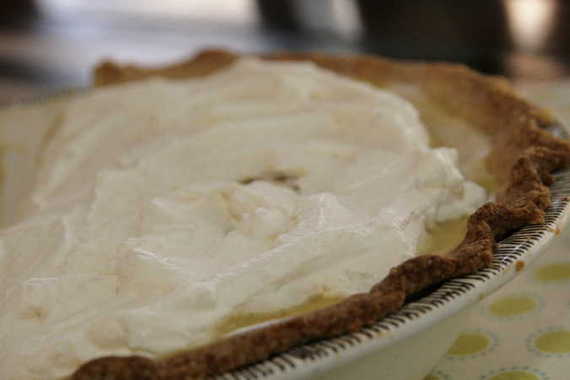
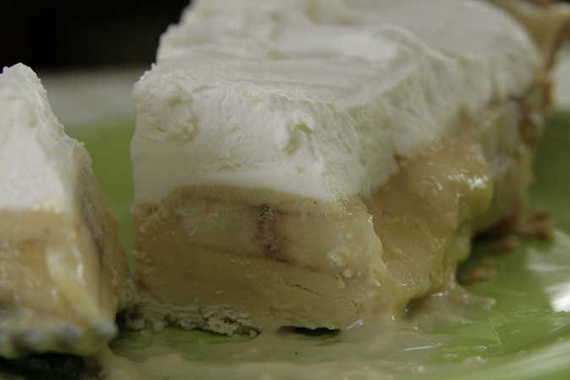
The day has finally come, my friends. The day when I, myself, lil ‘ol me gets to choose the recipe for Tuesdays with Dorie. When I got the email reminding me my turn was coming up, you would’ve thought I’d won a Tony award or something- I was so excited! In fact, there may have been some girlish squealing involved….maybe. It didn’t take long for me to decide – I flipped through the book two or three times, called everybody I could think of, and finally chose the Banana Cream Pie – nothing fancy, new-fangled or trendy. Just classic, good old fashioned pie. I love pie. Probably more than I love most desserts. It’s simple. It’s homey. It’s classic. Kinda like me, I guess. Funnily enough, my good ‘ol hubby doesn’t really like pie! HA!
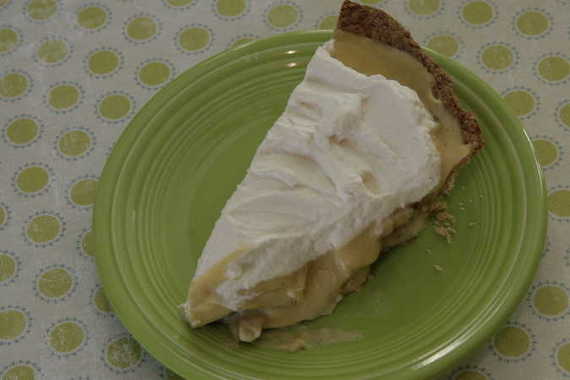
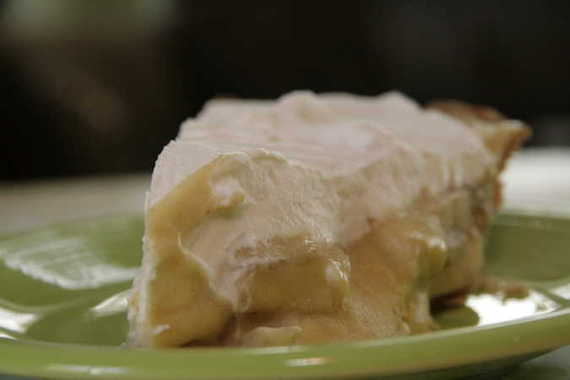
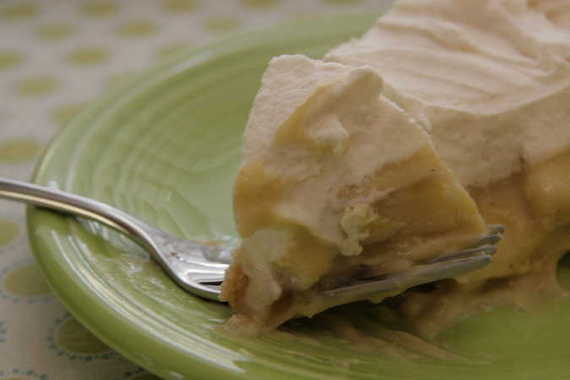
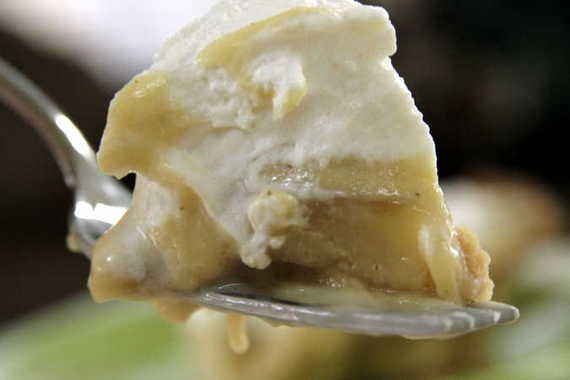
Believe it or not, this was my first ever banana cream pie – actually, my first cream pie, too! I love this recipe because it’s the way my great-grandmother made her cream pies- by slowly stirring the pastry cream over the stove top to get a rich, velvety pie filling. And I loved that little dash of cinnamon and nutmeg; it really gave it something special! And the sour cream in the topping…WOW. I think the topping may have been my favorite part!

I think the most important part about this pie is the crust. In my opinion, a pie is only as good as its crust and by-gosh, by-golly this crust recipe is as good as it gets! It’s simple and takes maybe 10 minutes to make. And it’s sooooo worth it, believe me! So don’t flake out on the crust (I’m so punny)- trust me, you want it with this pie!
To give this pie the ultimate taste test, I decided to make it for my parents last week. Everybody loved it. Loved the filling, loved the crust – it was a hit and I was very satisfied! Even hubby, who doesn’t really like pie loved it – yippee! I hope all the other TWD bakers had as much success with this recipe as I did.
This is where I would normally say, “If you would like the recipe, head over to so-and-so’s blog, yadda yadda…” , but today I get to post the recipe to share with everybody! So, ahem, if you would like the recipe for this delicious, awe-inspiring pie, just SCROLL DOWN, BABY!! 🙂
Banana Cream Pie
-Dorie Greenspan (AKA: The Queen)
For the Custard
2 cups whole milk
6 large egg yolks
1/2 cup (packed) light brown sugar, pressed through a sieve
1/3 cup cornstarch, sifted
1/2 teaspoon ground cinnamon
1/8 teaspoon freshly grated nutmeg
pinch of salt
1 teaspoon pure vanilla extract
3 tablespoons cold, unsalted butter, cut into bits
3 ripe but firm bananas
1 9-inch single crust made with Good for Almost Everything Pie Dough, fully baked and cooled
For the Topping
1 cup cold heavy cream
2 tablespoons confectioners’ sugar, sifted
1 teaspoon pure vanilla extract
2 tablespoons sour cream
To Make the Custard: bring milk to a boil. Meanwhile, in a large heavy-bottomed saucepan, whisk the yolks together with the brown sugar, cornstarch, cinnamon, nutmeg and salt until well blended and thick. Whisking without stopping, drizzle in about 1/4 of the hot milk- this will temper, or warm the yolks so they won’t curdle- then, still whisking, add the remainder of the milk in a steady stream. Put the pan over medium heat and, whisking constantly (make sure to get into the edges of the pan), bring the mixture to a boil. Boil, still whisking, for 1 to 2 minutes before removing from heat.
Whisk in the vanilla extract. Let stand for 5 minutes, then whisk in the bits of butter, stirring until they are fully incorporated and the custard is smooth and silky. You can either press a piece of plastic wrap against the surface of the custard to create an airtight seal and refrigerate the custard until cold or, if you want to cool the custard quickly (as I always do) put the bowl into a larger bowl filled with ice cubes and cold water and stir occasionally until the custard is thoroughly chilled, about 20 minutes. (If it’s more convenient, you can refrigerate the custard, tighly covered, for up to 3 days.)
When you are ready to assemble the pie, peel the bananas and cut them on a shallow diagonal into 1/4-inch-thick slices.
Whisk the cold custard vigorously to loosen it, and spread about one quarter of it over the bottom of the piecrust- it will be a thin layer. Top with half of the banana slices. Repeat, adding a thin layer of pastry cream and the remaining bananas, then smooth the rest of the pastry cream over the last layer of bananas.
To Make the Topping: Working with a stand mixer fitted with the whisk attachment or with a hand mixer in a large bowl, beat the cream until it just starts to thicken. Beat in the confectioners’ sugar and vanilla and continue to beat until the cream holds firm peaks. Switch to a rubber spatula and fold in the sour cream.
To Finish: Spoon the whipped cream over the filling and spread it evenly to the edges of the custard. Serve, or refrigerate until needed.
Good for Almost Everything Pie Dough
– makes enough for a 9-inch single crust –
1 1/2 cups all-purpose flour
2 tablespoons sugar
3/4 teaspoon salt
1 1/4 sticks very cold (frozen is fine) unsalted butter, cut into tablespoon-size pieces
2 1/2 tablespoons very cold (frozen is even better) vegetable shortening, cut into 2 pieces
About 1/4 cup ice water
Put the flour, sugar and salt in a food processor fitted with a metal blade; pulse just to combine the ingredients. Drop in the butter and shortening and pulse only until the butter and shortening are cut into the flour. Don’t overdo the mixing—what you’re aiming for is to have pieces the size of fat green peas and others the size of barley. Pulsing the machine on and off, add 3 tablespoons of the water—add a little water and pulse once; add some more water and pulse again; and keep going that way. Then use a few long pulses to get the water into the flour. If after a dozen or so pulses, the dough doesn’t look evenly moistened or form soft curds, pulse in as much of the remaining water, or even a few drops more, to get a dough that will stick together when pinched. If you’ve got big pieces of butter, that’s fine. The dough is ready and should be scraped out of the work bowl and on to a smooth work surface.
Shape the dough into a disk and wrap it. Refrigerate the dough at least 1 hour before rolling. (If the ingredients were very cold and you worked very quickly, you might be able to roll the dough immediately—you’ll know: the dough will be as cold as if it had just come out of the fridge.) The dough can be kept in the refrigerator for up to 5 days or frozen for up to 1 month.
Have a buttered 9-inch pie plate at hand. You can roll the dough out on a floured surface or between sheets of wax paper or plastic wrap or in a rolling slipcover. If you’re working on the counter, turn the dough over frequently and keep the counter floured. If you’ve got time, slide the rolled out dough in the fridge for about 20 minutes to rest up and firm up.
To Fully Bake a Single Crust: Preheat the oven to 400°F. Butter the shiny side of a piece of aluminum foil (or use nonstick foil), fit the foil, buttered side down, tightly against the crust and fill with dried beans or rice or pie weights. Put the pie plate on a baking sheet and bake the crust for 25 minutes. Carefully remove the foil and weights and, if the crust has puffed, press it down with the side of a spoon (or lightly prick the crust). Return the pie to the oven and bake for about 10 minutes more, or until the crust is golden brown. Transfer the pie plate to a rack and cool to room temperature before filling.
I’d like to thank all of the TWD bakers for baking with me this week – and Dorie, for being so friggin’ amazing! I hope everybody enjoyed the pie!
Happy Baking,
Amy

I know I didn’t come up with a dorky play-on-words title this time – it’s kind of hard to do that with some recipes. I mean, can you think of anything cutesy and catchy for coconut butter thins??? I really can’t…plus, it’s been one heck of a week and to be perfectly honest, I’m tired of thinking. So if it’s alright with you, I’ll just go with the obvious, no-thinking-required post title. Thank you.
This week, Jayne of The Barefoot Kitchen Witch chose Coconut Butter Thins. These are a really thin, crunchy, almost lacy-like cookie with bits of coconut and macadamia nuts and a little lime zest. The recipe also calls for a pinch of Coriander, but I decided to walk on the wild side and try a little curry powder in mine – very odd, yes, but it worked! Mine were also pretty salty (which I LOVED) because I used coarse sea salt- yum! These go into the oven as perfect little shortbread-looking squares, but they spread a little during baking, and come out more flattened and crisp. A nice surprise! You can really taste the lime zest, and surprisingly, you sort of forget that coconut is even in there! I couldn’t even taste it! I think these would be great as a late night snack with a cup of hot tea – they’re so dainty and crisp.
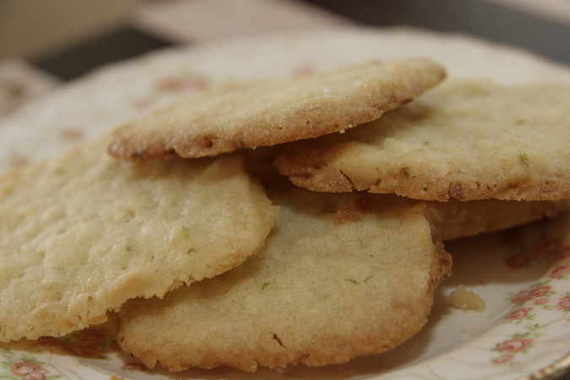
If you would like the recipe, head over to Jayne’s blog . And BE SURE to check my blog out next Tuesday because it’s MY TURN to pick the TWD recipe!!! I’m so stinking excited! Banana Cream Pie chosen by yours truly comin’ your way next week!!! Don’t miss it!
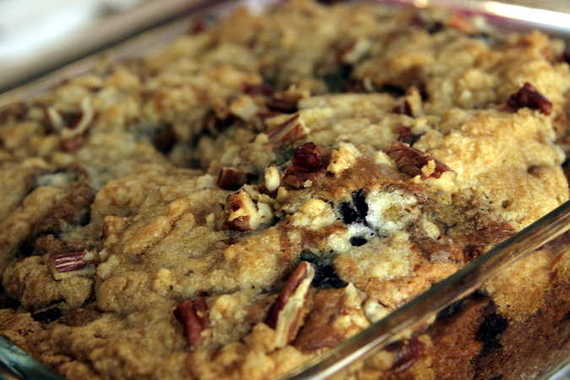
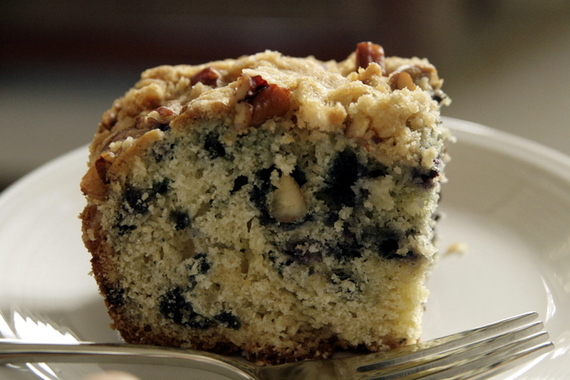
This week’s TWD recipe was Blueberry Crumb Cake, chosen by Sihan of Befuddlement. I was really excited when I saw this week’s choice – I’ve been eyeing this cake for a while now, plus, I have a delicious-smelling “Blueberry Scone” Yankee Candle that makes me crave any kind of blueberry baked goods whenever I burn it. I try not to burn it when I know I’m having company because I don’t want someone to walk into my house thinking I’ve made them some sort of yummy blueberry treat, when I really haven’t. But this weekend worked out perfectly because I was having company and got to burn my yummy-smelling candle because I was indeed baking a blueberry treat for them! Yippee!
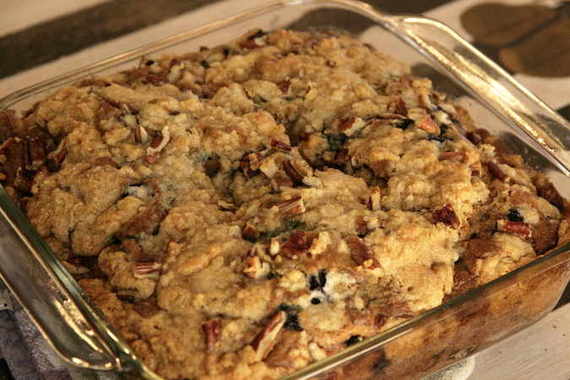
I had the most beautiful frozen blueberries for this cake – usually anytime I buy any kind of frozen berries, they’re all clumped together and sort of squished and not all together great-looking. But these blueberries were just perfect. Unfortunately, they didn’t have much flavor….at all. The lemon zest helped some, but not much – in fact, I couldn’t really even taste blueberries. Sad, yes, but it was still really tasty. The crumb topping is really the star of this cake – it’s buttery, slightly crunchy and sweet – I loved it! I can’t wait to try this recipe again, but with fresh blueberries or maybe some raspberries or blackberries. I give it two thumbs up!
If you want the recipe, head over to Sihan’s blog. This is a great cake and tastes best in the morning with your coffee (at least in my opinion!) – give it a try this week!
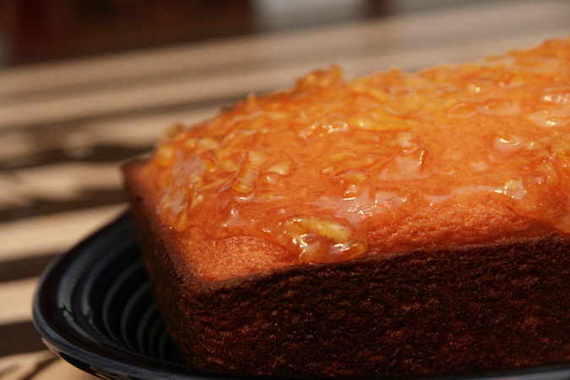
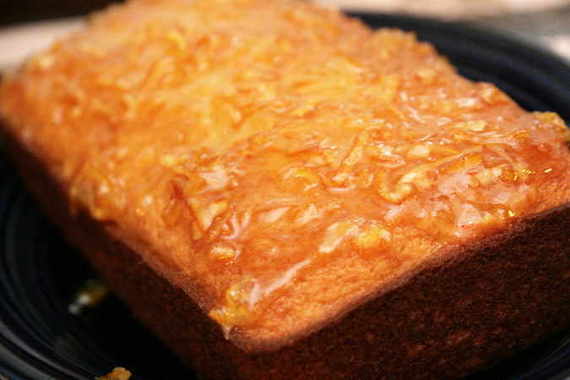
According to Dorie, this cake is as French as it gets. Apparently over in Paris, no person’s cooking repertoire is complete without this type of cake. Personally, I love the idea of baking something that is a favorite in people’s homes from another country and culture – it makes me feel special in a way. This French Yogurt Cake with Marmalade Glaze was chosen by Liliana of My Cookbook Addiction. It’s basically a lighter pound cake flavored with fresh lemon zest and topped with a lemon marmalade. Unfortunately, none of my grocery stores carry lemon marmalade, so I had to use orange. Boo. This was my first time using orange marmalade and I have quickly come to the conclusion that I don’t like it. The cake was still really good, but I just sort of scraped off the marmalade topping – bummer, because that’s probably supposed to be the best part. Honestly, this cake reminded me a whole lot of my most favoritest lemon cake – Ina’s Lemon Yogurt Cake, (but not near as good, in my opinion). I’m still really glad I tried this – I’ve been looking forward to this recipe for a long time now! I think next time I’ll try topping it with a little lemon curd…mmm, lemon curd.…..
If you want to feel really authentic and French-like, go over to Liliana’s blog and get the recipe for this cake! Perfect for Springtime!

Oops, how’d that get there?! Oh well…Izzy wishes everybody a happy St. Patrick’s Day!!
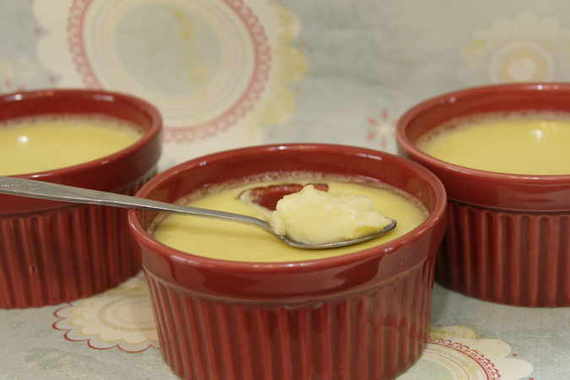
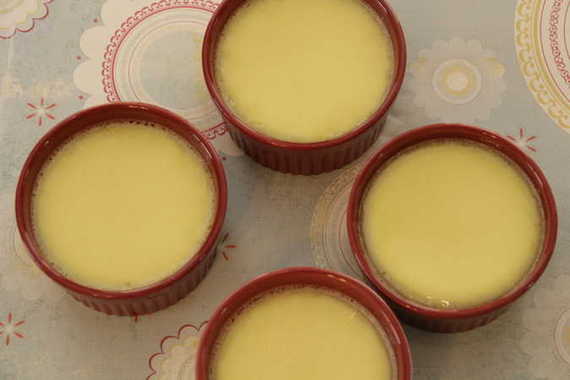
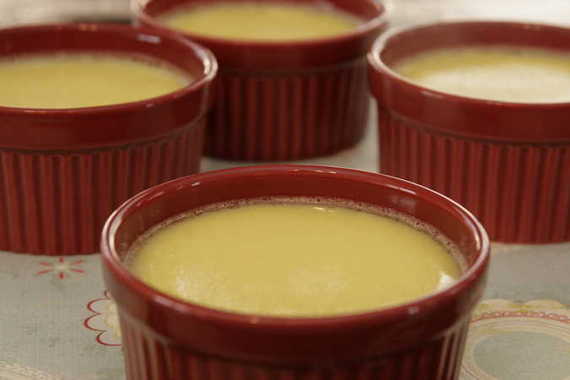
Here in Texas, the weather is about 70 degrees on average, the Bradford Pear trees are blooming again and absolutely gorgeous, people are out flying kites, walking their dogs and playing frisbee (Seriously. I live in Mayberry.) and there are mounds of beautiful, fresh lemons in my kitchen – that means Spring is finally here. Usually, I’m a winter kind of person – I love to bundle up in blankets with my hot cocoa and my hubby in front of a fire and just relax. But this winter was a little less-than-cozy…our heater sucks, so we were freezing cold from November through February. These past few days have been the first that I’ve been warm in a few months. Sad, I know. So naturally, now that the weather has warmed up, I’ve been wearing shorts and of course, making all kinds of lemon desserts. That’s where these custards come in.

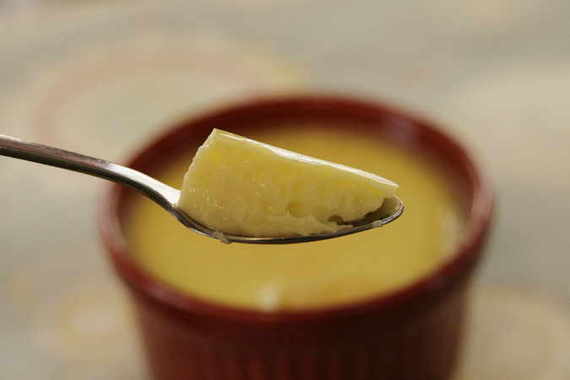
Bridget of The Way The Cookie Crumbles chose this weeks’ TWD recipe – Lemon Cup Custards. I was beyond excited when I saw her choice – I love lemon and I love custard. However, these were a little too “eggy” for me….Dorie even said herself that this is a very eggy dessert and those of us who aren’t big fans of desserts like this might want to skip this week. Honestly, I thought I was going to love these and its a crying shame I didn’t. I love flan, and I thought these would be similar, but really they weren’t, in my opinion. Too bad, but I’m really glad I made them and got to try them.
Even though I didn’t care much for this recipe, it was still a delight to be using lemons again. I absolutely love the scent of fresh lemon zest – it makes the whole kitchen smell so fresh and “springy”. Now I’m dying to make this lemon cake again! I guess it’s a good thing that next week’s TWD pick is a French Yogurt Cake with lemon marmalade – can’t wait for that one!
Don’t let my opinion of these custards scare you – if you’re a fan of custard and lemon, you might love this! It’s worth a try, anyway! Head over to Bridget’s blog and get the recipe – its really easy and only uses 4 ingredients.

Now get out there and enjoy Spring! Plant some flowers, take your dog on a long walk, sit outside at night with your hubby and enjoy a bottle of wine, or bake something with lemon – that’s the best way to enjoy the weather! Gosh, I sound like a big, stinking hippy, don’t I? Oh well…guess I should embrace it…“If you’re goinggggg to Saaaan Fraaaancisco…be sure to weeeear some flowers in your haaaaaaair….” Um…sorry. Don’t know exactly where that came from.
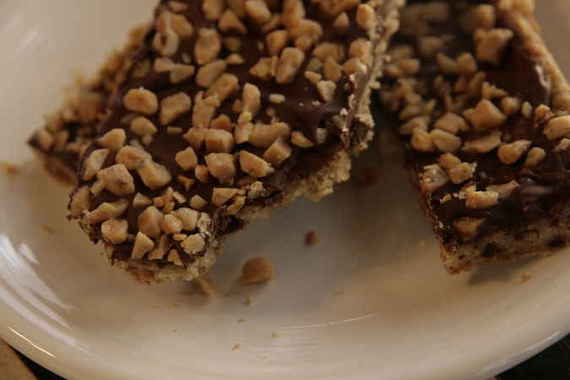
I CAME THIS CLOSE TO NOT MAKING THESE!!! What an awesome dessert I would’ve missed out on…when I think about it, it makes me shudder! As you see below, we adopted a dog this weekend, so baking wasn’t really on the top of my “to-do” list. Luckily, at the last minute I decided not to be a pansy and just get in the kitchen and bake! Boy am I glad I did!
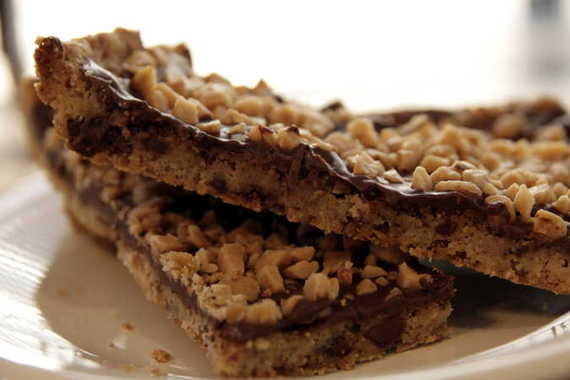
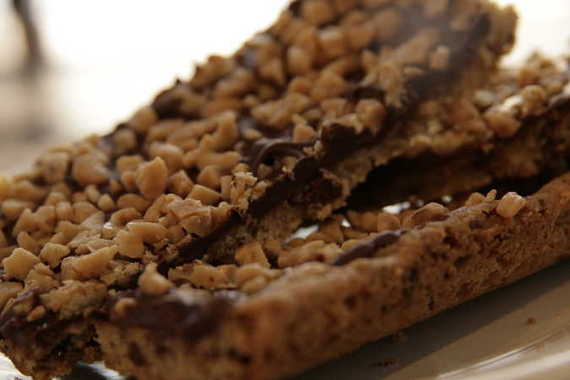
I mean, look at these babies! Chock full of butter, chocolate, brown sugar and FAT. I ask you: does it get any better??? Well does it?! I think not, readers….I think not. In fact, these were so good, I didn’t send the leftovers to work with hubby the next day….that’s big.
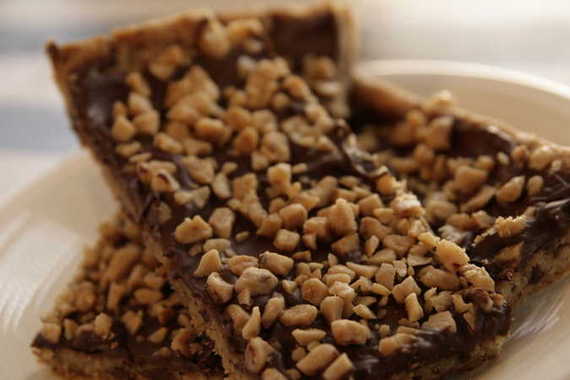
Now that I’ve got your interest peaked (or have I? Probably not, but I’ll pretend I’m that entertaining…) I’ll tell you what these beauties are! Caramel Crunch Bars, chosen by Whitney of What’s Left On the Table?. A layer of shortbread with espresso crystals, chocolate, and a touch of cinnamon, topped with melted bittersweet chocolate and little toffee bits. Um…yum.
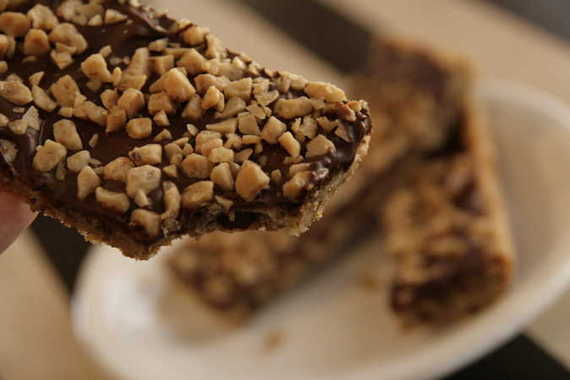
I made the mistake of only making half of a batch of these….and just let me tell you, I came pretty darn close to making a second batch today! I guess restraint is a good thing….. These were super duper easy – 30 minutes to make! Perfect for an afterschool treat (for those of you who have kids) or for a quick dessert. I’m telling you; give these a try! You won’t be sorry! Go check out Whitney’s blog for the recipe and make these this week!!!

Well, I hope everybody had a really nice Valentine’s Day! I know I did – hubby sent me these beautiful tulips (my favorite flower) and took me to the museum – it was a great day…except the part where hubby started choking on the cheese fondue that I screwed up in the first place thus scaring the crap out of me and really grossing me out to the point of not being able to finish my meal which made us both go into hysterics from laughing so much yet still kinda grossed out so we thought we’d just open the second bottle of champagne and try to forget everything….yeah, except for that. Good times. Note to self: next time you’re making cheese fondue, try not to double the amount of cheese you’re supposed to put in. Oops.

So anyway, let’s move on to this cake – the Devil’s Food White Out Cake, chosen by Stephanie of Confessions of a City Eater. This is the gorgeous black and white cake on the cover of Dorie’s book, Baking From My Home To Yours. The cake itself was totally easy to make – it took no time. It sort of reminded me more of a brownie or the Chocolate-Chocolate Cupcakes we made back in October than a normal chocolate cake – it was definitely rich and chocolatey. The icing is what sort of scared me, though – it’s a fluffy, marshmallowy icing, and it starts with a simple syrup that has to reach a specific temperature before being added to egg whites, which eventually all gets whipped up together. You have to use a candy thermometer. I don’t have a candy thermometer and didn’t really feel like buying one…so I used a meat thermometer and a prayer. Thank the good Lord (and my meat thermometer) it worked! I know – it’s sort of a “back-woods” way of doing things (“you might be a redneck if…”), but hey, it worked didn’t it? Don’t judge.

Personally, I’m not a big fan of this icing -it’s just a wee bit too sweet, if you ask me. Give me buttercream or cream cheese anyday! However, it still made for a very delicate, pretty cake – I enjoyed taking pictures of this. You’re supposed to slice the two layers of cakes into four and crumble the fourth layer to top your cake with – but somehow my layers ended up pretty scrawny, so I just sliced a tiny bit off of one layer and made do with only a few crumbs. So normally, this would be a tall, fluffy looking cake…..just use your imagination, hm?

I think this would be a perfect birthday cake for a kid – it’s really chocolatey and way too sweet….that’s what they like, right? That’s what I liked, anyway.

If you want the recipe for this cake – head on over to Stephanie’s blog. She’s got lots of other great stuff on there, too!

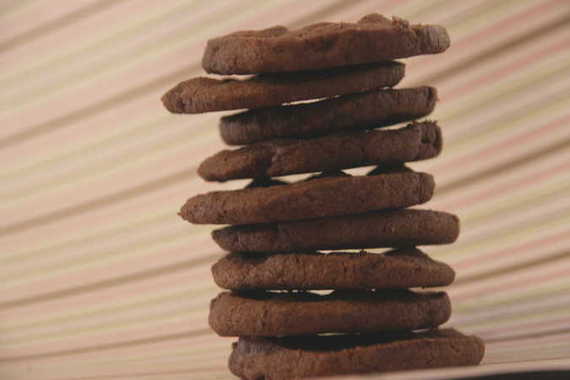
Aaaaaaand, one more picture…..then I’ll go. I swear.

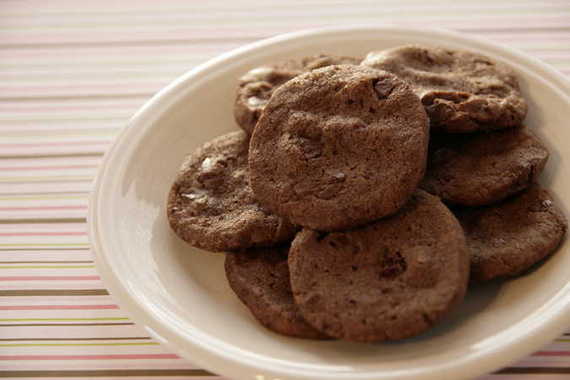
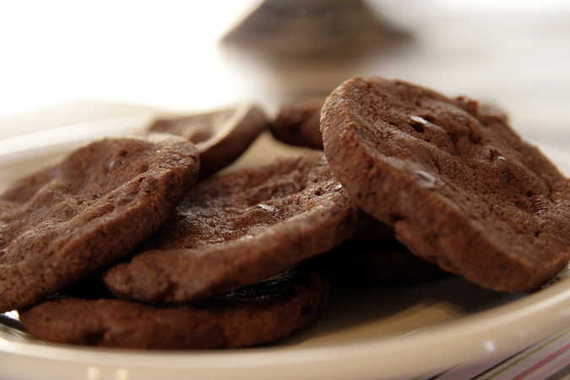
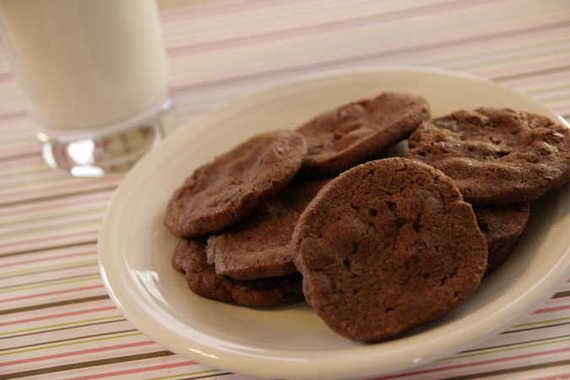
Those of you who have been reading my blog since the beginning know that these cookies have already been featured – shortly before I started Sing For Your Supper, I bought Dorie Greenspan’s Baking From My Home To Yours, and decided that I would make her World Peace Cookies right off. That was the first recipe of Dorie’s I ever made – and the rest, as you know, is history. Well that was almost a year ago, and I’ve been dying to make these amazing cookies again – thankfully Jessica of Cookbook Habit chose them for this week’s TWD recipe! Yay Jessica!!
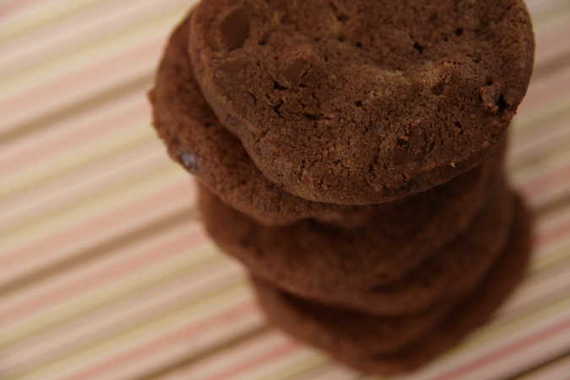
These cookies rock for two reasons: 1.) they’re light and crisp – I usually don’t like crunchy cookies, but these are just too good to resist; and 2.) they’re SALTY. The sea salt mixed with the dark chocolate just gives these babies something extra special. A girl could really lose herself in these cookies….
So you’re probably asking yourself, “why did she go to all the trouble of taking new pictures when all she had to do was use the same pictures as last time?” Oh – you’re not asking yourself that? Ah. Well just pretend you are…. The answer is because the pictures I took last time sucked. They were not TWD-worthy. Plus, I love taking pictures of my food!
Ok, so I already have the recipe for these posted on my blog from the last time I made these cookies, but for routine’s sake, I’ll inform you that you can get the recipe from Jessica’s blog if you want it. These really are awesome cookies – I suggest you give them a try; especially if you’re one of those people who love the combination of salty and sweet! YUM!