A few months before our wedding (golly, that was over three years ago!!) my sister gave me a very special cookbook. She worked really hard collecting her favorite recipes, gathering pictures and getting everything organized and put together in a cute little book. I happened to think this was the coolest present ever since I had no idea how to cook, really- and had hardly any recipes of my own. But thanks to my big sister, I now had a nifty book full of tried-and-true recipes that were simple and no-fail. To this day, out of all the volumes of cookbooks I own (and trust me, there are quite a few!), I still turn to my homemade collection of Lindsay’s recipes whenever I need a good, comforting meal. Some of my favorites include Fiesta Soup, Chicken Parmesan and the recipe I’m posting today – Cheesy Chicken Chowder.

This one can’t be beat- it’s as simple as can be, yet totally delicious. Perfect for these cold evenings we’ve been having lately (love it!), and it makes enough for you to get at least two meals out of it. I love the chunks of potatoes and chicken, with the richness and creaminess that feels like it should be way more fattening than it really is (the most fattening part is the cheese melted in it)! This is one of those soups that always gets made every year as soon as the weather gets cooler – it’s comforting, filling and down-right delicious!

Cheesy Chicken Chowder
4 cups chicken broth
1 1/2 cups diced potatoes
1 cup diced celery
1 cup diced carrots
1/2 cup diced onions
1/4 cup butter
1/3 cup all-purpose flour
3 cups milk
1 tbsp soy sauce
1 teaspoon black pepper
8 oz Velveeta cheese, cubed (1 loaf)
2 cups chopped cooked chicken
Combine the broth and the vegetables in a large sauce pan. Cover and cook over medium heat for 15 minutes or until the vegetables are tender.
Melt the butter in a Dutch oven over low heat. Add the flour, whisking until smooth. Cook for 1 minute, stirring constantly. Gradually stir in the milk and cook over medium heat, stirring constantly, until thickened and bubbly. Gradually stir in the vegetable mixture, soy sauce, cheese and chicken. Cook until the cheese melts and the soup is thoroughly heated.

We really like making pizza at home – it seems to taste so much better when you can put exactly what you want on it, exactly how you want it. Normally we like fresh tomatoes, mushrooms, lots of cheese (duh!), and sometimes black olives and green olives. Mmmm… But recently I saw this pizza on a fellow foodie’s blog-Taste of Home Cooking– and although it’s not something I’d normally make, it looked totally and completely delicious (in an odd, intriguing sort of way..).

(Please forgive my dark pictures – it’s getting to be that time of year where my pictures start to suck thanks to lack of sunlight…).
Buffalo Chicken Pizza – I know, it sounds really weird and maybe a little bit gross, but trust me…it’s gooood. I totally loved the combination of flavors – the spicy, tangy buffalo chicken with the sharpness of the blue cheese and a little hint of onion flavor from the scallions. I was so glad we gave this pizza a chance; it was really tasty and perfect Friday night/movie watching food! Do yourself a favor and at least give it a try…you’ll probably be really pleasantly surprised!
Buffalo Chicken Pizza
-seen on Taste of Home Cooking
Pizza dough
1lb chicken breasts, cut into small cubes*
1/2 cup Frank’s hot sauce
1 tablespoon butter
2-3 scallions, chopped on a bias
Blue cheese crumbles
Mozzarella cheese, shredded
Preheat the oven to 425 degrees. Put the Frank’s and butter in a small saucepan. Add the chicken and heat over medium until the chicken is cooked through, about 5 minutes.
Roll out the dough and place on a pizza pan or sheet pan. Top with a little mozzarella cheese. Add the blue cheese, spread into a thin layer. Scatter a few scallions on top. Using a slotted spoon add the chicken, being careful not to put on too much of the Frank’s (it will get soggy/greasy). Add just a few dashes of the Frank’s here and there on the pizza, then top with more mozzarella cheese and the remaining scallions.
Bake the pizza for 20-30 minutes, or until the crust is golden brown and cheese is bubbly.
*I chose to boil my chicken first, shred it, then toss it with the melted butter/Frank’s mixture.

I have a tendency to jump the gun sometimes…my husband would tell you I start listening to Christmas music entirely too early (which I think is debatable), I always buy Spring flowers and potted plants when it’s still too chilly out, and I start cooking/baking with pumpkin, apples and butternut squash when it’s still 90 degrees. It’s just that I get excited about seasons! It happens every year (especially when Fall comes around!) and this year is no exception.

I’ve had this recipe saved for about a year now. I copied it out of my mother’s Southern Living magazine last Fall and somehow just now got around to making it. Chicken and Corn Pie with Cornbread Topping…mmm, now doesn’t that sound yummy?? And it was, too – really yummy, actually! But after making it, I realized (ok, ok, so I pretty much knew all along…) that it really is a dish that is better served when it’s chilly or cold outside – however, I just couldn’t wait that long! I’m ready for Fall now! The filling is more like a thick stew (which I love!) and the cornbread topping is really cheesy and yummy- and the great thing is, it’s really versatile- you could put in ground beef, or another kind of vegetable…lots of possibilities! I think this would be a perfect dish for watching a football game when it’s nice and chilly outside! In fact, I’ll probably serve this again when the hubby and I are at home watching the Fightin’ Texas Aggies one saturday!

Chicken and Corn Pie with Cornbread Topping
-Southern Living Magazine, October 2008
1 (10-oz.) can enchilada sauce
1 (10-oz.) can Rotel Tomatoes
2 cups frozen whole kernel corn
1 teaspoon chili powder
3 cups chopped cooked chicken (2- 12.5-oz. cans chicken, drained, may be substituted)
1 (6-oz.) package Mexican-style cornbread mix
2/3 cup milk
1 large egg
2 tablespoons vegetable oil
1 cup (4 oz.) shredded Mexican four-cheese blend, divided
Preheat oven to 375°. Stir together enchilada sauce and next 3 ingredients in a 3 1/2-qt. saucepan over medium heat until combined; cook, stirring occasionally, 10 minutes. Stir in chicken.
Whisk together cornbread mix, next 3 ingredients, and 3/4 cup cheese in a small bowl just until blended.
Pour chicken mixture into a lightly greased 11×7 inch baking dish. Spoon cornbread mixture over hot chicken mixture. Sprinkle evenly with remaining 1/4 cup cheese.
Bake at 375° for 30 minutes or until golden and bubbly. Serve with sour cream and jalapeno peppers if desired.
No Tuesdays with Dorie this week….honestly, I just didn’t get a chance to make it. Ooops.
BUT – here is a scrumdiddlyumptious pasta dish instead!
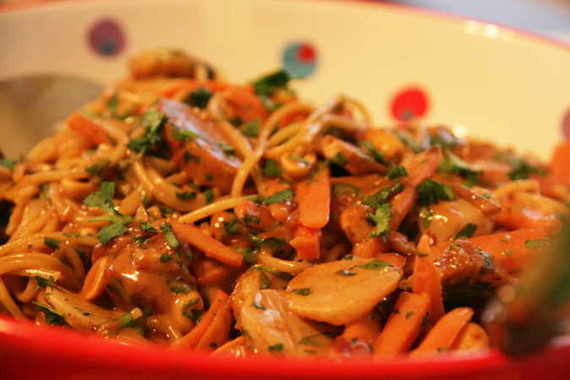
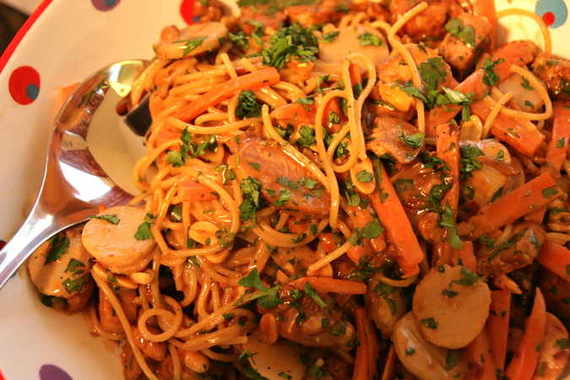
We used to go to the Cheesecake Factory a lot and my absolute favorite dish to order was the Thai Chicken Pasta. I’ve made it at home a few times, but I used a bottled peanut sauce, which was pretty good, but I wanted to make a homemade sauce this time. I started just throwing in things that I thought would work together and ended up with a great peanut sauce. I don’t mean to toot my own horn, but this was one fantastic pasta (toot, toot!).
Thai Chicken Pasta
For the Peanut Sauce:
1 cup smooth peanut butter
1/4 cup soy sauce
3 teaspoons chili paste
2 tablespoons brown sugar
2 limes, juiced
1/2 cup hot water
1 clove of garlic, minced
1 teaspoon rice vinegar
1 teaspoon ground ginger
1/2 teaspoon sesame oil
For the Pasta:
1/2 a pound thin spaghetti, fully cooked and drained
2 boneless, skinless chicken breast, fully cooked and sliced diagonally (I like to roast mine with olive oil, salt and pepper)
2 carrots, julienned
1 small can water chestnuts, drained
handful chopped peanuts, for garnish
bunch cilantro, chopped
To make the sauce, put all ingredients in a small bowl and mix until well combined. Store in the refrigerator until needed.
Blanch the carrots in boiling water for about 3 minutes, pulling them out while they’re still bright and crisp. Place in a large bowl with the cooked pasta, sliced chicken, water chestnuts, and cilantro. Pour the sauce over the pasta and toss to coat; top with more cilantro and chopped peanuts. Serve and enjoy!
Give this a try soon – you’ll love it!
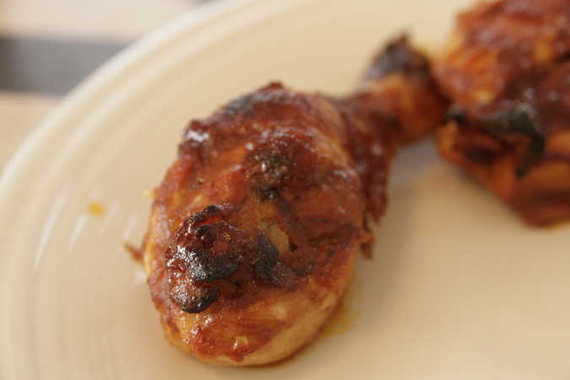
I guess you could eat barbecued chicken in the Fall or Winter, but I personally don’t want to. I want it in the summertime. I like to sit outside in a shady spot, eating barbecued chicken legs, deviled eggs and baked beans; getting sauce all over my face and under my fingernails. Oh yeah…that’s good. Last week, I decided I’d gone long enough without trying a homemade barbecue sauce. And I thought Ina Garten’s was the best place to start.
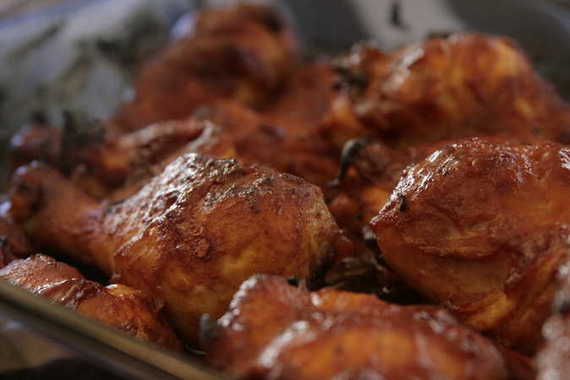
It was surprisingly really easy to make! It was delicious, but I think next time, I’ll add a little less mustard, as this was a little too “mustardy” for me. I loved that it used hoisin sauce, though – that really gave it a great flavor. Hubby and I both really enjoyed this. And the great thing is, I have tons of sauce left over, so I’ll be using it for weeks and weeks!
Barbecue Sauce
The Barefoot Contessa
1 1/2 cups chopped yellow onion (1 large onion)
1 tablespoon minced garlic (3 cloves) (I only used 1 large clove)
1/2 cup vegetable oil
1 cup tomato paste (10 ounces)
1 cup cider vinegar
1 cup honey
1/2 cup Worcestershire sauce
1 cup Dijon mustard
1/2 cup soy sauce
1 cup hoisin sauce
2 tablespoons chili powder
1 tablespoon ground cumin
1/2 tablespoon crushed red pepper flakes
*I also added a few dashes of liquid smoke, 1/2 cup of brown sugar and lots of black pepper
In a large saucepan on low heat, saute the onions and garlic with the vegetable oil for 10 to 15 minutes, until the onions are translucent but not browned. Add the tomato paste, vinegar, honey, Worcestershire sauce, mustard, soy sauce, hoisin sauce, chili powder, cumin, and red pepper flakes. Simmer uncovered on low heat for 30 minutes. Use immediately or store in the refrigerator.
I marinated the chicken in some of the barbecue sauce for 3 hours, then baked it in a 400 degree oven, covered with foil for about 40 minutes; I took the foil off, brushed on some more sauce, then baked uncovered, for about 10 or 15 minutes more. This goes great with some baked beans and deviled eggs (posted below). Enjoy your weekend!!
No, I don’t mean “Greek Week” as in all that sorority/fraternity college stuff – I mean it literally. A couple of weeks back, it really was a pretty “Greek” week – I cooked lots of Greek-style food and also received a bunch of Greek yogurt from Stoneyfield to use however I wanted. Fun! I’ll start with the meal:
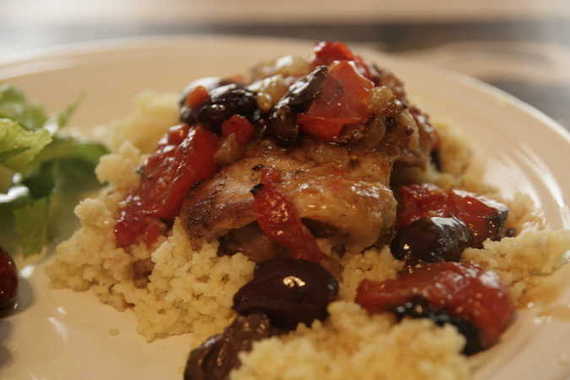
I really love Greek food – really really love it. Only thing is, I never really make it. Finally, I saw a couple of great-looking recipes on my favorite food blog, For The Love of Cooking. She had a recipe for Greek Chicken Thighs (pictured above) and Greek Salad – perfect! So I set out to make my own little Greek feast. Both of these recipes were super easy and took no time to make. I think this was one of Hubby’s favorite meals I’ve ever made – he loved the combination of flavors. The chicken thighs were awesome, but my favorite was the salad – I’ll definitely be making that one over and over again – in my opinion, it tasted better than a restaurant’s!
Greek Chicken Thighs
-For the Love of Cooking
2 tsp olive oil, divided
1-2 shallots, sliced into thin rings
1 clove of garlic, minced
6 boneless/skinless chicken thighs, trimmed of any fat
Sea salt and fresh cracked pepper, to taste
Garlic powder, to taste
Dried oregano, to taste
Handful of grape tomatoes
Small handful of kalamata olives, sliced in half
1/2-1 lemon juiced
Zest of one lemon
2 tbsp fresh parsley, chopped (divided)
2 tbsp low fat feta cheese
*I also chopped up some roasted red peppers and threw them in – it was great!
Preheat the oven to 425 degrees. Heat 1/2 tsp of olive oil in an OVEN SAFE skillet over medium heat. Once hot, add the shallot and cook, stirring frequently until soft and tender (about 2 minutes), add garlic and cook for an additional 45 seconds, stirring constantly. Remove from the pan and set aside.
Add the remaining olive oil to the same skillet and turn the heat up to medium high heat. Season the chicken thighs with salt, pepper, garlic powder and oregano to taste on each side. Once the pan is very hot, add the seasoned chicken breast to the skillet. Cook for 2-3 minutes, until the chicken is golden brown on one side, flip the chicken and add the grape tomatoes, kalamata olives, shallot and garlic mixture, lemon zest, lemon juice and half the parsley then season with sea salt and black pepper to taste. Place in the oven and roast for 9-10 minutes or until the chicken is cooked through. Remove from oven and sprinkle with the remaining parsley and the feta cheese. *I served mine over Couscous, but rice or pasta would be great too.

Greek Salad
-For the Love of Cooking
For the Salad:
Romaine lettuce, chopped
Kalamata olives
Grape tomatoes
Cucumber, seeded and chopped
Feta cheese
Sea salt and fresh cracked pepper, to taste
For the Lemon Garlic Dressing:
6 tablespoons olive oil
Juice of 1/2 of a lemon
1-2 garlic cloves, minced (I used a microplane to grate mine in)
2 tsp red wine vinegar
Sea salt and fresh cracked black pepper, to taste
1/4 tsp dried oregano
Whisk all ingredients together until thoroughly combined. Taste and re-season if needed. Toss the salad with the dressing and serve.

And now for the yogurt! A few weeks back, a representative of Stoneyfield Farm asked if I would be interested in trying their new Greek yogurt cups….heck yeah, I would! I had actually never tried Greek yogurt, so I was super excited to try this. The verdict: Ohmygawh amazing! Greek yogurt is my new favorite!! It’s so thick and creamy…YUM! And I especially liked the flavored ones – they had blueberry, honey and vanilla. The honey was by far my favorite- the honey is at the bottom and you stir it in….so freaking good! (And I promise I’m not just saying that for the Stoneyfield people…these really were amazing). I don’t know if I was supposed to cook something with the yogurt or just eat it. Hopefully just eat it, because that’s what I did – they were so good by themselves, I didn’t want to use them to cook with. I’m selfish like that, I guess….

And that pretty much brings us to the end of my Greek Week…give the chicken thighs and salad a try – you definitely won’t be sorry!! Hope everyone has a happy Memorial Day on Monday – enjoy your weekend!
What’s for dinner this weekend? Need a good meal idea? Here’s all you’re gonna need: chicken, barbeque sauce, onions, cheese and tortillas. Have this stuff in your fridge? Good – now, do your husband (or wife…there might a few fellas reading) a big favor and make the following recipe.
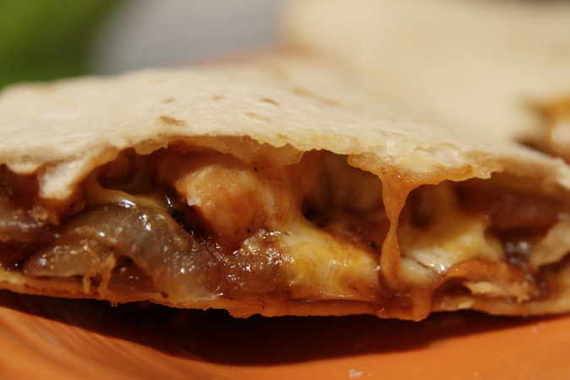
Texas Chicken Quesadillas. Miiiiiiighty tasty, in my opinion. Honestly, I don’t really know what makes these “Texan” – I guess the BBQ sauce; everybody knows we Texans slather it on everything we eat…right?? Um, no, not really. But whatever – let’s just go with it for now. This recipe has been really making the rounds in the food blogosphere – and every single foodie that’s made it has just raved about it. So I thought it was about time for me to give it a whirl. I’ll just come right out and say it – these are delicious. Melt in your mouth, cheesy, gooey, spicy, sweet…DELICIOUS. I don’t even like onions, but their so nice and carmelized, they take on a new, sweet flavor that I really dig…..really, really. And drizzled with a little homemade ranch dressing, these babies are pretty hard to beat! So, if you had any doubts about your Friday or Saturday night dinner – doubt no more. Make these quesadillas. Your hard-workin’ man (or lady) will thank you – trust me.
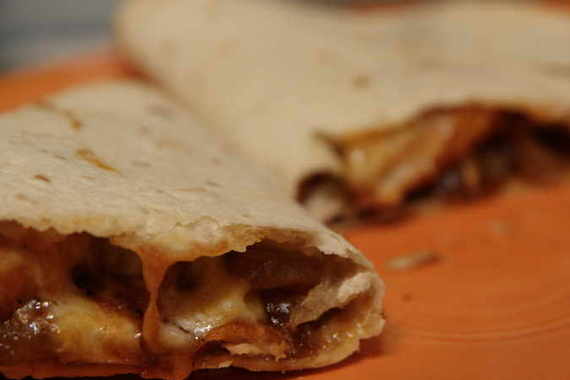
Texas Chicken Quesadillas
-Allrecipes.com
2 TBSP of oil
1-1/2 onions sliced into rings
1 TBSP honey
2 chicken breasts, diced
1/2 cup BBQ sauce
1 Cup shredded Mexican cheese
8 ten inch flour tortillas
Heat one tablespoon of the oil in a pan over medium high heat. Add the onions and cook until they begin to caramelize. Mix in the honey and stir until it is golden brown. Remove and set aside. Place the remaining oil in the pan and add the chicken. Cook through over a medium high heat. Stir in the BBQ sauce to evenly coat the chicken. Place the chicken, onions and cheese onto a tortilla, top with the other tortilla and cook in your quesadilla maker about 5 minutes. Alternatively, you can cook them in the oven at 350 degrees for 20 minutes. ENJOY!
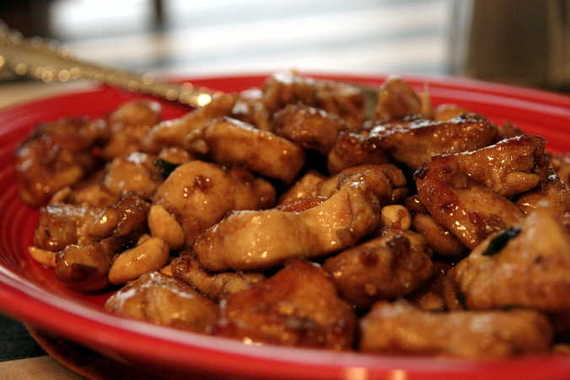
Big news everybody – BIG news! Last night, I had my first experience with cooking Chinese/Asian food!!! That deserves a big ‘ol freaking cookie! I know that sounds ridiculous, but for whatever reason, I’ve just never gotten around to cooking Chinese food – we usually just head over to Pei Wei or the local take-out place. But now that I’ve discovered these dishes, I think there will be a lot more Chinese food in the future! Yippee!
I’ve got a few of these type of recipes saved, but I chose this Kung Pao Chicken I saw on Pennies on a Platter recently because it has peanuts and I loooooove peanuts! It was super easy and took no time to put together. I paired it with a quick and easy recipe for Fried Rice that I found on Allrecipes.com. And voila! The perfect meal!
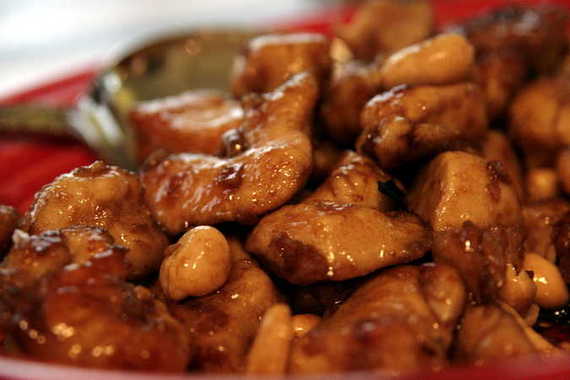
The sauce for this chicken was delicious and simple, and of course I loved the crunch of the peanuts. I think next time I’ll add a little more heat – maybe a little Cayenne pepper or a chopped chili- a little more “PAO”! Hehe…
Kung Pao Chicken
-Blog Chef
1lb boneless, skinless chicken breasts (cut into 1” pieces)
1 tablespoon cornstarch
2 teaspoons sesame oil
3 tablespoons green onions (chopped)
3 garlic cloves (minced)
½ teaspoon crushed red pepper flakes
½ teaspoon ground ginger
2 tablespoons rice wine vinegar
2 tablespoons soy sauce
2 teaspoons sugar
1/3 cup dry roasted peanuts
Combine chicken and cornstarch in a small bowl and toss to coat. Heat sesame oil in wok (or large deep-dish skillet) over medium heat, add chicken and stir fry 5-7 minutes or until no longer pink inside. Remove chicken from wok.
Add green onions, garlic, red pepper flakes and ginger to the wok and stir fry for 15 seconds.
Combine vinegar, soy sauce and sugar in a small bowl. Mix well and add the sauce to the wok.
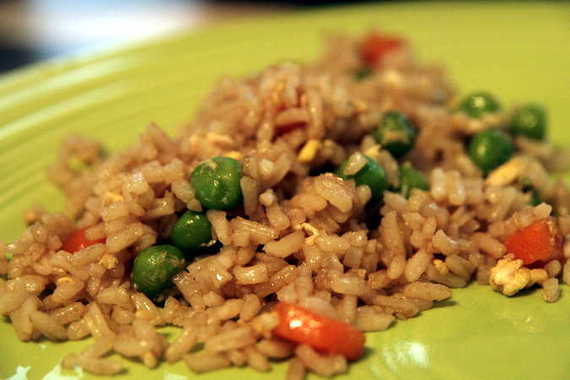
Return chicken to the wok and coat with sauce. Stir in roasted peanuts. Heat thoroughly. Top with additional green onions if desired and serve over white rice. (Or fried rice, in my case!)
The fried rice took about 10 minutes total – I love recipes like this! I think next time I’ll add a little oyster sauce and a tad more soy sauce – other than that, it was perfect!
Fried Rice
-Allrecipes.com
2 cups enriched white rice (I used Minute Rice)
4 cups water
2/3 cup chopped baby carrots
1/2 cup frozen green peas
2 tablespoons vegetable oil
2 eggs
soy sauce to taste
sesame oil, to taste
Cook rice according to package directions. In a small saucepan, boil carrots in water about 3 to 5 minutes. Drop peas into boiling water, and drain. Heat wok over high heat. Pour in oil, then stir in carrots and peas; cook about 30 seconds. Crack in eggs, stirring quickly to scramble eggs with vegetables. Stir in cooked rice. Shake in soy sauce, and toss rice to coat. Drizzle with sesame oil, and toss again.

First of all, let me state, for the record that I do not consider this dish to be “authentic” or “homestyle” in any way. Although these are very delicious and have that slow-cooked taste, I do not count them as real chicken and dumplings. (There, Nana – that’s for you)
I found this recipe on one of my favorite food blogs – The Bitten Word and knew I wanted to try it. But first let me tell you – REAL, honest-to-goodness chicken and dumplings (or chicken-n-dumplins, as it is pronounced down here) are something I don’t cook. I won’t. I have no desire to. Because no matter how hard I try, or how delicious they may turn out to be, they’ll never be half as good as my Nana’s. That’s a recipe you just don’t mess with – it’s been around for…forever. All my grandmother has to do is pick up the phone to any one of us, be it my parents, my sister’s family, my family or my uncle’s family, and say, “I’m making chicken-n-dumplins..” and we’re THERE. Hubby and I live an hour away from Nana and Grandaddy, but we’ll gladly make the drive on any given day, in a moment’s notice for her chicken and dumplings.
So with that being said, I’ll go on with this recipe. These are what I like to think of as “Yankee” chicken and dumplings (no disrespect to you northerners out there), because they have carrots, onion, celery and white wine. The ultimate recipe (i.e. Nana’s) are made with just chicken, broth and dumplings. Also – they’re not “real” because the dumpling part is made with frozen biscuits, instead of a homemade dough. But, sometimes you need just such a recipe for nights when you want that home-cooked taste without standing over the stove for hours and hours. And these are PERFECT for that.

After making these – I’d have to say that they’re some of the best chicken and dumplings I’ve ever had. Hubby couldn’t say enough good things about them – he went on and on about how amazing they were. And the whole meal (minus the time it took to cook my chicken all day in the crockpot) took about 20 minutes to make!! You can’t beat that! I added some cornstarch to make it extra thick and creamy and a little butter – because Nana told me to – and it really added to the richness and creaminess. I cooked 1 pound of boneless, skinless chicken thighs for about 4 hours on high in my crockpot and they were so tender and moist. The only seasonings I used were salt and pepper – and lots of it. That’s all you need.
Easy Homemade Chicken and Dumplings
-The Bitten Word
1/4 cup olive oil
4 chicken thighs, bone in (or 4 bone-in or boneless chicken breasts)
2 medium onions, diced
2 cups diced carrots
2 cups diced celery
1 cup dry white wine
1/2 tablespoon salt (plus more to taste)
1/2 tablespoon fresh ground pepper (plus more to taste)
6 cups chicken stock
4 frozen biscuits (such as Pillsbury Grands Frozen Biscuits), thawed enough to cut into pieces
Pat the chicken dry and season with salt and pepper. Heat half of the olive oil (1/8 cup) in a large pot or Dutch oven over medium-high heat. Sear the chicken, turning the pieces so that all sides are slightly brown, about 3 to 4 minutes for each side. Remove the chicken pieces and place on a paper towel-lined plate. Add the remaining 1/8 cup of olive oil to the pot, along with the onions. Saute the onions until they’re soft, about 6 minutes. Add the carrots, celery, and white wine. Scrape up any brown bits from the bottom of the pot. Saute, stirring frequently, for another 6 minutes. Add the chicken back to the pot. Cover the meat and vegetables with chicken stock. Bring to a boil. Reduce heat to medium-low and simmer, partially covered, for 90 minutes. (This step is especially flexible. If your liquid is reducing too much, you may need to add more chicken stock. If the dish is too liquidy, turn up the heat and to reduce the stock more. The idea is to end up with a consistency of a very thick stew.) If the broth is not as thick as you would like, remove one cup of the broth into a measuring cup and whisk in 1 tablespoon of corn starch. Return the broth to the pot and stir. Remove chicken pieces with tongs and allow them to cool. Debone the chicken and shred the meat into small pieces. Return to the pot. Cut the frozen biscuits into thirds. Drop the pieces onto the top of the chicken and vegetable mixture. Cover and cook on medium-low heat for 8-10 minutes, until the dumplings are cooked through. Serve immediately.
*NOTE: I did mine a little differently – since I cooked my chicken in the crockpot, I just added it (with all of its juice) to the broth and cooked vegetables, then dropped my biscuits in. Much easier, I think!
We both thought these were excellent. I would make these again in a heartbeat. I just hope Nana doesn’t disown me…
I had heard of this dip about a thousand times – originally called Buffalo Chicken Dip, it’s been nicknamed “crack dip” because its supposedly quite addicting. I thought, “hmm, anything with that title must be good!”, and then I read the ingredient list – canned chicken, buffalo sauce, blue cheese, ranch dressing….? BLECH! I’m sorry but that does NOT sound like something I would want to put in my mouth. So I never made it. I mean, I have to draw the line somewhere, right? It wasn’t until I was perusing some of my favorite food blogs looking for Super Bowl recipes that I found this recipe, once again. The guys over at The Bitten Word were raving about this dip – and that got me curious, I mean, if those guys like it then surely I could give it a try. So I did, and I took it to the Super Bowl party. As it turns out, this dip really is like crack…I could sit there and eat it all day! Hubby and I are both big blue cheese fans, so of course we loved it – but here’s a little warning for those of you who are picky eaters (ahem, my sister) – if you don’t like buffalo sauce and/or blue cheese, this dip isn’t for you. And even if you don’t like those things, still give it a try – you might be pleasantly surprised. Everybody at the party loved it! So without further ado – CRACK DIP!!!
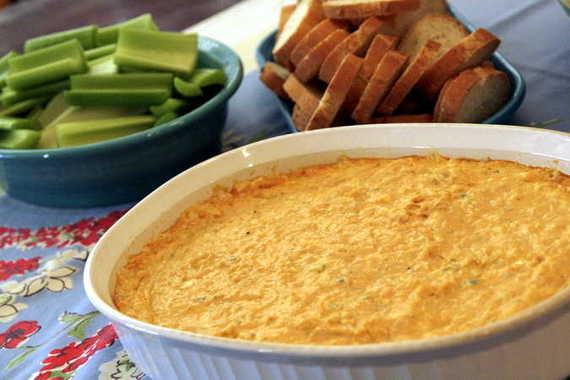
Buffalo Chicken Dip (AKA: Crack Dip)
8 ounce package of cream cheese, softened
1/4 cup ranch salad dressing
1/4 cup blue cheese salad dressing
1/2 cup buffalo sauce or buffalo style barbecue sauce
1/2 cup crumbled blue cheese (shredded mozzarella cheese can be substituted)
2 boneless, skinless chicken breasts, cooked and shredded
Pre-heat oven to 350 degrees F. In a deep baking dish, mix cream cheese, salad dressing, buffalo sauce, and cheese. Stir until combined. Stir in chicken.
Bake uncovered for 20-25 minutes, until the dish is heated through. Serve with crackers, pita chips, sliced bread or vegetables.
NOTE: Depending on your tastes and the ingredients on hand, you can use 1/2 cup ranch or blue cheese salad dressing rather than 1/4 cup of each. Similarly, you can mix blue cheese and mozzarella, or use portions of each.
*I used sliced baguettes and celery for dipping…mmm, MMMM!
Recipe source: The Bitten Word, originally from Frank’s Red Hot


