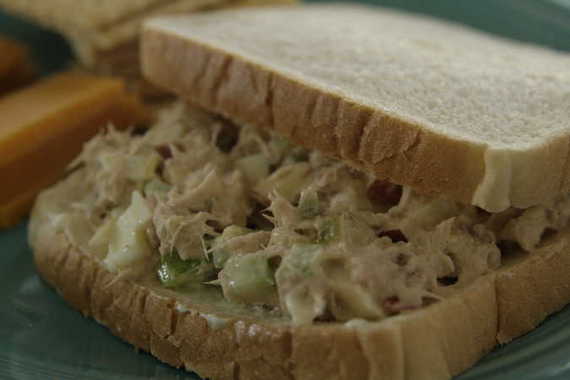
There’s not a whole lot to say about tuna salad- it’s nothing new. Most of us have been eating it our whole lives. In college, I used to eat it every day at lunch when I worked in the music department office, and people would come in and go, “Ewww, what’s that smell? Ugh, gross! Yuck – it smells fishy in here!”, which actually really got on my nerves, but didn’t stop me from eating it every day (hehe- take that, you tuna haters!). Tuna salad can be pretty dull. Tuna, mayo, relish…not much to write home about. But with the right ingredients, tuna salad can be pretty darn tasty! I’ll show you how I make it (and my mom, and grandmother, and sister…) and you can decide if it still sounds dull, mmkay? Here we go!
Tuna Salad
1 large can, chunk light tuna in water
1 celery stalk, chopped into very small pieces
2 dill pickles, chopped (not the uber-huge monster pickles, and not baby dill, either – just a regular sized pickle)
3 hard-boiled eggs, chopped
1 small apple, chopped (any kind of apple you like – I used Fuji, but if you like it more tart, Grannysmith is good)
approx. 1/4 cup mayonnaise (the real thing)
approx. 1/4 cup Miracle Whip
1 teaspoon Cajun Seasoning (I use Tony Chachere’s…in my family, we use this on just about everything)
1/4 teaspoon Cayenne pepper
splash of pickle juice
Mix all ingredients together in a bowl and chill until ready to serve. Enjoy!
*As far as the mayo goes, you can use as little or as much as you like – these are just approximations, as I usually just throw some in and taste as I go.
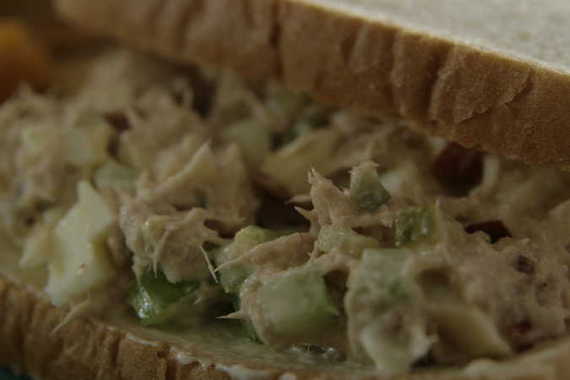
This is the tuna salad my family has been making forever – it’s always delicious and perfect for a summer picnic! It’s got a lot of crunch and a lot of flavor – hope you enjoy it!
No, I don’t mean “Greek Week” as in all that sorority/fraternity college stuff – I mean it literally. A couple of weeks back, it really was a pretty “Greek” week – I cooked lots of Greek-style food and also received a bunch of Greek yogurt from Stoneyfield to use however I wanted. Fun! I’ll start with the meal:
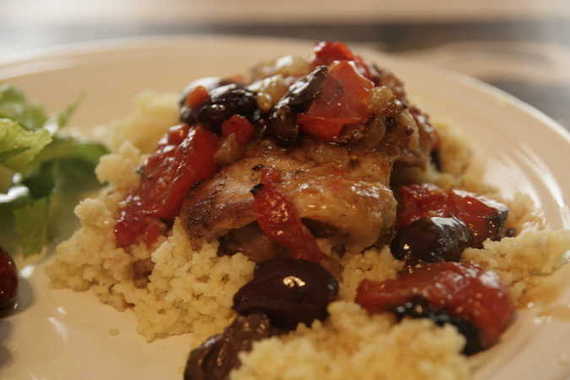
I really love Greek food – really really love it. Only thing is, I never really make it. Finally, I saw a couple of great-looking recipes on my favorite food blog, For The Love of Cooking. She had a recipe for Greek Chicken Thighs (pictured above) and Greek Salad – perfect! So I set out to make my own little Greek feast. Both of these recipes were super easy and took no time to make. I think this was one of Hubby’s favorite meals I’ve ever made – he loved the combination of flavors. The chicken thighs were awesome, but my favorite was the salad – I’ll definitely be making that one over and over again – in my opinion, it tasted better than a restaurant’s!
Greek Chicken Thighs
-For the Love of Cooking
2 tsp olive oil, divided
1-2 shallots, sliced into thin rings
1 clove of garlic, minced
6 boneless/skinless chicken thighs, trimmed of any fat
Sea salt and fresh cracked pepper, to taste
Garlic powder, to taste
Dried oregano, to taste
Handful of grape tomatoes
Small handful of kalamata olives, sliced in half
1/2-1 lemon juiced
Zest of one lemon
2 tbsp fresh parsley, chopped (divided)
2 tbsp low fat feta cheese
*I also chopped up some roasted red peppers and threw them in – it was great!
Preheat the oven to 425 degrees. Heat 1/2 tsp of olive oil in an OVEN SAFE skillet over medium heat. Once hot, add the shallot and cook, stirring frequently until soft and tender (about 2 minutes), add garlic and cook for an additional 45 seconds, stirring constantly. Remove from the pan and set aside.
Add the remaining olive oil to the same skillet and turn the heat up to medium high heat. Season the chicken thighs with salt, pepper, garlic powder and oregano to taste on each side. Once the pan is very hot, add the seasoned chicken breast to the skillet. Cook for 2-3 minutes, until the chicken is golden brown on one side, flip the chicken and add the grape tomatoes, kalamata olives, shallot and garlic mixture, lemon zest, lemon juice and half the parsley then season with sea salt and black pepper to taste. Place in the oven and roast for 9-10 minutes or until the chicken is cooked through. Remove from oven and sprinkle with the remaining parsley and the feta cheese. *I served mine over Couscous, but rice or pasta would be great too.

Greek Salad
-For the Love of Cooking
For the Salad:
Romaine lettuce, chopped
Kalamata olives
Grape tomatoes
Cucumber, seeded and chopped
Feta cheese
Sea salt and fresh cracked pepper, to taste
For the Lemon Garlic Dressing:
6 tablespoons olive oil
Juice of 1/2 of a lemon
1-2 garlic cloves, minced (I used a microplane to grate mine in)
2 tsp red wine vinegar
Sea salt and fresh cracked black pepper, to taste
1/4 tsp dried oregano
Whisk all ingredients together until thoroughly combined. Taste and re-season if needed. Toss the salad with the dressing and serve.

And now for the yogurt! A few weeks back, a representative of Stoneyfield Farm asked if I would be interested in trying their new Greek yogurt cups….heck yeah, I would! I had actually never tried Greek yogurt, so I was super excited to try this. The verdict: Ohmygawh amazing! Greek yogurt is my new favorite!! It’s so thick and creamy…YUM! And I especially liked the flavored ones – they had blueberry, honey and vanilla. The honey was by far my favorite- the honey is at the bottom and you stir it in….so freaking good! (And I promise I’m not just saying that for the Stoneyfield people…these really were amazing). I don’t know if I was supposed to cook something with the yogurt or just eat it. Hopefully just eat it, because that’s what I did – they were so good by themselves, I didn’t want to use them to cook with. I’m selfish like that, I guess….

And that pretty much brings us to the end of my Greek Week…give the chicken thighs and salad a try – you definitely won’t be sorry!! Hope everyone has a happy Memorial Day on Monday – enjoy your weekend!
Ok, I know it’s probably one of my cheesiest titles yet, but I really do want to apologize for being MIA for over a week now (and, the post is about pea salad, so there you go). I promise I have a good excuse – the opera company I sing with is doing Carmen in a couple of weeks and I’m right in the smack middle of rehearsals. Driving 30 minutes to and from almost every night and every Saturday and Sunday, getting home after 10 or 11 o’clock in the evenings, trying to memorize music, and remember where I’m supposed to stand on stage without looking like a complete idiot (which still happens quite a lot, incidentally)….all this plus dog-sitting a poodle along with my own high energy pup and teaching voice lessons two days a week. This doesn’t leave much time for food-blogging. And to be quite honest, I haven’t cooked a thing in over a week – except this pea salad.
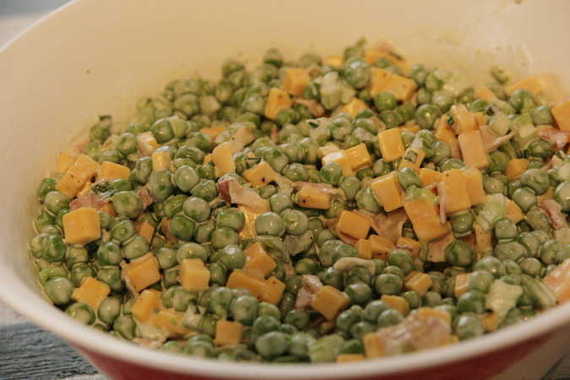
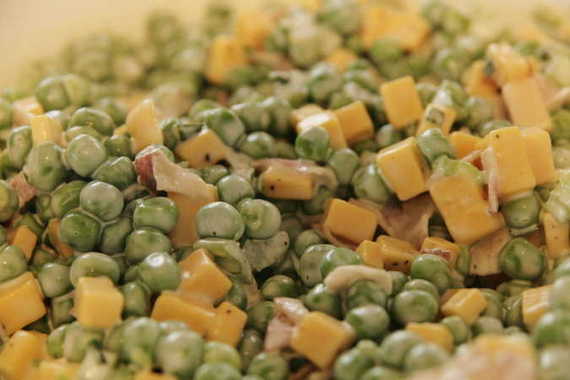
Easter was a really nice, welcomed break for the hubby and me. On top of the joy of celebrating Jesus’s resurrection, being with family, eating tons of Nana’s delicious ham and other yummy Easter-y things, it was just nice to have some time off and rest a bit. Although I didn’t rest too much – I was busy making a ginormous banana pudding (my mommy’s famous recipe) and this tasty pea salad! I had never had pea salad, and I’m not sure what made me want to try it, but for whatever reason I threw it together and decided to take it to my parent’s house for Easter Sunday. It was pretty good, too! I love the little cubes of cheese, and the bacon really gives it a good flavor. So, here is my “Peas Offering”, if you will (hehehe), and I promise I’ll try to do better with my food blogging in the coming weeks. Bear with me, ya’ll!
Creamy Pea Salad
One 10-ounce package of frozen tiny peas (thawed)
1/2 cup chopped fresh celery
3 green onions, chopped (I used only the green parts, otherwise I think it would overpower the salad)
3-4 slices of bacon, cooked, drained and crumbled or torn
1/2 cup cheddar cheese, cut into tiny cubes
1/2 cup real mayonnaise
1 or 2 tablespoons sour cream (depending on how much you like)
salt and pepper to taste
*I like to chop the celery and cheese about the same size as the peas, so everything is the about the same size
Combine all ingredients and chill until needed. Pretty straight forward, huh?
My old college roommate and close buddy, Courtney is working toward becoming a better cook. Now that we’re both in the real world and not living in our tiny college apartment anymore, our alternating dinners of mac-n-cheese and spaghetti just won’t cut it anymore. (I’m doing my best to move past these habits, too!) I told Courtney I would help her think of some quick and easy recipes to get her started, and so far she’s been making some pretty good stuff – I made this fish just for her.
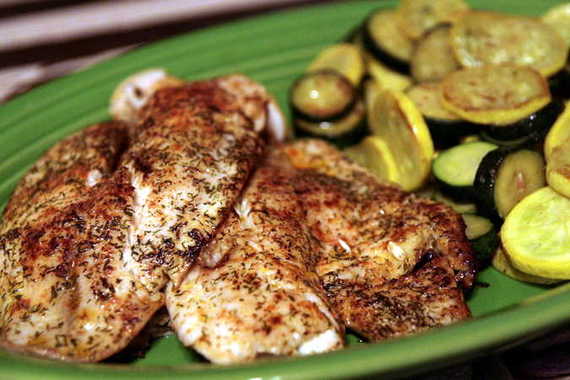
Super Easy Tilapia
*serves 1 – 2
2 tilapia fillets
Salt
Pepper
Paprika
Dill
Fresh lemon juice
Cayenne pepper (just a pinch; optional)
Extra virgin olive oil
Heat 1 or 2 tablespoons olive oil in a pan over medium heat; season fish with salt, pepper, paprika, dill, lemon juice and cayenne pepper to taste. Place fish in pan and cook for about 3 minutes on each side or until inside of fish is cooked through and “flaky”.
Serve with grilled or sauteed zucchini and squash (I just slice them thin, season with salt and pepper, and saute them in a litte olive oil in a skillet for about 7 – 10 minutes or until tender).
So here’s a winner for you, Courtney – give this a try this week; I promise you’ll love it!
**This post has been updated- click HERE to view it**

Do you like my fireplace? Its the first one hubby and I have ever had! We’ve always lived in an apartment, so when we moved into this house (which has two fireplaces, by the way!), we were super excited to have our first fire! So its no surprise that as soon as the weather changed and got a little cooler, we got a big fire in the fireplace and had a cozy little picnic on the floor in front of it!
It doesn’t get cold here in Texas until much later than the other (normal) states. In fact, here I am writing this post a week before Thanksgiving and its about 65 degrees outside (which we consider pretty chilly, by the way). So needless to say, as soon as the temperature drops below 80 degrees, I bust out my stock pots, fuzzy house shoes, and blankets and get ready for some cold weather comfort food! As I’ve said a million times, hubby loves his soups, so that’s the first thing I think of when it gets chilly outside. This potato soup is a perfect meal for a chilly evening at home – and it only tastes better when you eat it on a blanket on the floor in front of your blazing fireplace! YUM!! (sorry for the crummy picture, it was already dark outside and I was too hungry to care)

Potato Soup
-my mom’s recipe
5 -8 medium sized Russet potatoes, peeled and cut into chunks (this will make a pretty big pot, but if you want enough for a large crowd, I’d use 8-10)
1 yellow onion, chopped
salt and pepper to taste
milk (approx. 1/2 – 1 cup, depending on how “soupy” you like it)
Put the potatoes and onion in a large stock pot and cover with water; let it all boil together for 10 – 20 minutes, or until potatoes and onion are extremely tender and mushy. Drain most of the water (you can leave some in if you want a thinner consistency), then mash up the potatoes with a potato masher or a large spoon (if you want it super smooth, you could use a blender, but I just use a masher – I like a few lumps) and return the pot to low heat. Add the milk until you get the desired consistency, then season with desired amount of salt and pepper. Stir constantly for 2 -5 minutes, then remvove from heat and serve. I like to top mine with cheddar cheese and bacon bits.
I am categorizing this under “Soups/Stews/Other” because I really have no idea what to call this dish….or what kind of dish it is, exactly. I figure it fits under the “other” category pretty well – so we’ll just leave it at that.
I was a DARN picky eater as a kid…I hated a lot of things my mother would cook for us, as well as most restaurants. Some of the things my mom would make that I can remember having the most disdain for were her chicken enchiladas (WHA?! What was I thinking??!), chicken stew and stuffed peppers, to name a few. Of course I love all of those things now, but back then there was just something about them that made me absolutely despise them. I guess I was just your typical snot-nosed picky little girl….heheh- some things never change, I guess. 😉
My sister was sort of picky too, I suppose, though not near as whiny and shrieking about it. But there were some things that my sister and I loved that most kids wouldn’t touch with a ten foot pole. For example, everyday when we would come home from school, our choice of snack would always be canned, cold spinach and Vienna Weenies (you know, those short, stubby little weenies that come in the tiny little can?). We’d sit there and eat the stuff right out of the CAN! Even though we could have our choice of cookies, brownies, WHATEVER! We always wanted the cold spinach and weenies. Even looking back now I wonder what the heck we were thinking…and we were little kids, mind you – I was in like, 2nd grade! Weird freaking kids…..
So yeah, we had a habit of liking odd, non-kiddy type foods. I mean, sure, I liked those little frozen kiddy dinners that came with the cartoon-shaped macaroni and a tiny little brownie, but some grown-up foods were very appealing to us. One of those foods was cabbage. My sister and I both loved cabbage. I remember my Nana (hey Nana!) cooking cabbage in her big pot in the kitchen and my sister and I would absolutely gobble it up.
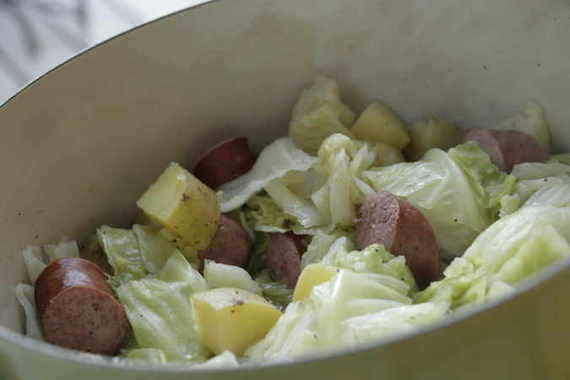
I still love cabbage to this day – its great in soups, as a side dish or cooked my personal favorite way – in a big pot with sausage and potatoes. YUM. I’m almost positive this dish came from somewhere, I just have no idea where. I don’t have a title for it, nor do I know what kind of food category it would fall under. Obviously. All I know is, my mother got the recipe from our Uncle Benny. He didn’t have a title for it either – he just thew it all in a pot and that was that. So, without further ado, I give you Cabbage, Sausage, Potato….stuff.
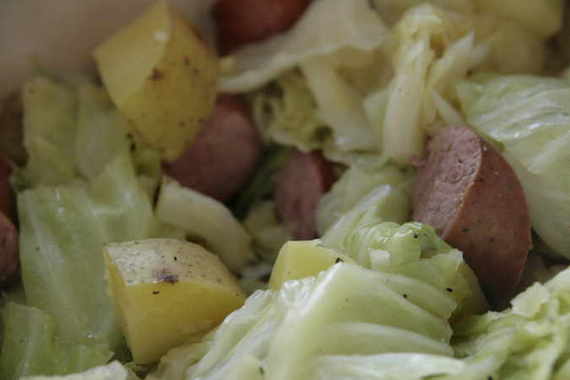
Cabbage with Sausage and Potatoes
1 head cabbage, roughly chopped (I guess you could use any type of cabbage you wanted – I just use the regular old “white looking” cabbage that you find everywhere)
1 pound fully cooked Hillshire Farms smoked sausage, sliced into big bite-sized pieces (I used Turkey sausage – fat free and you couldn’t taste the difference!!)
2-3 yukon gold potatoes, cut into chunks
Salt and Pepper to taste (I also use a bit of Cajun seasoning)
Pour approx. 1/2 cup water in the bottom of a large dutch oven or heavy pot, then add the sausage; layer the potatoes, then the cabbage over the sausage, seasoning with salt and pepper as desired (not too much, though – the sausage will do most of the seasoning for you). Cover and cook over medium-high heat for 15-20 minutes, or until cabbage and potatoes are tender. Make sure the bottom of the pot never goes dry – if the water dries up during cooking, quickly add more. Serves 4.
* You can also add onions if you want; I just choose not to. My Uncle Benny likes to add a can of Rotel Tomatoes as well. I like to keep mine simple, though. But that’s the beauty of this dish, you can pretty much add whatever you want to it – carrots, celery….whatever!
You could definitely serve this all by itself, but I like to have a little bread with it – I served this with Katie’s Easy Cheesy Beer Bread. This is seriously filling and delicious – hubby LOVES it. Plus, its a super satisfying meal in one pot that costs less than $5.00! You can’t beat that, people!

Well, Renea over at Sweet, Savory, Southern hits another bullseye! I’m telling you folks, this has quickly become one of my favorite food blogs! I catch myself making her recipes all the time, and to top it off, everything of hers that I’ve made has been a huge hit! The woman can cook, I’ll tell you that! Well, this latest recipe was no exception – light and fresh and just plain delicious (not to mention, easy!)!
Chicken and Summer Vegetable Tostadas
by Renea at Sweet, Savory, Southern
1 teaspoon ground cumin
1/4 teaspoon salt
1/4 teaspoon black pepper
2 teaspoons olive oil
12 ounces chicken breast tenders (I diced up the chicken into bite-size pieces before cooking)
1 cup chopped red onion (I omitted)
1 cup fresh corn kernels (I used frozen)
1 cup chopped zucchini (about 4 ounces)
1/2 cup salsa
3 tablespoons chopped fresh cilantro, divided
4 (8-inch) fat-free flour tortillas (I used 2 soft taco sized flour tortillas)
Cooking spray
1 cup (4 ounces) shredded Monterey Jack cheese (I used cheddar)
(I also added a can of black beans, drained and rinsed)
Preheat broiler.
Combine first 3 ingredients, stirring well. Heat oil in a large nonstick skillet over medium-high heat. Sprinkle the spice mixture evenly over chicken. Add chicken to pan; sauté for 3 minutes. Add onion, corn, and zucchini (and beans-if using) to pan; sauté for 2 minutes or until chicken is done. Stir in salsa and 2 tablespoons cilantro. Cook 2 minutes or until liquid almost evaporates, stirring frequently.
Working with 2 tortillas at a time, arrange tortillas in a single layer on a baking sheet; lightly coat tortillas with cooking spray. Broil 3 minutes or until lightly browned. Spoon about 3/4 cup chicken mixture in the center of each tortilla; sprinkle each serving with 1/4 cup cheese. Broil an additional 2 minutes or until cheese melts. Repeat procedure with remaining tortillas, chicken mixture, and cheese. Sprinkle each serving with about 3/4 teaspoon of remaining cilantro. Serve immediately. (I also topped mine with shredded lettuce and diced tomatoes)


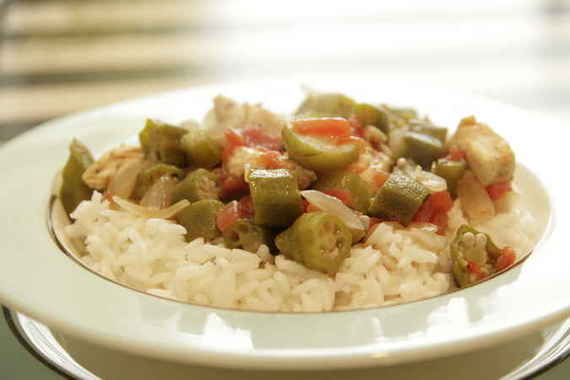
My sister is one of those hard working women – with a job, a husband, a kid, a house and everything else to take care of, I don’t know how she manages to find time to cook (and sometimes she doesn’t – but a pizza night every now and then never hurt anybody, right?). Sometimes she’ll stumble across a recipe that was extra yummy and kindly pass it on to me (woo hoo!). The latest recipe she’s given me was this Okra Gumbo. Surprisingly easy and super fast, but really really tasty at the same time! Its one of those dinners that you can have on the table in no time on a busy night , yet it tastes like its been cooking all day! Hubby really enjoyed it, as did I! Thanks, big sis!! Keep the recipes comin’!
Lindsay’s Okra Gumbo
1-16 oz. package frozen cut okra, unthawed
1 onion, chopped (I used half)
1-15 oz. can diced tomatoes (don’t drain them)
2-3 slices bacon
salt & pepper and cajun seasoning (lots) to taste
(I added 1 1/2 chicken breasts cut up into small pieces for a little extra flavor)
In a large pot over medium-high heat, cook bacon, reserve grease. Remove the bacon from the pan and add the onion, cooking until translucent, then add the chicken (season it with a little s&p before tossing in) and sautee until cooked through. Add the frozen okra and tomatoes; season with plenty of salt and pepper and lots of Cajun seasoning (yum!), then add the bacon back in and cook over medium to low heat for 15 -20 minutes until heated through.
Serve over white rice. *Here’s a little tip: throw in a splash of white vinegar – it helps to cut the okra’s “sliminess” and you don’t taste it a bit!

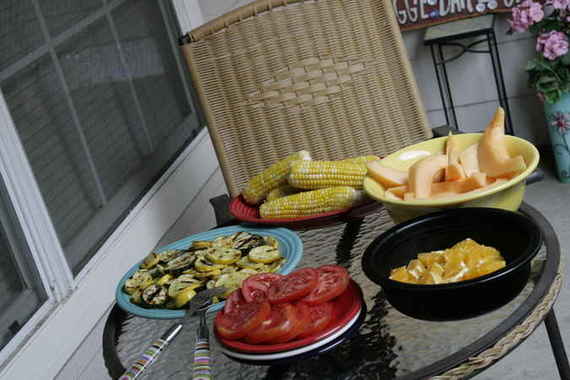
It’s been one heck of a week. Between late night opera rehearsals, work and plenty of uncalled for D-R-A-M-A, I haven’t had much time for cooking, cleaning, quality time with my husband, or shoot, even eating! Needless to say, I’ve been a little stressed. But today, thank the good Lord, I had a day off. There was a pile of whites on my couch that desperately needed folding, my kitchen was in less-than-perfect condition, and my dining room table looks more like dump grounds than a place to sit down and eat. Yeah, I know – lots of work to be done! However, it was a gorgeous, sunny day and it felt like summer outside, sooooooo, I decided to go hang out by the pool (The laundry can wait.). It was glorious….97 degrees with a delightful breeze, drink in hand, sunglasses, iPod playing the Beach Boys….the makings of a perfect afternoon! As I lay there soaking up the sun, slowly letting all the stress melt away, I was (of course) thinking about what to fix for dinner – not a hard decision – two words: grilled vegetables. One of my favorite things about the spring/summer is going to the farmers market and wandering around to see what looks good. I almost always come away with corn on the cob, tomatoes, cantaloupe and green beans. One of my favorite meals is grilled corn on the cob, green beans and red potatoes, fresh sliced tomatoes and a fresh, ripe cantaloupe . I decided to do an all-vegetable meal like that tonight. The weather was too perfect! So my buddy Alyshia and I headed to the farmers market and loaded up on yummy, fresh, delicious veggies and fruits. I decided to just do some simple grilled corn on the cob, zucchini and summer squash served with a sliced cantaloupe, sliced tomatoes (delicious with salt and pepper!) and some sliced oranges (Joel loves oranges!). There’s not much of a “recipe” for this post – I just seasoned everything and threw it on the grill – but it was too yummy not to blog it!
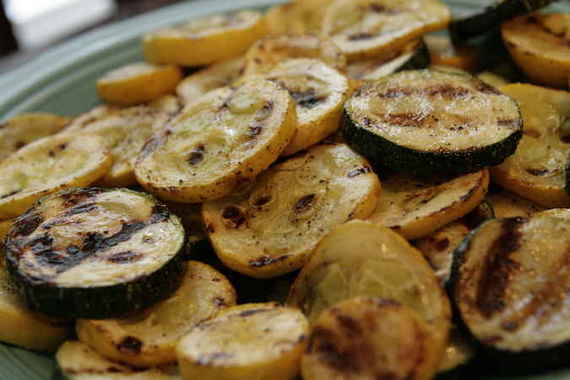
Grilled Zucchini and Summer Squash
One large zucchini, sliced
Two small summer squash, sliced
Olive oil
salt, pepper, seasoning salt
In a large bowl, toss sliced zucchini and squash with olive oil (as much as you’d like), salt, pepper, and seasoning salt. Grill on one side for 3-5 minutes, then turn and cook for another 2-3 minutes.
Grilled Corn on the Cob
There’s really no recipe for this – I just cleaned off the husks, seasoned them with salt and pepper, wrapped them in foil and cooked them on the grill for about 25-30 minutes, turning every 5 minutes or so. Top with butter and serve! Yummy!

It was such a nice evening, we decided to have a little “picnic” on our balcony! Mmmm, grilled corn, zucchini, squash, sliced tomatoes, cantaloupe and oranges…the perfect all-vegetable, yet completely filling and delicious summertime meal!!