One last Christmas cookie post before the big day!
There are only 4 1/2 days till Christmas! How exciting! My baby’s first Christmas…..we absolutely CANNOT wait! I know she probably won’t have a clue what’s going on, but Mommy and Daddy will be brimming with excitement to witness our baby girl opening presents under the Christmas tree!
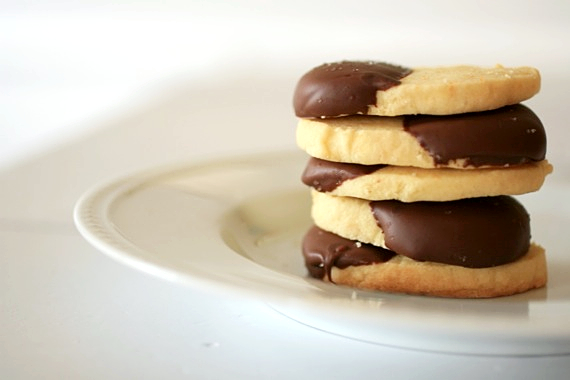
Anyway, I just had to post one more cookie recipe before I take off for the holiday fun. And let me tell you, this one is a KEEPER! Crisp, crumbly, buttery shortbread flecked with bright, citrusy orange peel, then dipped in luxurious dark chocolate and sprinkled with sea salt. OMG so amazingly good! (P.S. sable is the french word for shortbread). If you still have parties to go to, or perhaps want to leave Santa something a little more special this year, by all means, this cookie is for you!

Chocolate-Dipped Orange Sables
2 sticks (8 ounces) unsalted butter, softened at room temperature
3/4 cup sugar
1/2 teaspoon salt, preferably sea salt, plus more for sprinkling
2 large egg yolks, at room temperature
2 cups all-purpose flour
1/2 teaspoon almond extract
zest of 2 large oranges
2 cups melted dark chocolate, for dipping (you can use chips, or chop your own)
Working in a mixer fitted with a paddle attachment, beat the butter at medium speed until it is smooth and very creamy. Add the sugar, salt, and orange zest and continue to beat until smooth and velvety, not fluffy and airy, about 1 minute. Reduce the mixer speed to low and beat in the egg yolks and almond extract, again beating until well blended.
Turn off the mixer, pour in the flour, drape a kitchen towel over the mixer and pulse the mixer about 5 times at low speed for 1 or 2 seconds each time. Take a peek; if there is still a lot of flour on the surface of the dough, pulse a couple of more times; if not, remove the towel. Continuing at low speed, stir for about 30 seconds more, just until the flour disappears into the dough and the dough looks uniformly moist. If you still have some flour on the bottom of the bowl, stop mixing and use a rubber spatula to work the rest of it into the dough. (The dough will not come together in a ball — and it shouldn’t. You want to work the dough as little as possible. What you’re aiming for is a soft, moist, clumpy dough. When pinched, it should feel a little like Play-Doh.)
Scrape the dough onto a work surface, gather it into a ball and divide it in half. Shape each piece into a smooth log about 9 inches long (it’s easiest to work on a piece of plastic wrap and use the plastic to help form the log). Wrap the logs well and chill them for at least 2 hours. The dough may be kept in the refrigerator for up to 3 days or frozen for up to 2 months.
Preheat the oven to 350 degrees and line a baking sheet with a silicone baking mat or parchment paper.
Trim the ends of the roll if they are ragged and slice the log into 1/3-inch-thick cookies.
Place the rounds on the baking sheet, leaving an inch of space between each cookie, and bake for 17 to 20 minutes, rotating the baking sheet at the halfway point. When properly baked, the cookies will be light brown on the bottom, lightly golden around the edges and pale on top. Let the cookies rest 1 or 2 minutes before carefully lifting them onto a cooling rack with a wide metal spatula. Repeat with the remaining log of dough. (Make sure the sheet is cool before baking each batch.)
When the cookies are cool, dip each cookie (I like to just dip half of the cookie since white chocolate can be a bit rich) in the melted chocolate and place on wax paper. Sprinkle with a tiny bit of sea salt. Makes about 50 cookies.
Recipe source: sable recipe adapted from Dorie Greenspan; the orange-chocolate idea is a Sing For Your Supper original

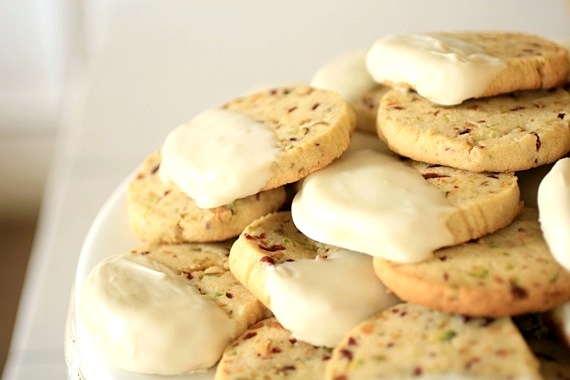
So far this Christmas season, I’ve been really proud of myself as far as branching out goes. Every year it seems I bake the same cookies, cakes, and snacks. I have lists and lists of awesome sounding recipes I’ve been wanting to try, yet I still end up making the same old things. Not that there’s anything wrong with a great standby, but you gotta be adventurous, right? I looooove shortbread and I looooove the combination of pistachios and cranberries; and that’s exactly how these cookies were born!

I recently mentioned that I baked these for our Christmas party (along with these Soft Almond Sugar Cookies), but I didn’t go into any detail. Well, let me tell you what a HIT these were! People kept going back and forth between these and the almond cookies trying to figure out their favorite, but I feel like these were the clear winner. I think it was the white chocolate that did it. 😉 These were so incredibly EASY! Great taste, great appearance, great method. GREAT Christmas cookie.
Pistachio-Cranberry Shortbread Cookies
2 sticks (8 ounces) unsalted butter, softened at room temperature
3/4 cup sugar
1/2 teaspoon salt, preferably sea salt
2 large egg yolks, at room temperature
2 cups all-purpose flour
1/2 teaspoon vanilla extract
3/4 cup chopped pistachios
1/2 cup dried cranberries, chopped
2 cups melted white chocolate chips, for dipping (optional)
Working in a mixer fitted with a paddle attachment, beat the butter at medium speed until it is smooth and very creamy. Add the sugar and salt and continue to beat until smooth and velvety, not fluffy and airy, about 1 minute. Reduce the mixer speed to low and beat in the egg yolks and vanilla, again beating until well blended.
Turn off the mixer, pour in the flour, drape a kitchen towel over the mixer and pulse the mixer about 5 times at low speed for 1 or 2 seconds each time. Take a peek; if there is still a lot of flour on the surface of the dough, pulse a couple of more times; if not, remove the towel. Continuing at low speed, stir for about 30 seconds more, just until the flour disappears into the dough and the dough looks uniformly moist. If you still have some flour on the bottom of the bowl, stop mixing and use a rubber spatula to work the rest of it into the dough. (The dough will not come together in a ball — and it shouldn’t. You want to work the dough as little as possible. What you’re aiming for is a soft, moist, clumpy dough. When pinched, it should feel a little like Play-Doh.) Stir in the pistachios and cranberries.
Scrape the dough onto a work surface, gather it into a ball and divide it in half. Shape each piece into a smooth log about 9 inches long (it’s easiest to work on a piece of plastic wrap and use the plastic to help form the log). Wrap the logs well and chill them for at least 2 hours. The dough may be kept in the refrigerator for up to 3 days or frozen for up to 2 months.
Preheat the oven to 350 degrees and line a baking sheet with a silicone baking mat or parchment paper.
Trim the ends of the roll if they are ragged and slice the log into 1/3-inch-thick cookies.
Place the rounds on the baking sheet, leaving an inch of space between each cookie, and bake for 17 to 20 minutes, rotating the baking sheet at the halfway point. When properly baked, the cookies will be light brown on the bottom, lightly golden around the edges and pale on top. Let the cookies rest 1 or 2 minutes before carefully lifting them onto a cooling rack with a wide metal spatula. Repeat with the remaining log of dough. (Make sure the sheet is cool before baking each batch.)
When the cookies are cool, dip each cookie (I like to just dip half of the cookie since white chocolate can be a bit rich) in the melted white chocolate and place on wax paper. Makes about 50 cookies.
Recipe source: sable (shortbread) recipe adapted from Dorie Greenspan; pistachio-cranberry-white chocolate idea is a Sing For Your Supper original


Ho, ho, ho! Santa Claus is coming soon- do you know which cookies you’ll be baking for him? We sure do! Normally, I’d be baking these M&M Cookies, a Christmas tradition in our family, but this year, I’ve decided on a new favorite! These soft, chewy, sugary cookies with a gloriously subtle and delicate almond flavor, and sparkly, crunchy sugar all over the outside…..WHAT. A. COOKIE! We hosted a Christmas party this weekend and I transformed into a baking fiend. I baked these amazing almond cookies, my favorite M&M cookies mentioned above, and shortbreads with pistachios, cranberries, and white chocolate (can’t wait to share those with you!). They were all amazing, but my hands-down favorite were these soft almond cookies.

Normally, I’m not a huge fan of anything with almond extract, but I decided to make these anyway, because my big sis loves it. I’m so glad I took a chance! Not only are these beautiful, they’re downright DE-licious! Try them this Christmas! Santa Claus will thank you! 🙂
Soft and Chewy Almond Sugar Cookies
1 1/2 cups sugar
1 1/2 cups (3 sticks) butter, at room temperature
2 eggs
2 teaspoon almond extract
1/2 teaspoon vanilla extract
2 1/2 cups cake flour**
1 cups all purpose flour
2 teaspoons cornstarch
2 teaspoons baking powder
1 teaspoon salt
coarse decorating sugar, for rolling the cookies
Preheat oven to 350 degrees.
Cream sugar and butter. Stir in eggs, almond extract, and vanilla. Combine flour, cornstarch, baking powder, and salt and add to butter/egg mixture.
Form dough into walnut sized balls and roll in decorating sugar. Place on ungreased baking sheet and press down to flatten slightly. Chill for at least 30 minutes.
Bake for 8 minutes; cookies should not brown much at all- do not overbake.
**If you don’t have cake flour, all purpose will work fine
Recipe source: adapted from Confections from the Cody Kitchen


The 4th of July is almost upon us! Yippee! What a great holiday – a whole day spent with family and friends out grilling, swimming, eating, watching fireworks…all the best things! Growing up, my family had a lakehouse (built from the ground-up by my Grandaddy), and we’d spend every 4th of July there. Swimming in the lake, eating watermelon, and watching the fireworks from the boat dock. Happy, happy times!
I love making fun 4th of July desserts every year (like these cute cupcakes) and this year was extra fun! What’s better than sweet, fluffy buttercream sandwiched between soft, chewy sugar cookies studded with red, white, and blue sprinkles?! FUN, I tell you!

Star Spangled Sandwich Cookies
2 cups all-purpose flour
1/2 teaspoon salt
1/2 teaspoon baking powder
1 stick plus 2 tablespoons (10 tablespoons) unsalted butter, at room temperature
1 cup sugar
1 large egg
1 large egg yolk
1 teaspoon pure vanilla extract
1/4 teaspoon almond extract
Red, white, and blue sprinkles
white sanding sugar
For the buttercream:
1 stick unsalted butter, at room temperature
3-4 cups confectioners’ sugar
1 teaspoon vanilla extract
1/4 teaspoon almond extract
pinch salt
splash milk (optional)
blue food coloring
Preheat the oven to 350 degrees. Line two baking sheets with parchment paper or silicone mats.
Whisk the flour, salt, and baking powder together.
Working with a stand mixer fitted with a paddle attachment, or with a hand mixer in a large bowl, beat the butter at medium speed until smooth. Add the sugar and continue to beat for about 2 minutes, until the mixture is light and pale. Add the egg and yolk and beat for another minute or two; beat in the vanilla and almond extract. Reduce the mixer speed to low and steadily add the flour mixture, mixing only until it has been incorporated. Slowly stir in the red, white, and blue sprinkles.
Using a teaspoon, scoop out the dough, roll into balls, and place on the baking sheets; press down gently to flatten slightly. Sprinkle with the sanding sugar before baking.
Bake the cookies for 8-9 minutes. The cookies should feel firm, but they should not color much, if at all. Cool completely.
To make the buttercream, beat the butter on medium speed until smooth. Add in the powdered sugar a little at a time until desired consistency is reached (it should be fairly think, but easily spread or piped.). Add in the vanilla extract, almond extract and salt. If icing is too thick, stir in a little milk. Gently stir in as much food coloring as you want to make it the desired color of blue.
Pipe or spread the buttercream on half of the cookies; place other half of the cookies on top to make sandwiches. Makes approximately 20-24 cookies.
Recipe source: cookie recipe adapted from Dorie Greenspan; buttercream is a Sing For Your Supper original

If you’re looking for a perfect peanut butter chocolate chip cookie, look no further. This one is amazing. Chewy, soft, slightly crisp around the edges with the perfect ratio of peanut butter to chocolate. I love them. I made two batches of dough so I could have plenty leftover to freeze after the baby came. Lucky I did, because these tasted SO good after a long day of diapers, feedings, burping and rocking. In fact, I still have a little bit left in my freezer right now…we may have to bake some up tonight! YUM!

Peanut Butter Chocolate Chip Cookies
1/2 cup (1 stick) butter
1/4 cup sugar
1/2 cup brown sugar
1 egg
1 teaspoon vanilla
3/4 cup peanut butter
1 cup flour
1 teaspoon baking powder
1/2 teaspoon salt
1 1/4 cups semi-sweet chocolate chips (I used mini-sized)
Preheat oven to 375 degrees.
In a large mixing bowl, cream butter and sugar until light and fluffy. Add the egg, vanilla, and peanut butter. Beat until smooth. Mix in the flour, baking powder and salt. Stir in the chocolate chips.
Drop spoonfuls of dough onto a cookie sheet. Bake for 10-12 minutes, or until lightly browned. Store in an airtight container at room temperature. Makes approximately 30 cookies.
Recipe source: The Pastry Affair


To me, oatmeal raisin cookies are the ultimate comfort cookie- now, don’t get me wrong, chocolate chip cookies are about as close to perfection as you can get, but when I need a smile I crave a good, chewy oatmeal cookie. Oatmeal cookies are grandmotherly to me. Just something about them makes me feel all warm and fuzzy, as if I were sitting at Nana’s kitchen table. Especially these. They’re super chewy, soft and have that perfect sweetness that makes them hands down, my all-time favorite oatmeal cookie. I made a big batch last week when it was a particularly cold, drizzly night. They absolutely hit the spot (…and I may have eaten 7 or 8). These are a spin-off of my award winning Toasted Oatmeal Cookies with Golden Raisins, Pecans and Coconut – only a much, much simpler, bare essentials version. Sometimes I don’t want all that extra stuff- just a simple oatmeal raisin cookie. I finely chop the raisins since I’m not a big raisin fan, but I like the chewiness and sweetness they add to the cookie- I find this makes the absolute perfect oatmeal raisin cookie! Give them a try this week- you’ll love them!
*P.S. Don’t you just love my “Izzy” napkins? My mom gave them to me for Christmas!

Oatmeal Raisin Cookies
1 1/2 cups old-fashioned oats
1 cup all-purpose flour
1/2 teaspoon baking soda
1/2 teaspoon baking powder
rounded 1/2 teaspoon salt
1/2 cup (one stick) plus 2 tablespoons unsalted butter, softened
1/2 cup packed brown sugar
1/2 cup granulated sugar
1 large egg
1/2 tablespoon half and half
1 teaspoon vanilla extract
1/2 teaspoon cinnamon
1 cup raisins, finely chopped (you can leave them whole if you want; I just prefer the texture with them chopped)
Preheat oven to 350 degrees. Combine oats, flour, baking soda, baking powder, salt and cinnamon in a bowl. Set aside.
In a stand mixer fitted with a paddle attachment (or using a hand mixer), cream both sugars and butter until light, fluffy and smooth. Add egg, half and half and vanilla and blend until smooth. Gradually stir in the oat mixture, then the raisins. Drop dough onto a cookie sheet lined with parchment paper in rounded spoonfuls (or use a cookie scoop) about 2 inches apart. Bake for about 10-12 minutes or until edges of cookies are golden brown. Transfer to a wire rack for cooling. Makes approximately 2 dozen.
*Cookies will spread quite a bit, so be sure to space them at least 2 inches apart on the cookie sheet.
Recipe Source: Sing For Your Supper original


I know my posts have been a little more sparse lately and I apologize! Joel and I volunteered to sing with our hometown church choir’s Christmas program over the weekend, so the past few weeks have been extremely hectic! It was pretty cool getting to hear my daddy sing a solo, though! 🙂
With all the craziness going on lately I haven’t gotten much of a chance to do as much Christmas baking as I would’ve liked. However, I recently had a free afternoon and jumped on the chance to bake up something yummy and festive! These cookies are a version of my mom’s favorite Christmas cookies, Santa’s Whiskers, which normally have candied red and green cherries in them (so pretty!), but I didn’t have any on hand, so those will have to wait for another time! We decided these were very reminiscent of pecan sandies – very crunchy and shortbread-like in texture – and I added a healthy dose of cinnamon to give them a little more flavor. The edges of the cookies are rolled in coconut before baking, so the coconut flavor isn’t overpowering, but still very prominent. I think these would be awesome with a cup of hot cocoa– the perfect Christmastime treat!

Coconut Pecan Sandies
1 cup (2 sticks) butter, softened
1 cup sugar
2 tablespoons milk
1 teaspoon vanilla extract
2 1/2 cups flour
1/2 teaspoon salt
1/2 teaspoon cinnamon
1/2 cup pecans, finely chopped
3/4 cup sweetened flaked coconut
In the bowl of an electric mixer fitted with a paddle attachment, beat butter and sugar together on medium speed until light and fluffy; about 2 minutes. Blend in milk and vanilla.
Slowly stir in flour, salt, cinnamon and pecans. Form dough into 2 8-inch rolls and roll in the flaked coconut. Wrap in plastic wrap and chill for at least 2 hours. Cut into 1/4 inch slices and place on an ungreased baking sheet. Bake at 375 for 11-12 minutes, until lightly browned. Makes approximately 40 cookies.
Recipe source: my mom (this is a very old family recipe, given to my mom just after she and my dad were married!)

P.S. Here’s a little tip- during all of your holiday baking this year, don’t forget to use real butter! Margarine or butter “spread” just won’t work as well as the real thing and you’ll most likely end up with flat cookies that spread too much. Real butter gives you a tender, flaky, more flavorful cookie that just can’t be equaled! Happy baking!


I hope everyone enjoyed a happy Thanksgiving with friends and family! We sure did! Although, I learned the hard way that being 8 months pregnant and eating one’s weight in turkey and dressing (and cranberry sauce…and mashed potatoes…and green bean casserole…and 3 kinds of pie…) isn’t the smartest idea (I literally thought I was going to pop!). Instead of being sociable with the rest of the women, I snoozed with the men folk in front of the TV. It was worth it, though- I LOVE Thanksgiving food!

But now it’s onto more important things, like baking Christmas goodies! I couldn’t wait to get home, get in my kitchen and start baking! I made these gingerbread cookies a couple of years ago, but rolled them out into gingerbread men and decorated them. As fun as that was, I’m not a fan of having to wait for the dough to chill, then roll it out, then cut out the shapes…then repeat 10 times. This time, all I wanted was a chewy, spicy gingerbread cookie I could bake in minutes and enjoy right away! And these are sooooo good! Especially if you’re a huge gingerbread cookie fan like I am! They’re crispy around the edges but have a wonderful chewiness that’s downright addicting! I think I polished off about 6 of these in one sitting! I have tons of leftover dough, so I know I’ll be baking lots more of these in the coming weeks!
Soft and Spicy Gingerbread Cookies
1 cup butter (2 sticks), softened
1 cup sugar
1 cup molasses
1 egg
4 cups flour
1 teaspoon salt
1 1/2 teaspoons baking powder
1/2 teaspoon baking soda
1 teaspoon cinnamon
1 1/2 teaspoons ground cloves
2 teaspoons ground ginger
1 teaspoon nutmeg
Preheat oven to 350 degrees. In the bowl of a stand mixer fitted with the paddle attachment, cream together butter and sugar until light and fluffy; about 1 minute. Add the egg and molasses and combine.
In a separate bowl, combine flour, salt, baking powder, baking soda, cinnamon, cloves, ginger and nutmeg. Slowly and gradually blend into the butter mixture until smooth.
Using a cookie scoop or a spoon, scoop dough out into 1 1/2 inch rounds onto a cookie sheet lined with parchment paper. Space cookies about 2 inches apart. Bake for 10-11 minutes. Let cookies cool for 10 minutes on the cookie sheet, then remove to a cooling rack to cool completely. Makes approximately 4 dozen cookies.
Recipe source: adapted from allrecipes.com


While visiting my Nana a couple of weeks ago, I was flipping through a Better Homes and Gardens cookbook that had come with one of her latest magazines. It was nothing but cookies, so of course I was finding recipes left and right I wanted to try. The first one to catch my eye was one for sugar and spice espresso cookies. Sounds great, right? Well, they really are! I came home and immediately baked up a batch of these cookies! The verdict: we loved them (even Joel, who isn’t crazy about coffee!)! Just a teensy bit chewy with a good amount of crunch and the coffee flavor is nicely complimented by the cinnamon. They tasted like cinnamon coffee, which happens to be one of my favorite fall treats. I loved the way my house smelled while these were baking, too! I marked the recipe with a little star and put it in my recipe box, which means I’ll definitely be making these over and over again!
Sugar and Spice Espresso Cookies
2 tablespoons, plus 1 teaspoon instant espresso powder
1 tablespoon hot water
1/2 cup (1 stick) butter, softened
1/4 cup shortening
1 1/4 cups sugar
1/2 cup packed brown sugar
1 teaspoon baking powder
1 teaspoon ground cinnamon
1/2 teaspoon salt
1 egg
1 teaspoon vanilla
2 cups flour
In a small bowl, combine the 2 tablespoons espresso powder and water, stirring until coffee powder is dissolved. Set aside.
In the bowl of a mixer fitted with the paddle attachment (or using a hand mixer), combine the butter and shortening; beat for 30 seconds. Add 1 cup of the granulated sugar, the brown sugar, baking powder, cinnamon, and salt. Beat until combined, scraping down the sides of the bowl occasionally. Beat in the egg, vanilla and coffee mixture. Slowly add the flour a little at a time until fully incorporated.
Divide the dough into thirds. Shape each portion into a 7-inch log. Wrap each log in plastic wrap and chill about 2 hours or until dough is firm enough to slice.
Preheat oven to 375 degrees. Cut logs into 3/8-inch slices. Place slices 2 inches apart on a cookie sheet lined with parchment paper. In a small bowl, stir together the remaining 1/4 cup sugar and 1 teaspoon espresso powder; sprinkle over slices. Bake for 9-10 minutes or until edges are golden brown. Makes approximately 48 cookies.
Recipe source: Better Homes and Gardens Best Ever Cookies recipe book


Happy Friday! I have some GREAT news- yesterday Joel and I had our “big” sonogram at the doctor’s office. You know, the big gender reveal?! After weeks and weeks of people constantly asking us, “do you know yet what you’re having??” we were SO ready for this day. Everybody had their guesses, but in the end team pink won out! That’s right, WE’RE HAVING A LITTLE GIRL!!!! Words can’t even begin to express how excited we both are- I’ve always dreamed of having a girl and when the sonogram technician said, “it’s a little girl!” my heart skipped a beat and Joel and I couldn’t stop giggling.

So obviously, that’s where these cookies come in. After I got home from the doctor I couldn’t sit still. I had already called, texted, facebooked and tweeted my friends and loved ones so really, there was nothing left for me to do but get in the kitchen and bake some girly pink cookies to celebrate! These soft frosted sugar cookies (yes, just like the sugary store-bought ones!) were the first things to come to mind! I had seen variations of them on all my friends’ blogs- Annie, Jessica and Tara, to name a few- and knew I had to make my own (especially since Joel absolutely adores the store-bought version!). As expected, these did NOT disappoint! They’re super soft, chewy and taste just like their store-bought counterparts, only better! We’re in love!

Soft Frosted Sugar Cookies
For the cookies:
4 1/2 cups all-purpose flour
4 1/2 teaspoons baking powder
1 teaspoon salt
1 1/2 cups (3 sticks) butter, at room temperature
1 1/2 cups sugar
3 large eggs
5 teaspoons vanilla extract
For the frosting:
5 cups confectioners’ sugar, sifted
1/3 cup (5 1/3 tablespoons) unsalted butter, melted
1 tablespoon vanilla extract
7-8 tablespoon milk (plus more, as needed)
Food coloring (optional)
Sprinkles (optional)
Preheat the oven to 350 degrees. Line baking sheets with parchment paper or silicone baking mats. In a medium bowl, whisk the flour, baking powder and salt. In the bowl of an electric mixer fitted with a paddle attachment, beat the butter and sugar together on medium-high speed until soft and fluffy, about 2-3 minutes. Beat in the eggs one at a time, mixing well after each addition. Blend in the vanilla. With the mixer on low speed, add in the dry ingredients mixing just until incorporated and evenly mixed. Cover and chill the dough for 1 hour.
When you are ready to bake the cookies, scoop a scant quarter cup of dough and roll into a ball. Flatten the ball slightly and place on the prepared baking sheet. Repeat with the remaining dough, spacing the cookies at least 2-3 inches apart. Bake about 10-12 minutes or just until set (do not overbake! The edges should be no more than very lightly browned if at all). Let cool on the baking sheet for several minutes. Transfer to a wire rack to cool completely.
To make the frosting, place the confectioners’ sugar in a medium bowl. Add the melted butter, vanilla, and milk to the bowl and whisk until smooth. Whisk in additional milk as necessary, 1 teaspoon at a time, until you reach your desired consistency. Tint with food coloring if desired. Use a spatula or spoon to frost the cooled cookies (If the frosting begins to thicken as you decorate, just continue to whisk in small amounts of milk to keep it workable). Top with sprinkles if desired. Store in an airtight container. Makes 2 dozen large cookies.
Recipe source: Annie’s Eats, originally from Hostess With the Mostess


