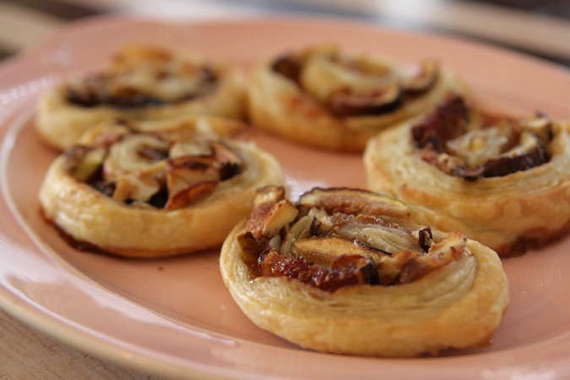
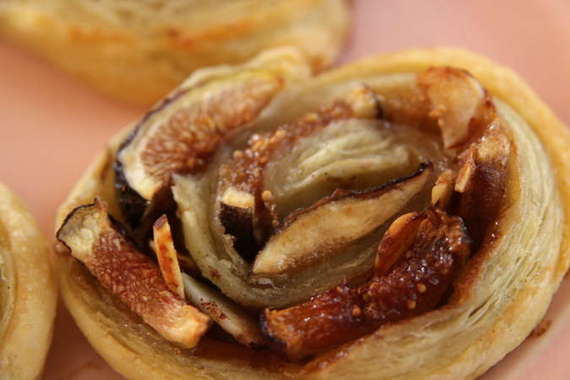
You may find this hard to believe, but I have never had figs before. I mean, of course I had tried Fig Newtons when I was younger, and like most kids, hated them. But when I saw that my local grocery store had a big, beautiful display of them, (and despite the fact I had no idea what to do with them) I just couldn’t resist. So, I spent all last week trying to find or think of ways to use my big, beautiful figs. Finally, I just rolled out a sheet of puff pastry and went from there.
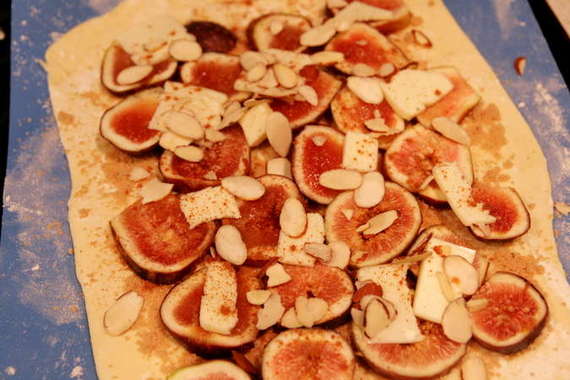
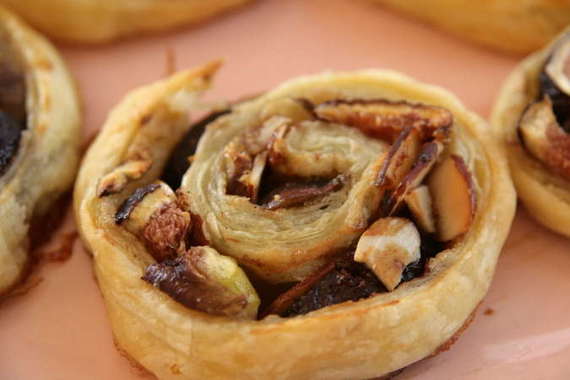
I sliced them up and scattered them all over the puff pastry along with brown sugar, cinnamon, sliced almonds and butter, rolled it up, sliced them into little pinwheels, threw them into the oven and hoped for the best. I couldn’t believe how beautifully they turned out! Just like I’d hoped!
There are still tons of fig recipes I’d like to make in the future, but I was really glad I decided to start with this one. These would be great with coctails, or for dessert – very versatile, in my opinion! Hubby really loved them, and while I’m still getting used to the taste of figs – I thought they were great too.
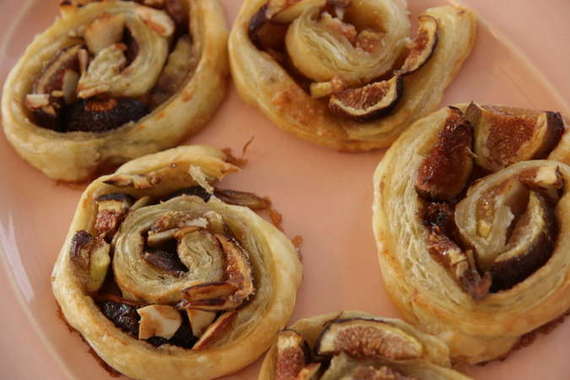
Fig and Brown Sugar Pinwheels
1 sheet puff pastry, thawed
6-8 fresh figs, sliced length-wise (I used Brown Turkey figs, but you could also use Kadota or Mission)
1/2 cup brown sugar
1 teaspoon cinnamon
1/3 cup slice almonds
2 tablespoons butter, melted and cooled (In the picture above, I didn’t melt the butter – I just placed little pieces of butter over the top of the figs, but I think melting it would be better!)
Preheat oven to 350 degrees. On a floured surface, roll out the puff pastry slightly. Brush the melted butter over the pastry, then top with brown sugar. Spread the sliced figs evenly over the whole surface, then top with cinnamon and sliced almonds. Roll the puff pastry up like a jelly roll, then slice into little pinwheels – you should get 10-12 rolls. Pinch the edges of each pinwheel to keep them from coming unrolled. Place on a baking sheet lined with parchment paper and bake for 15-20 minutes, or until golden brown and bubbly. Enjoy!

This was by far, one of the stranger recipes I’ve made so far with TWD. A Raspberry Blanc-Manger, chosen by Susan of Sticky, Gooey, Creamy, Chewy (who is a fellow musician, by the way! Woot, woot!). You’re probably wondering what the heck a blanc-manger is…I know I sure was! Basically, it’s sort of a creamy jell-o, if you will….Panna Cotta meets flan…sort of. Honestly, it was just weird to me. Ground almonds, milk, whipped cream, gelatin and fresh raspberries get mixed together and chilled for a few hours, then topped with rasperry coulis. Sounds good, right?

I was very tempted to just skip this week, as I wasn’t really in the mood for anything that sounded all French and snooty-like, but I’ve been a little neglectful of my TWD duties lately, so I decided to give it a go. This probably shouldn’t have been as complicated and time-consuming as I made it…but for whatever reason, it was. And I couldn’t really get over the fact that the whole time I kept tasting it…it reminded me of Cream of Wheat (you know, the hot breakfast cereal?). I guess it was the ground almonds in there with the cream and milk – it just tasted…breakfasty. Still, once I added the raspberries, let it set in the fridge, and topped it with a really delicious raspberry coulis (I threw in a splash or two of Chambord liquer…yum!), it tasted pretty good.

I loved the light, airy texture of it – that part was fantastic. It felt really fancy – this would probably really impress company. I probably won’t make this again – just not my cup of tea, I guess. However, as always, I’m still really glad I tried it…plus, I like saying the name. Blah-mah-jay! Fun. As always, if you’d like the recipe, head on over to Susan’s blog. She’ll have it posted.

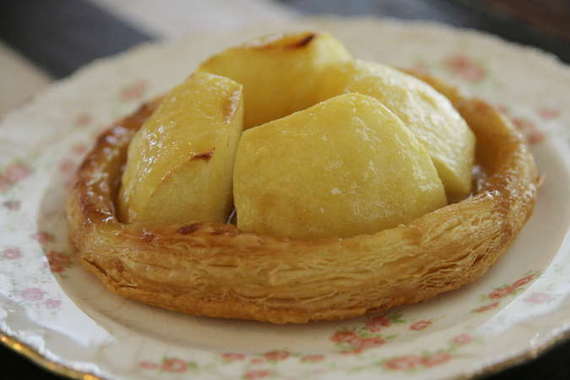
Yippee! This week’s recipe was chosen by my good buddy, Jessica, of My Baking Heart! Great pick, Jess!! These were sooooooooo easy! They literally took me 5 minutes to put together! Now that’s a recipe I can get behind!! All you need is some frozen puff pastry, an apple, brown sugar and butter…that’s it! And you get a gorgeous, flaky, buttery tartlet….it’s like a little apple birds nest! So cute!
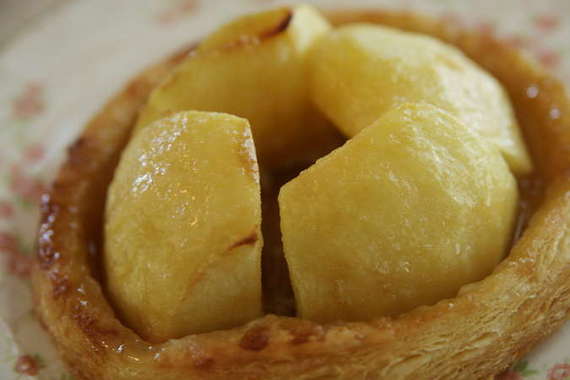
I am SO looking forward to making these again with other kinds of fruits – peaches, nectarines, plums, apricots….oh man, I’m getting all excited just thinking about it! My mother and nephew are coming for a few days this week and I’m thinking these are going to be the perfect little treat to welcome them!

I made two tarlets and sneaked a few bites as I was photographing them….a “few bites” quickly turned into me standing in the kitchen scarfing the remaining tartlet with my hands, with juice running all down my wrists. Talk about food guilt. I think Izzy and I will go on a nice, long walk tonight.
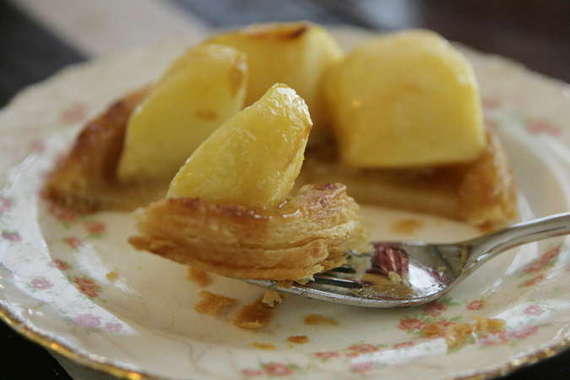
Go visit my good buddy Jessica’s blog and get the recipe from her- these would be perfect for company – they look like they were so much trouble, but really they’re embarassingly easy! Perfect!
First, let me start by saying how glad I am to be back to normal and back to blogging again! After a week and a half of being sick, I’m glad to report that I’m healthy again and back to my old self! Of course, now my hubby is sick, wouldn’t you know….but don’t worry, I’m taking good care of him. 🙂
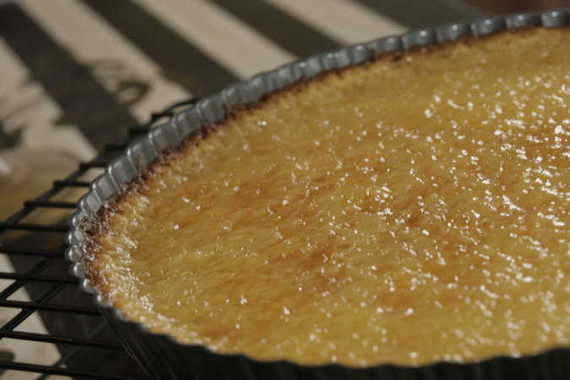
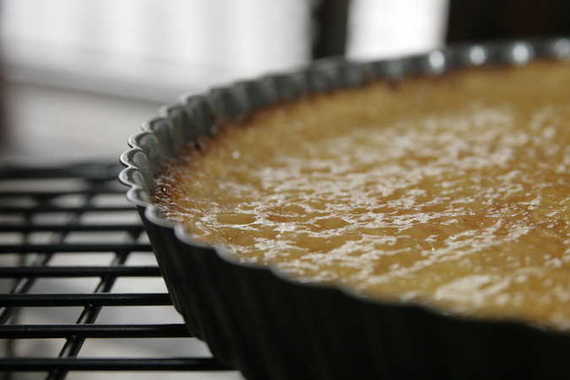
Ok, so, this week’s TWD recipe is Dorie’s Tartest Lemon Tart, chosen by Babette of Babette Feasts. It sure was nice to get back into my kitchen again and bake lots of goodies – I was very busy this weekend, in fact. Besides making this tart, I also got ready for my Mother’s Day brunch by baking next week’s mango bread and defeating my fear of yeast with the Pioneer Woman’s cinnamon rolls (all coming soon!). I was actually really excited about this tart because my mother loves lemony desserts but never gets them because my daddy doesn’t like lemon – perfect!- the tart would be part of my mom’s Mother’s Day gift!
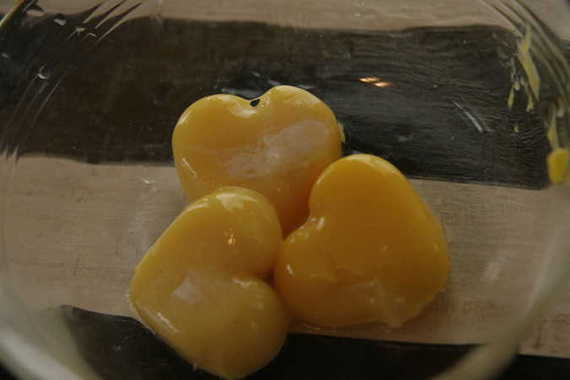
The thing that makes this tart extra special (and extra lemony) is the fact that the recipe uses the entire lemon – zest, pulp, juice, everything. You cut the lemon in pieces and throw the whole thing into the blender with some sugar, egg yolks (pictured above- I had frozen them in a heart shaped ice tray) and a few other things, blend it all together and pour it into Dorie’s amazingly delicious tart crust. A few TWD members had issues with it being too bitter due to the pith of the lemon, however, I heard from my mother and she said she really enjoyed it. She said it was definitely tart, but she loved it. Yay!
If you would like the recipe, visit Babette’s blog and she’ll fix you up! My mom said this is the perfect summer dessert, so everybody get busy and make yourself a lovely, summery lemon tart!

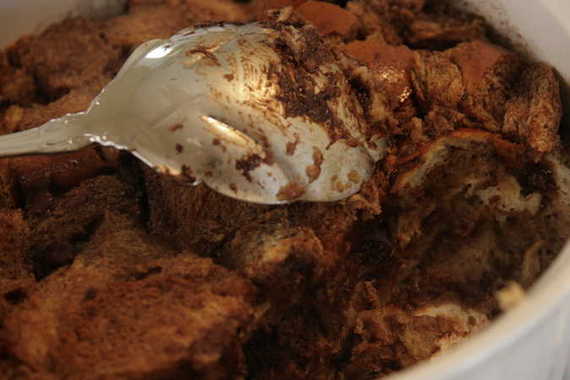
I love bread. I love chocolate. I love soggy, chocolatey bread. So you can imagine I thoroughly enjoyed this week’s TWD recipe chosen by Lauren of Upper East Side Chronicle (soon to be A Baking Blog), 4-Star Bread Pudding. I’m sure you all know how bread pudding works, basically you soak stale bread cubes in a milk mixture and bake it – deeeelicious. Dorie boils milk and cream together and mixes it together with eggs, sugar and chocolate; she pours it over stale Challah or Brioche and raisins or dried cherries and voila, chocolate bread pudding.
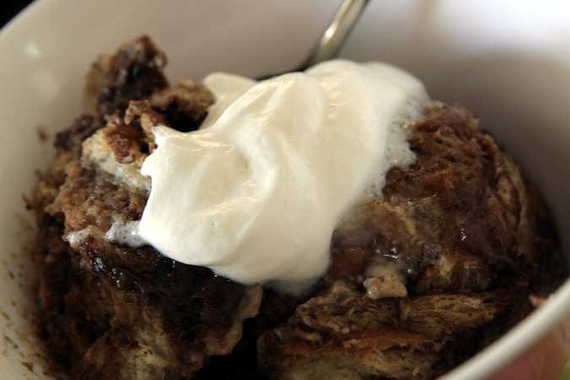
Now, I didn’t do excactly as Dorie told me to. I decided to pass on the option of the raisins or dried cherries (I don’t believe in fruit/chocolate mixtures- you know that!), I added a dash of cinnamon, and I also tossed in some semi-sweet chocolate chips with my bread. I ended up using twice the amount of chocolate called for and still could’ve used a tad more….I know..it’s a sickness. We’re looking into it. I used Challah bread, which was perfect – I love Challah. Especially the smooth, shiny crust – beautiful.
I personally think this recipe would be perfect at breakfast/brunch. To me, it seems to fit in somewhere in the family of my personal breakfast favorite, chocolate chip pancakes (with the whipped cream smiley face, thankyouverymuch!). I was really glad I added the extra chocolate chips – it really added to the “gooeyness” and in my opinion helped a lot with the taste and texture.
If you would like the recipe, head on over to Lauren’s blog and make yourself a chocolate bread pudding this weekend!
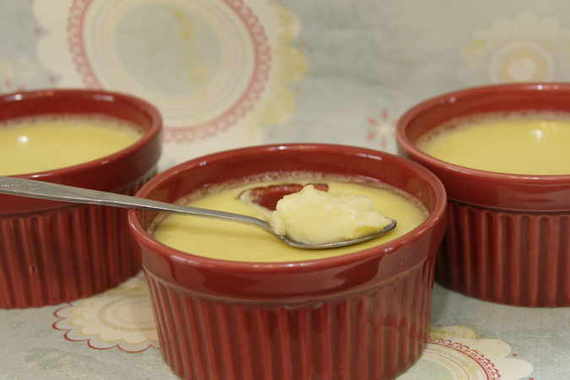
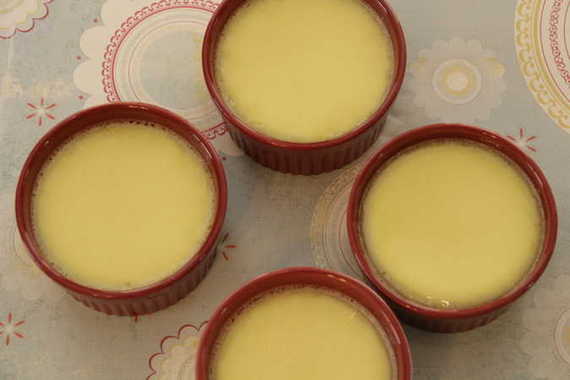
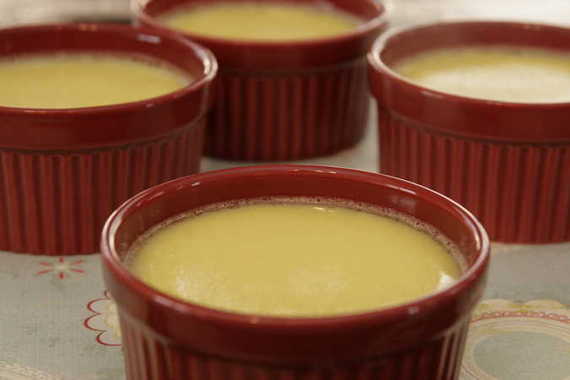
Here in Texas, the weather is about 70 degrees on average, the Bradford Pear trees are blooming again and absolutely gorgeous, people are out flying kites, walking their dogs and playing frisbee (Seriously. I live in Mayberry.) and there are mounds of beautiful, fresh lemons in my kitchen – that means Spring is finally here. Usually, I’m a winter kind of person – I love to bundle up in blankets with my hot cocoa and my hubby in front of a fire and just relax. But this winter was a little less-than-cozy…our heater sucks, so we were freezing cold from November through February. These past few days have been the first that I’ve been warm in a few months. Sad, I know. So naturally, now that the weather has warmed up, I’ve been wearing shorts and of course, making all kinds of lemon desserts. That’s where these custards come in.
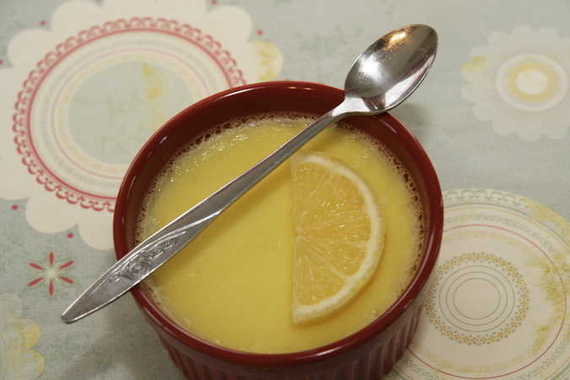
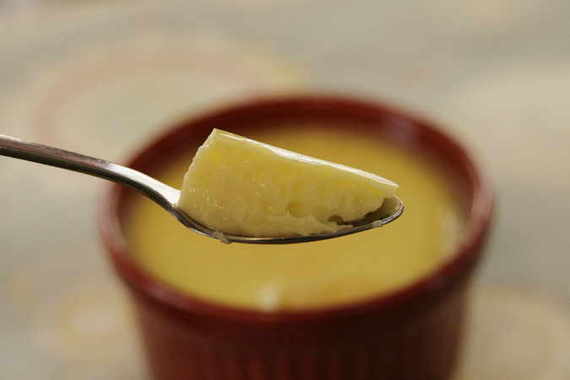
Bridget of The Way The Cookie Crumbles chose this weeks’ TWD recipe – Lemon Cup Custards. I was beyond excited when I saw her choice – I love lemon and I love custard. However, these were a little too “eggy” for me….Dorie even said herself that this is a very eggy dessert and those of us who aren’t big fans of desserts like this might want to skip this week. Honestly, I thought I was going to love these and its a crying shame I didn’t. I love flan, and I thought these would be similar, but really they weren’t, in my opinion. Too bad, but I’m really glad I made them and got to try them.
Even though I didn’t care much for this recipe, it was still a delight to be using lemons again. I absolutely love the scent of fresh lemon zest – it makes the whole kitchen smell so fresh and “springy”. Now I’m dying to make this lemon cake again! I guess it’s a good thing that next week’s TWD pick is a French Yogurt Cake with lemon marmalade – can’t wait for that one!
Don’t let my opinion of these custards scare you – if you’re a fan of custard and lemon, you might love this! It’s worth a try, anyway! Head over to Bridget’s blog and get the recipe – its really easy and only uses 4 ingredients.

Now get out there and enjoy Spring! Plant some flowers, take your dog on a long walk, sit outside at night with your hubby and enjoy a bottle of wine, or bake something with lemon – that’s the best way to enjoy the weather! Gosh, I sound like a big, stinking hippy, don’t I? Oh well…guess I should embrace it…“If you’re goinggggg to Saaaan Fraaaancisco…be sure to weeeear some flowers in your haaaaaaair….” Um…sorry. Don’t know exactly where that came from.
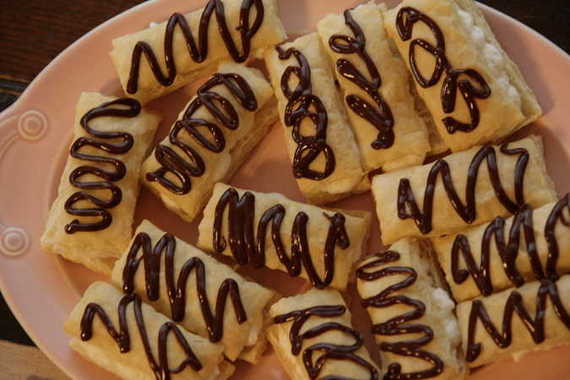
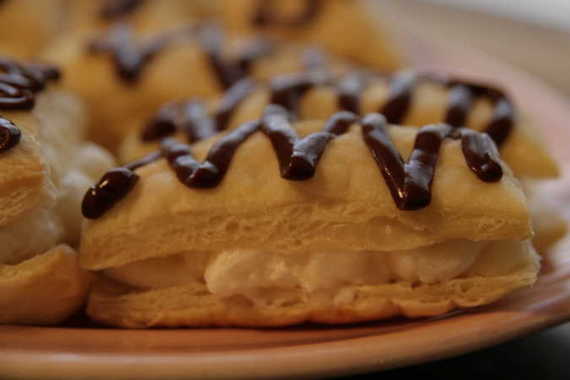
A while back, I saw this recipe on Bunny’s Warm Oven and thought it would make a great dessert for company! A few weeks ago, I had my parents over for a nice dinner and decided to serve these for dessert. They were a big hit, thankfully – and so simple to make. I love that it calls for puff pastry!
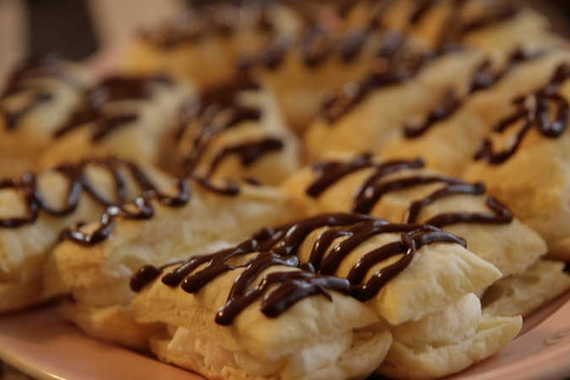
Cream-filled Pastry
-Bunny’s Warm Oven
PASTRY:
1 pkg. frozen puff pastry sheets, thawed per package directions
Remove the package of puff pastry from the box; take it out of the wrapper and allow it to sit on the counter @ room temperature for 20-30 minutes Carefully open one pastry sheet along the creases; place remaining sheet in the refrigerator to keep it cold (I cut the pastry when it’s partially frozen-as long as I can unfold it and it doesn’t tear, it’s fine. The pastry seems to puff higher when it bakes if it’s cold when it goes in the oven). Using a long, sharp knife, cut each strip of pastry at creases, forming 3 strips. Cut each strip widthwise into 7 pieces, slicing straight down-don’t drag the knife across the pastry. Flip each cut piece over (to place the side you cut on down onto the sheet). Place on lightly greased baking sheets, leaving room between each piece. Repeat with remaining sheet of pastry. Bake at 400 degrees for 10-12 minutes or until golden brown. Remove to a wire rack and cool completely. Using a serrated knife, slice through the center to make top and bottom halves.
CREAM FILLING:
1 c. whole milk
5 Tbsp. all-purpose flour
1 c. granulated sugar
1/2 tsp. salt
1/2 c. shortening
1/2 c. butter or margarine, at room temperature
1 tsp. vanilla extract
Place flour in a small saucepan; slowly whisk in milk. Cook and whisk constantly over low heat until mixture thickens and comes to a boil. Remove from heat; place mixture into a small bowl. Cover bowl with a paper towel and cool to room temperature.
Place cooled mixture in bowl of electric mixer; beat until fluffy. Add remaining ingredients, one at a time, and continue beating on medium-high speed for 5-10 minutes or until light and fluffy (I use my KitchenAid mixer-I start with the paddle, then when all the ingredients are very well mixed, I switch to the whisk attachment and let that do the rest of the work). The mixture should look like a whipped cream type frosting. I rub a little of it between my fingers to make sure the sugar has totally dissolved. Spread about 1 Tbsp. of filling on bottom half of each pastry; replace tops. Store in refrigerator. Yield: 42 pastries.
*I used Dorie Greenspan’s chocolate ganache recipe for the glaze on top:
3 oz bittersweet chocolate, coarsely chopped
1 tbsp confectioners’ sugar, sifted
2 tbsp cold unsalted butter, cut into 6 pieces
Melt the butter, then pour over the chocolate and stir until chocolate melts. Gradually whisk in the sugar and stir until lumps are gone. Let sit at room temp. to cool slightly before using.
I just used a ziploc baggie with a tiny hole cut in the tip (a la Aunt Sandy) to pipe the chocolate onto the pastries.3 oz bittersweet chocolate, coarsely chopped (Valrhona bittersweet 70%)
**WARNING** This post contains large amounts of cheesiness and ooey gooey “warm fuzzies”. Please don’t make fun of me. Thank you.
This is a very special week for TWD – not only are we celebrating one year since Laurie dreamed up this amazing group, but Dorie herself (as in Tuesdays with) has chosen the recipe for this week!!! I mean, how freaking awesome is that?! I’ve been looking forward to this post all week!
**And just in case Dorie reads this (hey, a girl can dream, right?), I want to say what a joy this group has been for me. Before I joined TWD, the only things I ever baked came out of a box. I never really knew how good something baked from scratch could taste. Now I bake almost everything from scratch (except brownies…honestly, I just haven’t found a recipe I like better than good ‘ol Duncan Hines! I’m not ashamed!), and I’m so much more open to new recipes and ideas than I was a year ago. I mean, last week I made my first EVER cheesecake! That was huge for me, and it’s all because I committed to this group and this amazing book. I have so much pride in the things I bake now….and I owe that to being in this group and most importantly to Dorie.
Ok, enough of me being a huge loser. Onto the recipe! Dorie chose one of her favorites for us this week- the French Pear Tart (oooh, ahhhhh…)
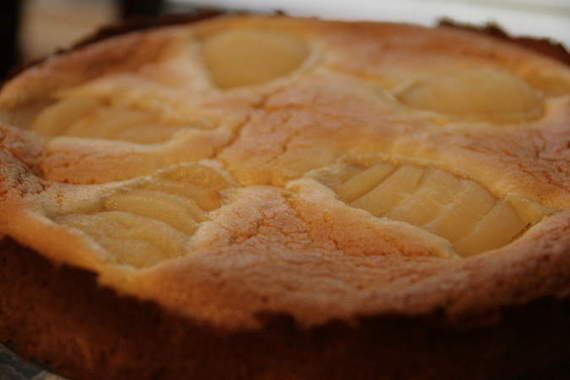
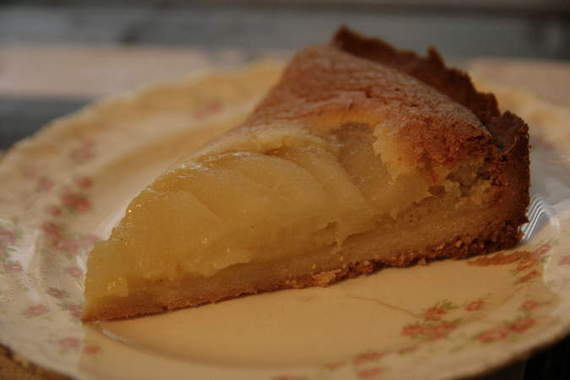
I was so glad Dorie chose this, because honestly it’s not something I would’ve chosen on my own, but it turned out to be fantastic! It starts out with Dorie’s Sweet Tart dough (which is awesome, by the way – it tastes like a shortbread cookie!), filled with an almond cream, then topped with sliced pears. The great thing about this dessert is, you can use canned pears if you’re short on time – Dorie gives you permission! The almond cream calls for either rum or vanilla extract, but I wanted to use my new vanilla paste, so my custard had lovely little flecks of vanilla bean all through it, which I really liked! My crust got a little too “done”, but it still tasted wonderful!
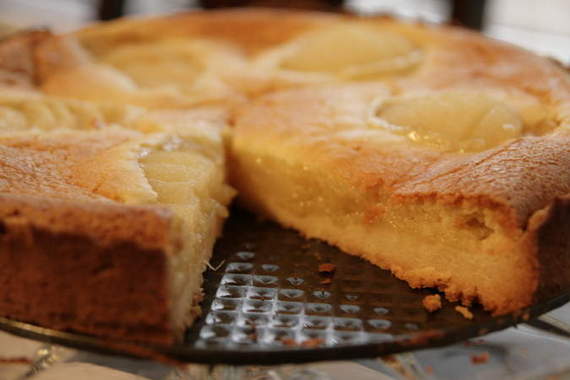
I had to use my 9 inch springform pan because I didn’t have the right sized tart pan; so mine looks a little less “Frenchy” and a little more “rustic”. This was a really good tart and hubby and I both really enjoyed it. I think it would be great to serve for company – it looks really impressive but it doesn’t require a lot of work! Perfect! Dorie will be featuring this recipe on her blog (and trust me, her’s looks waaaaaaay better than mine!) so be sure to head over there and check it out!! Seriously. Go now.
If there are those of you out there that do not own a copy of Baking From My Home to Yours by Dorie Greenspan, let me urge you to go out and get yourself a copy. This book changed my life – seriously. I haven’t come across a bad recipe yet. Or even just a mediocre recipe, come to think of it – they’re all absolutely amazing. Go! Grab yourself a copy and start baking! Your husbands will thank you. And HAPPY BIRTHDAY TUESDAYS WITH DORIE!!! Here’s to another great year!
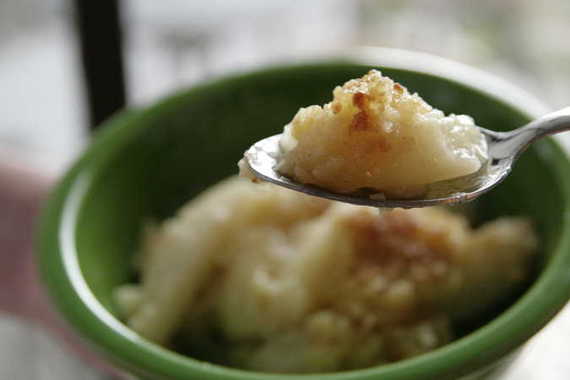
(Hehe – if you look really close, you can see my reflection in the spoon!)
There comes a time (not very often, mind you) when you want something more than chocolate chip cookies or brownies for dessert. Now, I LOVE a good chocolate chip cookie fresh out of the oven…there’s nothing like it! But on a cool Fall night, there’s nothing better than a bowl of warm apple crisp – soft, cinnamony apples covered with a crispy, yet slightly chewy, buttery topping, dripping with a scoop of melty vanilla ice cream. Ohhhhhh baby…..now THAT’S a dessert!! And the fact that it takes practically no time to prep, which means you don’t have to wait long to shove your pie hole full of a big ‘ol bite, doesn’t hurt its case, either! Its one of those quick fix desserts that I find myself making every single Fall. The same recipe. Everytime. Why change a good thing, you know?
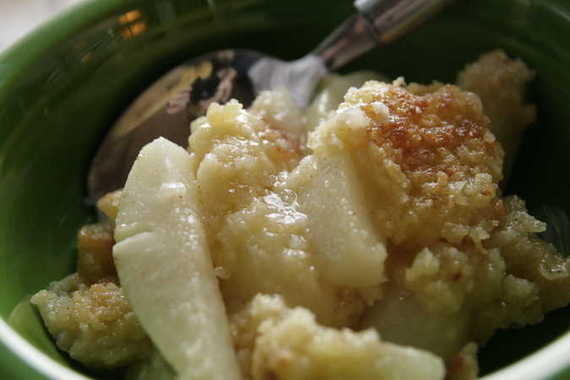
BUT – I didn’t come here to talk about apple crisp….I’d rather talk about pear crisp. (“Oooh, pear crisp?” you’re thinking….yeah, pear crisp – and its fantastic!) Yesterday I was at the grocery store picking up stuff for dinner (beef tips over rice – post coming soon!) and as I walked through the produce section, I was hit in the face with the overwhelming smell of fresh, juicy pears. “Hmmmm, pears would be great in place of apples in my apple crisp recipe!” , I thought! So I decided to give it a try and boy was I glad I did! This was delicious! Last night was a really chilly night, and hubby and I cuddled up on the couch with a big bowl of warm pear crisp and had ourselves a fantastic night! I highly recommend this recipe – its just delicious!
Pear Crisp
-original apple crisp recipe from my mom
1 Cup AP flour
1 Cup sugar
pinch salt
1 stick butter or margarine, melted (I found that about 6 tablespoons does the trick – a whole stick is a little too much, in my opinion)
1 egg, beaten
cinnamon to taste
3 -4 pears, peeled, cored and sliced into wedges
juice of half a lemon
Preheat oven to 350 degrees and grease a square baking dish. In a bowl, whisk together flour, sugar, and salt, then add the beaten egg and stir until you have pea-sized pieces of dough. Place sliced pears in the baking dish and squeeze lemon juice over them; sprinkle desired amount of cinnamon over pears. Sprinkle crumb topping over pears and pour the melted butter evenly over the topping. Cover and bake for about 20 minutes, then remove foil and bake for another 20 – 25 minutes or until golden brown and bubbly. Serve with a big ‘ol scoop of ice cream!
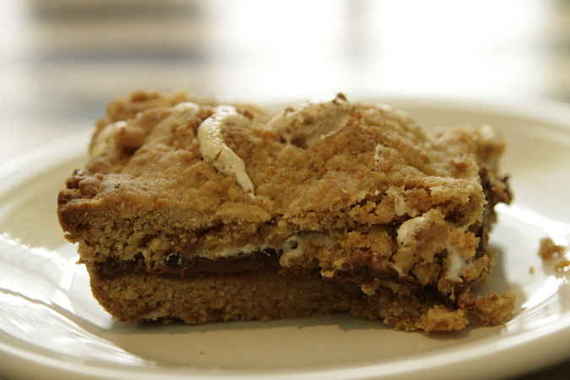
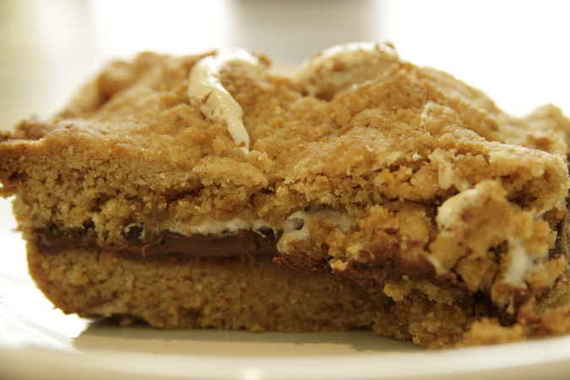
The other night was a serious “girl-on-the-edge-needs-chocolate” kind of night. I toyed with making the Pioneer Woman’s chocolate sheet cake (don’t worry, that will come shortly, I can assure you!) or a delicious chocolate cake I found in another of my favorite blogs, Joy the Baker – but I decided to take one last peek at my saved recipes from other cooking blogs and stumbled across S’more bars from Noodle Nights and Muffin Mornings – bingo. Anything with chocolate, marshmallow and graham cracker crumbs sounded utterly perfect to me, so on with the S’more bars!
These were delicious – even hubby, whose respones to my baked goods are usually along the lines of, “yeah, its pretty good” loved these and made a point to tell me over and over again how much he enjoyed them! I sent the rest of the bars to work with him the next day and he came home with rave reviews. Bullseye!
S’more bars
Noodle Nights and Muffin Mornings blog
Ingredients:
1/2 cup (1 stick) butter or margarine, softened
3/4 cup sugar
1 egg
1 teaspoon vanilla extract
1-1/3 cups all-purpose flour
3/4 cup graham cracker crumbs
1 teaspoon baking powder
1/4 teaspoon salt
4 (1.55 oz. each) Milk Chocolate Bars
1 cup marshmallow creme
Directions: Heat oven to 350°F. Grease 8-inch square baking pan.
Beat butter and sugar in large bowl until light and fluffy. Add egg and vanilla; beat well. Stir together flour, graham cracker crumbs, baking powder and salt; add to butter mixture, beating until blended. Press half of dough into prepared pan. Arrange chocolate bars over dough, breaking as needed to fit. Spread with marshmallow creme. Scatter bits of remaining dough over marshmallow; carefully press to form a layer.
Bake 30 to 35 minutes or until lightly browned. Cool completely in pan on wire rack. Cut into bars.
Yields 16 bars


