
Just in time for Labor Day weekend, here’s a knock-out recipe for baked beans! I have a feeling these will make yet another appearance at our get together this weekend! Enjoy the holiday!
Crockpot Brown Sugar Baked Beans
3 (28 ounce) cans pork and beans
1 small onion, diced
1 bell pepper, diced
1/2 cup barbecue sauce
1/2 cup ketchup
3/4 cup brown sugar
2 tablespoons yellow mustard
5 slices bacon
Mix first 7 ingredients in a crockpot. Stir until combined and arrange the bacon strips on top. Cover and cook on low for 3-5 hours, stirring occasionally. Remove the bacon strips before serving.
Recipe source: a mixture of my mom’s recipe and a recipe from Six Sisters’ Stuff
Howdy folks! I told you we were gearing up to take our very first family vacation. Well, it happened last weekend. And surprisingly…it rocked. Every aspect of it was wonderful (except for the hellish car trip home…that made us both rethink this whole parenting thing). Here are a few pictures from our trip to Galveston, Tx. (all photos are unedited. Frankly, I’m just too lazy…)


first time on the beach- she was terrified of the sand!


Needless to say, she slept VERY well each night…
More pictures to come soon! 🙂

Well, friends, the time has finally come for our little family of 3 to take the plunge and do something highly stressful, chaotic, yet very important and hopefully very memorable…
…take our first vacation. That’s right. Very soon, we’ll load up our little CR-V and head for the Texas coast. We’ll be renting a small condo on the beach for 3 nights and I’d be lying if I said I wasn’t totally nervous.
What if I forget the blankie/paci/sippy cups?
What if Cassidy hates the beach?
What if she’s not able to sleep in the pack-n-play at night?
What if I don’t properly sunscreen her and she gets sunburned?
What if she steps on a jelly fish?
What if a creepy sunken ship washes up on shore and my worst nightmare comes to life??
Ok, so that last one is probably a bit of a stretch, but you get the idea. I’m a vacation-stresser anyway (meaning, I usually ruin our vacations with my constant worrying that something will go wrong, when what I don’t realize is that my worrying IS the something that goes wrong.), so naturally when a 19 month-old is involved, I take the stressing to a whole new level. However, I’ve done a good bit of researching tips for taking toddlers to the beach and I feel like I’ve got most of my bases covered, at least. So I guess we’ll just cross our fingers and hope for the best! 🙂

Now, onto these cookies! Who doesn’t love sandwich cookies, right? Soft, chewy cookies filled with sweet, buttery frosting? Yes, please! Our music minister and his family recently celebrated 10 years of service at our church- that’s a big deal! So the church threw them a little party and the choir volunteered to bake cookies. I didn’t want to bake just ANY old cookies for Matt and Caryn, and I decided nothing screams ‘celebration’ like funfetti, so these funfetti sandwich cookies were born! They disappeared pretty quickly, too, so I guess people liked them! Caryn, Matt- if you’re reading this, congratulations again! We love you!

Funfetti Sandwich Cookies
2 cups all-purpose flour
1/2 teaspoon salt
1/2 teaspoon baking powder
1 stick plus 2 tablespoons (10 tablespoons) unsalted butter, at room temperature
1 cup sugar
1 large egg
1 large egg yolk
1 teaspoon pure vanilla extract
1/4 teaspoon almond extract
Colorful sprinkles
For the buttercream:
1 stick unsalted butter, at room temperature
3-4 cups confectioners’ sugar
1 teaspoon vanilla extract
1/4 teaspoon almond extract
pinch salt
splash milk (optional)
yellow food coloring
Preheat the oven to 350 degrees. Line two baking sheets with parchment paper or silicone mats.
Whisk the flour, salt, and baking powder together.
Working with a stand mixer fitted with a paddle attachment, or with a hand mixer in a large bowl, beat the butter at medium speed until smooth. Add the sugar and continue to beat for about 2 minutes, until the mixture is light and pale. Add the egg and yolk and beat for another minute or two; beat in the vanilla and almond extract. Reduce the mixer speed to low and steadily add the flour mixture, mixing only until it has been incorporated. Slowly stir in the sprinkles.
Using a teaspoon or small cookie scoop, scoop out the dough, roll into balls, and place on the baking sheets; press down gently to flatten slightly.
Bake the cookies for 8-9 minutes. The cookies should feel firm, but they should not color much, if at all. Cool completely.
To make the buttercream, beat the butter on medium speed until smooth. Add in the powdered sugar a little at a time until desired consistency is reached (it should be fairly think, but easily spread or piped.). Add in the vanilla extract, almond extract and salt. If icing is too thick, stir in a little milk. Gently stir in as much food coloring as you want to make it the desired color of yellow.
Pipe or spread the buttercream on half of the cookies; place other half of the cookies on top to make sandwiches. Makes approximately 17-20 sandwich cookies.
Recipe source: cookie recipe adapted from Dorie Greenspan; buttercream is a Sing For Your Supper original

Let’s say hypothetically, you’ve had a day from you-know-where; maybe hypothetically, your sweet, precious little angel had somehow transformed into a squealing, screaming, whining, hitting little devil. [hypothetically] Perhaps the little tike dropped her toy espresso maker on your foot at just the right angle, so as to make each step you take after that excruciatingly painful. And then, perhaps, upon trying to give her a hug, the little sweetheart tried to slap your face away and ended up cutting your gums with her adorable little fingernail. HYPOTHETICALLY. 12 screaming tantrums, 4 thrown sippy cups, and 1 disappointingly short nap later, it’s dinner time. Joy. And since your precious cherub is teething, getting her to eat anything is darn near impossible. And don’t forget the fact that you let her eat Chick-fil-a nuggets for lunch, so whatever you cook needs to be healthy. Go ahead, supermom. Get in that kitchen and make some magic! And don’t forget to whistle a happy tune while you do it! 😉
Luckily, I have recipes like this one on standby. Quick, easy, and good for you. My 3 requirements. And when I’ve had the (ahem, hypothetical) day from you-know-where (by the way, my freaking foot is still throbbing…), I can pull this dinner off in less than 30 minutes. Remember that awesome roasted broccoli I just shared with you? Well guess what- it’s GREAT on pizza! And Cassidy loves it! Mommy: 1; Rotten day: 0!

Roasted Veggie Pizza
4 personal-sized thin pizza crusts (I use store-bought, but feel free to make your own)
1 head broccoli, cut into bite-sized pieces
1 red bell pepper, sliced thinly
1 heaping cup button mushrooms, sliced
salt and pepper
olive oil
pizza sauce
mozzarella cheese
Preheat oven to 400 degrees and line a baking sheet with foil. Toss the broccoli, red pepper, and mushrooms in a little olive oil and spread in a single layer on the baking sheet. Sprinkle with salt and pepper and roast for about 20 minutes, until vegetables are soft.
Make your pizzas: spread each pizza crust with a thin layer of pizza sauce. Top with roasted veggies, then cheese. Bake in the preheated oven (still at 400) for about 8 minutes, until crust is crisp and cheese is melted. Serve immediately.
Recipe source: Sing For Your Supper original

Moms: do you have trouble getting your little ones to eat their veggies? Well don’t give up! Green vegetables like peas, spinach, green beans, broccoli, kale, etc are so, so good for our growing kiddos! I understand the struggle – up until I started cooking it like this, I could never get Cassidy to eat her broccoli. She loves peas and green beans, but it seemed like no matter what I did, she wouldn’t touch broccoli. Probably because it tastes like flavorless mush by the time I finish steaming it. But broccoli fixed this way? She can’t get enough and I’m thrilled!
It’s SO simple- toss your broccoli florets with a little olive oil, salt, and pepper and roast it at 400 for about 15-20 minutes. That’s it and it’s WONDERFUL! The broccoli gets nice and soft, but it’s still bursting with flavor. I’m a huge fan of roasting any vegetables since it brings out the flavor so beautifully, and I have to say, I think roasted broccoli is my new favorite.
…just make sure you burn a candle or open a window since we all know how stinky it is to cook broccoli. A small price to pay for a delicious, healthy side dish, right? 😉
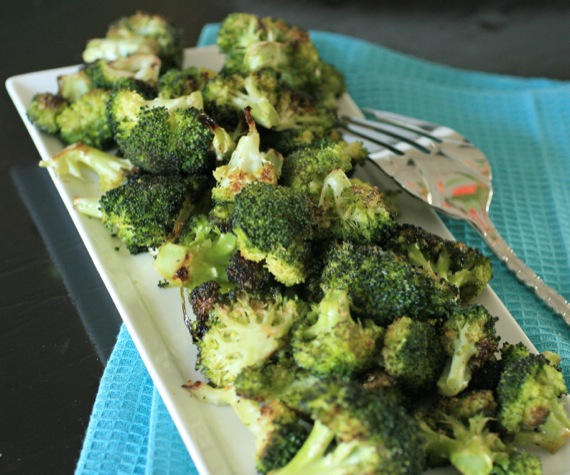
Roasted Broccoli
1 head fresh broccoli, cut up into bite-size pieces
olive oil
salt
pepper
Preheat oven to 400 degrees. Toss the broccoli with the olive oil, then spread onto a baking sheet lined with foil (this makes cleanup a snap!) and sprinkle with salt and pepper. Roast for about 15-20 minutes, turning the broccoli over halfway through cooking. Edges should be slightly dark and broccoli will be tender when done. Serves 2-3 as a side dish.
Recipe source: Sing For Your Supper original, although, this is not a new concept 😉
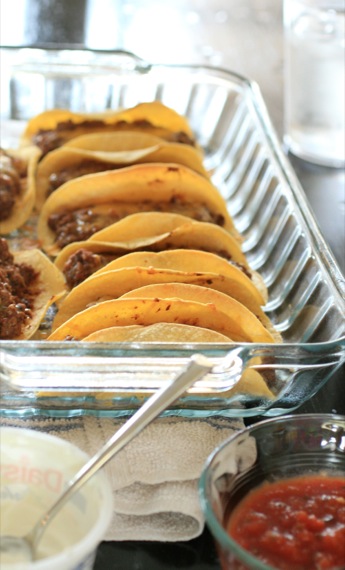
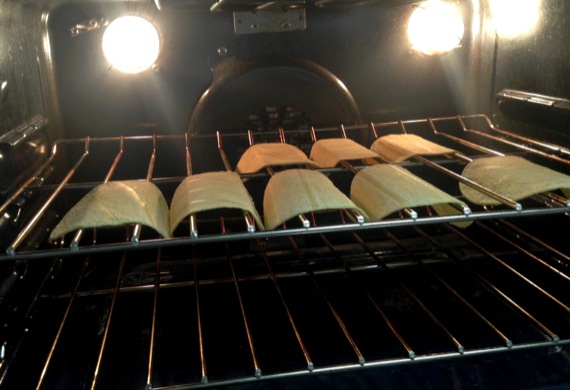
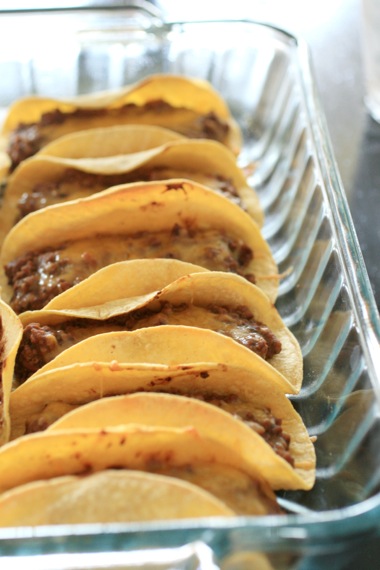
I don’t know about you (actually, I’m pretty sure I do), but I get most of my meal planning ideas from Pinterest. On the days I go grocery shopping, I’ll sit down and peruse my ‘Food’ board for ideas as I make my shopping list. I think I have 2 or 3 different versions of this recipe pinned. As much as we love tacos in this house, I’m shocked I haven’t made these before now. I love the idea of refried beans mixed in with the meat filling, and I love that this recipe doesn’t call for the cardboard-like, boxed pre-made taco shells. You make your own crisp shells right on the oven rack! Genius! These were soooo good topped with a little salsa and sour cream and I can’t wait to make them again!
Baked Tacos
2 pounds lean ground beef
1 can refried beans
1/2 cup salsa
1 package taco seasoning or 2 – 3 Tablespoons of homemade taco seasoning
shredded cheese
15-18 corn tortillas
Make the taco shells: Preheat oven to 375. Place tortillas in a damp paper towel and microwave for 30 seconds. Spray each tortilla with cooking spray and carefully drape over two bars of the oven rack. Cook for about 7-10 minutes, until crispy.
Meanwhile, brown ground beef. Drain off any fat and add refried beans, salsa, and seasoning.
Spoon mixture into taco shells and place into a 9×13 pan, standing up. Sprinkle with cheese.
Bake at 400 for 10-12 minutes or until heated through and cheese is melted. Top with your favorite taco toppings (sour cream, salsa, lettuce, etc.). Serves around 5-6.
Recipe source: slightly adapted from One Good Thing by Jillee

Happy Friday!! To celebrate the coming weekend (woo!), I’m sharing a yuuuuummmmm-EEEE breakfast treat with you! These little gems are a family favorite that my sister and I enjoyed a lot growing up. There are a few steps involved, but really, they couldn’t be easier! All you need is a can of biscuit dough, oil for frying, and cinnamon-sugar. Easy.

Obviously, since these are deep fried, I don’t make them too often, but recently, the whole family got together for a birthday brunch celebration for my sister and grandmother, and I wanted to make something special for them. If you can’t eat fried dough on your birthday, then when can you, eh? 😉

Fried Cinnamon-Sugar Biscuits
1 8-piece can refrigerated biscuit dough
vegetable or canola oil for frying
1/2 cup sugar
2 tablespoons cinnamon
In a large dutch oven or deep cast iron skillet, heat about 2 inches of oil to around 350 degrees. To know when your oil is hot enough, you can either use a thermometer or put a drop of water into the oil; if the water sputters and pops, it’s ready. I kept my heat set on medium-low after reaching the desired temperature and was able to keep a pretty consistent 350 degrees.
Have a large platter lined with paper towels ready. Mix sugar and cinnamon together in a pie plate or platter; set aside. Cut each biscuit into quarters. Drop 6-8 pieces of dough in the hot oil (carefully) and cook until they begin to brown on one side and float. Turn them over and cook until the other side is lightly browned. Remove from the oil and drop into the cinnamon-sugar; roll to coat and set on the paper towel-lined platter.
Repeat with the remainder of the dough pieces. If your dough seems to be browning too quickly, your oil is too hot. Reduce the heat just a little. Each piece should take about 45 seconds to 1 minute on each side. Serve immediately. Makes 32 pieces.
Recipe source: an old family recipe, not sure of its origin
For Valentine’s Day this year, Joel took me (sans baby) to an nice hotel for the weekend. We lounged in bed watching movies, snacked on complimentary cake balls and champagne, and literally did pretty much nothing but wallow in our sweet, sweet freedom. I know. That sounds just horrible, doesn’t it? How could we even think about enjoying ourselves without our precious one year old?? Well….it was EASY. Although I did require hourly updates from my parents and may have ended up watching a video they sent us of Cassidy having an absolutely splendid time over…and over…and over. Ah, freedom from the baby; always a bit bittersweet, no? 😉
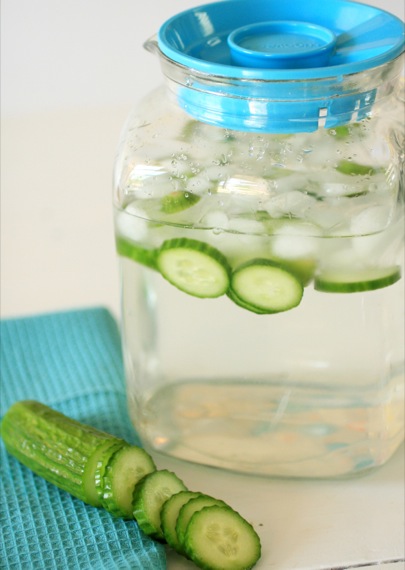
Anyway, to treat ourselves after a particularly long and tiring few weeks, we visited the spa at the hotel. Being one of the top rated spas in the DFW area, we were eager to give it a try, and it totally lived up to its reputation! Hands down, the greatest massage I’ve ever had! However, the thing I remembered most from our little spa outing was the lovely snacks they had! All kinds of fresh fruits, dried fruits, nuts, coffee, a variety of teas, and glasses of ice cold water with cucumber slices. It was so crisp and refreshing! Since that weekend in February, I’ve made several pitchers of this cucumber water. When it’s hot summer, there’s nothing better than a cold glass of this stuff! It’ll cool you right off!
Refreshing Cucumber Water
filtered, cold water
1 seedless hothouse cucumber (if your store doesn’t carry the seedless variety, regular cucumbers are fine)
ice
Fill a large pitcher with cold, filtered water. Thoroughly wash and thinly slice your cucumbers; no need to peel. Add ice and cucumbers to pitcher. Serve immediately.

Raise your hand if you love breakfast for dinner. Me too. Something about getting to drink coffee at night is strangely fun for me. Speaking of that, isn’t it funny how old people always drink coffee with their dinner? In our little town, you’ll go to a restaurant and see an old couple eating mexican food and drinking coffee. Weird.
Anyway, about these biscuits. Now, normally, I would insist on making my great-grandmother’s biscuits, since that was her thing. Baba was a very gifted cook, but I think she would agree with me when I say biscuits were her specialty (well, it may be a tie with her peach cobbler.). However, I don’t exactly have the recipe. Once I tried making them from the cookbook my mom said Baba always used for her biscuits, but something wasn’t right. Honestly, for whatever reason, I’m too scared to make Baba’s biscuits. Just add it to the list of things I’m too chicken to make (my mom’s fried okra, chicken fried steak, anything involving yeast…the list, unfortunately, goes on).
So this time, I chose Deb of Smitten Kitchen’s recipe. And they were really, really good. So perfect hot from the oven and smeared with butter alongside a cup of coffee. And far too easy to continue making store-bought. Frankly, there’s just no comparison.
Buttermilk Biscuits
2 1/4 cups all-purpose flour
1 teaspoon sugar (to taste; you can use more or less. I don’t like mine to be overly sweet)
1 tablespoon baking powder
3/4 teaspoon salt
3/4 teaspoon baking soda
9 tablespoons chilled unsalted butter, cut into small chunks
3/4 cup buttermilk
Preheat oven to 400 °F and line baking sheet with parchment paper. Whisk flour, sugar, baking powder, salt and baking soda in large, wide bowl. Using fingertips or a pastry blender, work butter into dry ingredients until the mixture resembles a coarse meal, Add buttermilk and stir until large clumps form. Using hands, knead mixture briefly until it just holds together.
Transfer dough to floured counter and pat out until 1/2 to 3/4-inch thick. Using a round cutter (about 2 inches; I always use a small juice glass, like my great-grandmother did), press straight down — twisting produces less layered sides — and transfer rounds to baking sheet, spacing two inches apart.
Bake until biscuits are golden brown on top, about 12 to 15 minutes. Serve warm. Makes approximately 9 biscuits.
Recipe source: barely adapted from Smitten Kitchen

Ok, so these look more like meatloaf…spheres.
I make meatloaf all the time- I love it, Joel loves it, Cassidy loves it….we all love meatloaf. But sometimes it’s fun to play around with a classic. What’s more fun than having your own personal little meatloaf sphere muffin? I don’t know how it is at your house, but at my house, everyone wants the end piece of the meatloaf- it’s the piece with the most “crust” on the outside. By making muffins, every single piece is the end piece! Huzzah!

Meatloaf Muffins
1 pound lean, ground beef
1 egg, beaten
1 15-oz. can diced tomatoes
1 teaspoon salt
1/2 teaspoon pepper
1 teaspoon worcestershire sauce
half an onion, chopped
1 green pepper, chopped
1/2 package Saltine Crackers, crushed (probably about 10 crackers or so)
ketchup for the tops, if desired
Preheat the oven to 375 degrees. Grease a muffin pan that holds 12. In a small skillet over medium-high heat, sauté the onion and pepper with a little butter or olive oil until soft; about 5 minutes. Set aside to cool.
In a large bowl, combine the ground beef, egg, tomatoes, salt, pepper, worcestershire, onion and pepper, and saltine cracker crumbs (I find the best way to do this is with my hands). Place some of the meat mixture in each greased muffin cup and bake for about 35 minutes, until a nice crust forms on the tops. Top with ketchup before serving, if desired. Makes about 12 muffins.
Recipe source: Sing For Your Supper original


