
Over the past few weeks, we’ve really gotten a taste of some glorious weather. Sunshine, 80 degree temps, and nice cool breezes. I’ve been taking Cassidy and Izzy on lots of nice, long walks every day to enjoy the beautiful weather. We even had a little picnic in our front yard last week!

So, with all the gorgeous weather, I’ve just been dying to get in the kitchen and bake up some bright, springy treats. And then- BOOM! Freezing temperatures and high, cold winds. *sigh* Oh well. That’s what you get when you live in Texas. However, I STILL decided to bake up something bright and sunny- this Orange Yogurt Cake. It’s nice and moist with a great pop of fresh orange flavor. So even if it was freezing outside, we brought the sunshine indoors with this yummy cake!
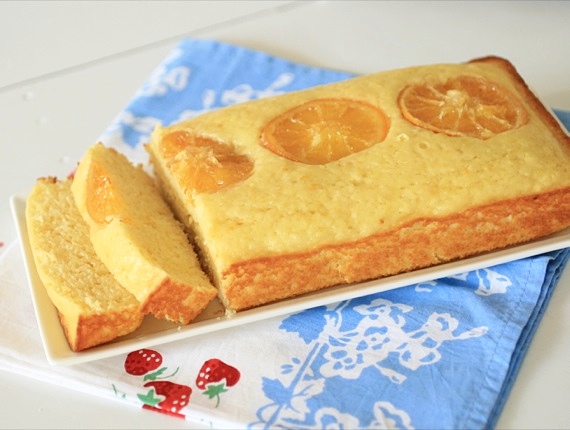
Orange Yogurt Cake
1 cup all-purpose flour
1/2 cup granulated sugar
1/2 teaspoon baking powder
1/8 teaspoon baking soda
1/4 teaspoon salt
1/2 cup non-fat Greek yogurt
1/4 cup vegetable oil
1 tablespoon grated orange zest, plus 1 tablespoon, juice
1 egg
1/2 teaspoon pure vanilla extract
Preheat oven to 350 degrees. Butter an 8-inch round cake pan. Stir flour, sugar, baking powder, baking soda, salt, yogurt, oil, orange zest and juice, egg, and vanilla in a bowl. Pour into pan. Bake until a cake tester comes out clean, about 25 minutes. Let cool on a wire rack.
Garnish with additional orange slices if desired.
Recipe source: adapted from Martha Stewart

I don’t post political rants. I don’t even post my political opinions. This is a food blog, not a place for me to try to sway others toward my ways of thinking. That’s why I had to chuckle while reading my twitter feed during the days leading up to and during the election.
“Oh, I’m a big, important food blogger with my own cookbook (who doesn’t have one these days?….ok, me…. womp, wah), so naturally, people will change their votes based on my snarky, foul-mouthed tweets…”. Really? Really??
I just couldn’t help but laugh. In fact, that’s all you can do when people you normally look up to and respect are posting things that are mean, condescending, and downright nasty about others. So food bloggers, let’s stick to what we know – food. Speaking of food- Thanksgiving is a mere 2 weeks away! Do you know how exciting that is?! Get those cans of pumpkin ready, because the best time of the year (next to Christmastime, of course…duh) is UPON US! Yippee!!!
This cake rocks. Moist, pumpkiny, cinnamony, cake drizzled with sweet, sticky sweetened condensed milk. I’m in love!

Sticky Pumpkin Cinnamon Cake
1 boxed yellow cake mix
1 can pumpkin
1/3 cup vegetable oil
2 eggs
1 teaspoon cinnamon
2 tablespoons unsalted butter, melted
1 14-ounce can sweetened condensed milk
1/2 teaspoon cinnamon
Preheat the oven to 350 degrees. In a large bowl, combine the cake mix, pumpkin, oil, eggs, and cinnamon; beat until smooth. Spread into a greased 9×13 pan; drizzle the melted butter over the top of the batter (I used a knife to swirl the butter into the batter so it would be a little more evenly drizzled over the cake, but you don’t have to do this.) Bake for 25-30 minutes, until a toothpick inserted into the center comes out clean.
Meanwhile, mix the sweetened condensed milk and cinnamon.
While the cake is still warm, poke holes all over the top using a toothpick or fork. Pour the sweetened condensed milk over the top of the cake and spread evenly. Let sit at room temperature until all the glaze has soaked into the cake. Serve immediately. Serves 12.
Recipe source: Sing For Your Supper original


Are you ready for an EASY recipe that will knock your socks off?? Well, this is it, folks! This 4 ingredient dessert is one of those awesome, easy, and quick recipes that everyone is sure to love. I promise.
My sister first introduced me to this “cake” awhile back. She had made it for a party and was kind enough to share the leftovers with me. I was skeptical at first (and really, who could blame me- graham crackers, instant pudding, and canned chocolate frosting?), but was singing a different tune after one bite. Something magical happens when graham crackers and vanilla pudding sit together for awhile. The end result is strangely similar to a real eclair. And since I don’t have time to mess with pâte à choux…this is perfect! Try it- you won’t be disappointed!!
Chocolate Eclair Cake
2 (3.5 ounce) packages instant vanilla pudding mix
1 (8 ounce) container frozen whipped topping, thawed
3 cups milk
1 (16 ounce) package graham cracker squares
1 (16 ounce) container prepared chocolate frosting
In a medium bowl, whisk the pudding mix, whipped topping, and milk.
Arrange a single layer of graham cracker squares in the bottom of a 13×9 inch baking pan and evenly spread half of the pudding mixture over the crackers. Top with another layer of crackers and the remaining pudding mixture. Top with a final layer of graham crackers.
Soften the frosting in microwave for 30 seconds, stirring halfway through and spread over the whole cake up to the edges of the pan. Cover and chill at least 4 hours before serving. Serves 12.
Recipe source: My Baking Addiction

I have to admit, it’s been over six months since giving birth to Cassidy and I’m still having trouble losing the last bit of weight. We’ve been watching our portions and trying (TRY-ing) to cut back on sweets. However, for me, this proves veeeerrrry difficult…I can’t be expected to quit cold turkey! That’s why recipes like this make me happy- I still get my sweet fix, but I don’t have to feel so guilty afterwards!

This one couldn’t be easier- a box of angel food cake mix and a can of crushed pineapple. I loooove angel food cake, and the addition of pineapple makes it even yummier! Just bake it up in little cupcake liners and you have the perfect portion sizes! (of course, then, you’ll have to practice a little self control and not eat 12…..). 😉
Pineapple Angel Cakes
1 box angel food cake mix
1 20-ounce can crushed pineapple, undrained
Preheat oven to 350 degrees. Stir the pineapple into the cake mix and pour into cupcake pans lined with cupcake liners (you’ll have enough batter to fill around 24 cups).*
Bake for 20-25 minutes, until puffed and golden brown. Cool before serving. Serves 24.
*You can also bake in a 9×13 pan or a tube pan.
Recipe source: adapted from allrecipes.com


Poke cakes have been around for ages. I’m not sure when they first hit the scene, but I bet if we could peek back in time, we’d find Martha Washington bringing a poke cake to the Revolutionary potluck (what? It could’ve happened…). Poke cakes are an American tradition, after all. 🙂
My favorite poke cake is this Piña Colada Cake, which is drizzled with cream of coconut (nectar of the gods, I tell you!) while hot and topped with pineapple-y whipped cream. A family favorite. BUT this Oreo version is pretty stinking awesome as well. Rich devil’s food cake studded with crushed Oreos, drizzled with Oreo pudding, then sprinkled with MORE crushed Oreos, and finally topped with whipped cream and you guessed it, more Oreos. An Oreo lovers’ dream come true.

Chocolate Oreo Poke Cake
1 box Devil’s Food cake mix
Oreos, roughly chopped (you’ll need almost an entire package. I use double-stuff)
1 large packet instant Oreo pudding
2 cups milk
1 small tub Cool Whip
Prepare the devil’s food cake as directed on box; stir in a large handful of the chopped Oreos. Pour batter into a greased 9×13 dish and bake at 350 degrees for about 30 minutes, until a toothpick inserted in the middle comes out clean.
Combine the milk and Oreo pudding mix in a medium-sized bowl and whisk until smooth.
Using a chopstick or the end of a wooden spoon (while the cake is still warm), poke holes all over the top of the cake. Pour the pudding over the cake and spread evenly so it will soak into all of the holes (you’ll need to do all of this fairly quickly as the pudding will set and get thick after a couple of minutes). Top with more chopped Oreos. Allow cake to cool completely. Spread the Cool Whip over the top of the cake and sprinkle with more chopped Oreos. Refrigerate for at least an hour. Serves 12.
Recipe source: I didn’t follow any specific recipe, but I’m sure this particular poke cake has been around for awhile.

My little photographer’s assistant! 🙂

**Disclaimer: I am NOT one of those women who believes any sort of food, herbal remedy or old wives’ trick can induce labor. I fully believe my little girl will come when she is good and ready, thus making the idea of this cake completely bogus in principal, but nevertheless, good for a chuckle.
Evening primrose oil, castor oil, spicy foods, raspberry leaf tea…I’ve heard of just about every trick out there to induce labor. Of course I believe they’re all complete horse pucky. So naturally, when I was reading on a popular baby discussion forum about all these women baking and eating these so-called “labor cakes” to induce labor, I laughed out loud. Of all the ridiculous notions….yeah sure, a boxed mix chocolate cake is going to kick-start my labor…riiiight. However, I sat there and got to thinking about a warm, gooey, chocolaty cake fresh from the oven and just couldn’t resist. While I don’t believe any amount of chocolate will convince Cassidy to get a move on, any excuse to shove my face full of cake is good enough for me. So I made myself a labor cake. Following the recipe exactly (box mix and all). And it was dang good. Did Cassidy come? Nope. Did I enjoy my cake and go to bed with a smile on my face? You bet.

“Labor Cake” (A dressed up chocolate cake)
1 box Devil’s Food Cake mix
1 small package chocolate pudding mix
1 cup sour cream
3 eggs
1 1/3 cups water
1/2 vegetable oil
1 12-ounce package mini chocolate chips
Mix all ingredients in a large bowl and pour into a greased bundt pan. Bake at 350 degrees for 45-55 minutes, until a toothpick inserted comes out clean.
To make mine extra chocolaty, I topped it with my grandmother’s fudge icing:
Nana’s Fudge Icing (adapted to be a thin glaze rather than a thick frosting)
1/2 cup cocoa powder
1 1/2 cups sugar
3/4 cup (1 1/2 sticks) butter
1/2 cup milk
1/2 teaspoon salt
1 teaspoon vanilla
Heat all ingredients except vanilla in a small saucepan over medium heat. Stir until mixture is melted and beginning to thicken. Remove from heat and add vanilla. Let sit for about 5 minutes before serving.
Cake recipe source: www.justmommies.com

Let me start off by stating a few things: 1.) Happy New Year! 2.) Those of you who have resolved to eat healthier, lose weight, etc, just click away now, because this recipe is neither healthy nor diet-friendly. In fact, it’s pretty much just butter and cream cheese. And sugar. 🙂 3.) There’s really nothing about this recipe that makes it a “cheesecake” in any way, except maybe the abundance of cream cheese (in fact, it’s more along the lines of a cheese danish), but that’s what the recipe is called, so for propriety’s sake, I’ll continue calling it “sopapilla cheesecake”.
A few weeks ago, at our friends’ Christmas party, the hostess pulled something freshly baked out of the oven. The sweet, cinnamony smell immediately caught my attention and I was first in line to try a plateful. At first glance, it looked like some sort of cobbler covered in cinnamon-sugar, but with one bite I knew what I was eating- the sopapilla cheesecake I had seen plastered all over pinterest. Crescent rolls, cream cheese, butter, sugar. That’s it. And I have to admit, it was stinking delicious. My big pregnant self ate two helpings. Then I immediately came home and made one of my own for my parents to try. Embarrassingly easy, shamefully fattening and ridiculously yummy. A pregnant woman’s dream dessert.
Sopapilla Cheesecake
2 cans Pillsbury crescent rolls
2-8oz blocks cream cheese, at room temperature
1 1/2 cups sugar
1 teaspoon vanilla extract
1 teaspoon cinnamon
6 tablespoons butter, melted
Spray a 9 x 13 pan with cooking spray. Unroll and press 1 can crescent rolls into the bottom of the baking dish press the seams together.
In a separate bowl blend the cream cheese, 1 cup sugar and vanilla; spread evenly over top of dough. Unroll the second can of crescent rolls and place on top of the cream cheese mixture pressing seams together again. Pour the melted butter over top layer of crescents.
Mix the reaming 1/2 cup of sugar and cinnamon together. Sprinkle cinnamon-sugar mixture generously over the top. Bake at 350 degrees for 25-30 minutes until bubbly and browned. Allow to cool before serving (personally, I like it better warm, so I let mine cool for only 15 or 20 minutes before serving). Serves 8.
Recipe source: barely adapted from Real Mom Kitchen, via Mommy’s Kitchen


I waited as long as I could. I really did. But when we got that blast of glorious fall weather this weekend, I decided I couldn’t wait any longer; it was time to bring in fall! I’ve gotten out all my fall decorations, made soup, homemade applesauce (recipe to come!) and baked this pumpkin pound cake. And lemme tell ya- I feel GREAT! Nothing like a cool breeze and the smell of pumpkin and cinnamon to lift a girl’s spirits! Sure, it’s supposed to get back into the 90’s next week but for now, it’s fall outside and I’m enjoying every second of it. My mom is responsible for me baking this cake- she thought a pumpkin pound cake sounded great and charged me with finding a great recipe to try. I did a little searching and came up with exactly what I was looking for! The cake is delicious- not too sweet, super moist, dense and full of warm spices. I loved it with my morning coffee- the perfect combination!

Pumpkin Pound Cake
1 cup granulated sugar
1 cup brown sugar
1 cup canola oil
3 eggs
3 cups all-purpose flour
2 teaspoons baking soda
1 teaspoon ground cinnamon
1 teaspoon ground nutmeg
1/2 teaspoon salt
1/4 teaspoon ground cloves
1 package instant vanilla pudding mix
1 can (15 ounces) pumpkin puree
Confectioners’ sugar, for dusting
In a large bowl, combine sugar and oil until blended. Add eggs, one at a time, beating well after each addition. In a separate bowl, combine flour, baking soda, cinnamon, nutmeg, salt, cloves and pudding mix; add to egg mixture alternately with pumpkin, beating well after each addition.
Transfer to a greased bundt pan. Bake at 350 degrees for 60-65 minutes or until toothpick inserted near the center comes out clean. Cool for 10 minutes before inverting onto a wire rack. Remove from pan and cool completely. Dust with confectioners’ sugar. Serves 12-16.
Recipe source: Adapted from Taste of Home


If you’re like me and about 80 gajillion other people, you’ve just read The Help (or saw the movie) and loved it. I thought it was one of the best books I’ve read in a long time, but frankly, what stuck with me most from the book was Minny’s famous caramel cakes mentioned so often. I’m a sucker for a good Southern recipe (duh) and this famous caramel cake the author mentions so many times definitely had me intrigued. I come from a peach cobbler-buttermilk pie type family, so cakes didn’t play a huge roll in our family get-togethers; but good old fashioned Southern cakes like this one are very much a part of my heritage. As soon as I finished this book (like, 3 days ago), I set out to make myself a caramel cake. Where did I turn? Why, Baba’s American Woman’s Cookbook, of course. If you want a good old fashioned recipe, be it buttermilk biscuits, a Lady Baltimore cake, or perfect-every-time pie crust, this book will never let you down! Sure enough, I found exactly what I was looking for!

I’m not going to lie and say this was a simple cake to make; in fact, I’ll go ahead and fess up to having to make more batches of caramel than I’d like to admit. There are 3 different caramel-y aspects to this cake: the caramel syrup that goes into the batter, the caramel filling (more like a glaze) and the caramel buttercream, which I did not get from the cookbook, but here instead, since it was more along the lines of what I was looking for. Other than lots of caramel making, this recipe is extremely easy (it’s just like any other cake you’ve ever made…except WAY more delicious!), so don’t let all that caramel scare you- if I can do it, YOU can do it!

Now, the verdict: holycowhallelujahwowomigoshjeezlouise! After just one bite, every sense in my body told me this was the best cake I’ve ever made. Even Joel, who isn’t a big fan of caramel couldn’t shut up about this cake! All it took was that one bite and I knew, “this is Minny’s caramel cake. I’ve nailed it.” As I read about Minny cooking her caramel and bringing the finished cakes to people’s houses, this was exactly how I pictured it. And heck, it may not be anywhere close to what the author was talking about, but in my mind it’s perfect and I’ll never make a caramel cake any other way. It’s incredibly moist, absolutely bursting with sweet, caramel flavor and the gooey caramel center….pure heaven. Making all that caramel may be a bit of a pain, but do your friends, your loved ones and yourself a favor and make this cake ASAP- then take a bite and experience the South.

Caramel Cake
1 3/4 cups sugar
1/3 cup hot water
3 cups cake flour
3 teaspoons baking powder
1/2 teaspoon salt
3/4 cup (1 1/2 sticks) butter
3 eggs
1 teaspoon vanilla
2/3 cup milk
Preheat oven to 350 degrees.
Prepare the caramel syrup: place 1/2 cup of the sugar in a heavy skillet over medium-high heat, stirring constantly until the sugar melts. When it becomes a dark amber color (about 5 minutes- watch it closely!), remove from heat and whisk in the hot water VERY slowly until dissolved. You’ll be left with a syrup about the consistency of simple syrup. Cool completely. *The first time I tried this I added my hot water too fast and ended up with a rock-hard lump of caramel, so be sure to add the water VERY slowly while whisking!
Sift flour, baking powder and salt together. In the bowl of a stand mixer, cream the butter and the remaining 1 1/4 cups sugar until light and fluffy, about 2 minutes. Add eggs, one at a time, beating well after each addition. Add vanilla and the cooled caramel syrup; blend. Add dry ingredients and milk alternately, beating until smooth. Pour into 2 greased 9-inch cake pans lined with wax paper and bake for about 25-30 minutes, or until a toothpick inserted in the center comes out clean.
Caramel Filling
1 1/2 cups brown sugar
1 tablespoon butter
2 teaspoons cornstarch
1 cup half-and-half
1 1/2 teaspoons vanilla
Cook the sugar, butter, cornstarch and milk together in a double boiler until thick (mine never got too thick and I cooked it for at least 15 minutes). Remove from the heat and add vanilla. Let cool for about 5 minutes then pour over the warm cakes still in their pans (I poked holes all over my cakes with a toothpick so it would soak up the liquid better). Let the cakes sit out at room temperature in their pans until completely cooled.
Caramel Buttercream
1/4 cup sugar
2 tablespoons water
1/4 cup heavy cream
1 teaspoon vanilla
3/4 cup (1 1/2 sticks) salted butter, softened
2 cups powdered sugar
Briefly stir together granulated sugar and water in a small saucepan and bring to a boil over medium-high heat. Continue cooking, without stirring, until mixture turns dark amber in color, about 6 to 7 minutes.
Remove from heat and very slowly add in cream and vanilla, stirring with a wooden spoon until completely smooth (be careful, as the mixture will definitely bubble up and possibly splatter a bit as you add in the cream). Set aside until cool to the touch, about 25 minutes.
Beat the butter in the bowl of a stand mixer fitted with the paddle attachment on medium-high speed until light in color and fluffy, about 2 minutes. Reduce speed to low, gradually add powdered sugar, and mix until completely incorporated. Turn off the mixer, and then add caramel. Beat frosting on low to combine, and then increase to medium-high and beat until airy and thoroughly mixed, about 2 minutes. Refrigerate if not using immediately (or to harden the frosting a bit).
To assemble the cake:
*This part was a little tricky since I had to somehow figure out how to get the wax paper off the bottoms of the cakes while they were gooey with caramel! Slide a dull knife all the way around the edges of the cakes to loosen the sides from the pan and (using a spatula or possibly your hands- however you deem fit, really), lift the cake from the pan, peel the wax paper off the bottom and place, caramel side up on a cake platter.
The second layer is easier- just line the cake up evenly with the bottom layer and gently overturn the pan, setting it upside down (caramel side down; so you’ll have caramel-to-caramel), then peel off the wax paper.
Using a cake spatula, gently and evenly spread the caramel buttercream over the top and sides of the cake. Refrigerate until about 1 hour before serving. Makes one 2 layer, 9-inch cake. Phew! 🙂
Recipe sources: cake recipe adapted from American Woman’s Cookbook; caramel frosting from Gimme Some Oven


In my opinion, there’s nothing better than a good old fashioned yellow cake with chocolate frosting. There’s just something so comforting and homey about it. While I do love a good chocolate-on-chocolate cake, the combination of a moist, buttery yellow cake with rich, creamy chocolate frosting is unbeatable! Makes me feel as if I were sitting at my mom’s kitchen table after school. I love desserts like that- nothing fancy or intricately decorated, just simply frosted, like my grandmother would do.

And I have to say, this is the BEST yellow cake I’ve ever had. I was unsure which recipe to use (there are so many good ones out there), but luckily my friend Bridget of The Way The Cookie Crumbles did an in-depth yellow cake comparison on her blog recently and took all the guess work out of it for me! Thanks Bridget (she’s done lots of these comparisons on her blog, so be sure to check them all out!)! I ended up choosing a Cooks Illustrated recipe and it definitely did not disappoint! It’s definitely the most moist yellow cake I’ve ever had and by far the most flavorful. The butter flavor really comes out and the texture is just perfect- light and tender. I paired it with my favorite chocolate frosting recipe and it was just scrumptious. We LOVED this cake (in fact, I’ve had an embarrassing amount of it in the past few days)!

For those of you who are searching for the perfect yellow cake recipe (and I know there are a lot of you!), this is it. I’ve made Martha Stewart’s recipe as well and it doesn’t compare. It may be a little more involved than your average cake recipes, but trust me, it’s worth it.

Fluffy Yellow Layer Cake
Makes two 9-inch round cakes
2 1/2 cups cake flour, plus extra for dusting pans
1 1/4 teaspoon baking powder
1/4 teaspoon baking soda
1/4 teaspoon table salt
1 3/4 cups sugar
10 tablespoons unsalted butter, melted and cooled slightly
1 cup buttermilk, at room temperature
3 tablespoons vegetable oil
2 teaspoons vanilla extract
6 large egg yolks plus 3 large egg whites, at room temperature
Adjust an oven rack to the middle position and heat the oven to 350 degrees. Grease two 9-inch cake pans and line the bottoms with parchment paper. Grease the paper rounds, dust the pans with flour, and knock out the excess. Whisk the flour, baking powder, baking soda, salt and 1 1/2 cups sugar together in a large bowl. In a 4-cup liquid measuring cup or medium bowl, whisk together the melted butter, buttermilk, oil, vanilla, and yolks.
In the clean bowl of a stand mixer fitted with the whisk attachment, beat the egg whites at medium-high speed until foamy, about 30 seconds. With the machine running, gradually add the remaining 1/4 cup sugar; continue to beat until stiff peaks just form, 30 to 60 seconds (whites should hold peak but mixture should appear moist). Transfer to a bowl and set aside.
Add the flour mixture to the now-empty mixing bowl fitted with the whisk attachment. With the mixer running at low speed, gradually pour in the butter mixture and mix until almost incorporated (a few streaks of dry flour will remain), about 15 seconds. Stop mixer and scrape the whisk and sides of the bowl. Return the mixer to medium-low speed and beat until smooth and fully incorporated, 10 to 15 seconds.
Using rubber spatula, stir 1/3 of the whites into the batter to lighten, then add the remaining whites and gently fold into the batter until no white streaks remain. Divide the batter evenly between the prepared cake pans. Lightly tap the pans against the counter 2 or 3 times to dislodge any large air bubbles.
Bake until the cake layers begin to pull away from sides of pans and a toothpick inserted into the center comes out clean, 20-22 minutes. Cool the cakes in the pans on a wire rack for 10 minutes. Loosen the cakes from the sides of the pan with a small knife, then invert onto a greased wire rack and peel off the parchment. Invert the cakes again and cool completely on rack, about 1 1/2 hours.
Perfect Chocolate Frosting
3/4 cup (1 1/2 sticks) butter, melted
1 cup cocoa powder
5 1/2 cups powdered sugar
1/2 cup milk
1 1/2 teaspoons vanilla extract
Stir melted butter into cocoa and alternately add powdered sugar and milk, beating to spreading consistency. Add a small amount of additional milk, if needed. Stir in vanilla. Makes about 3 1/2 cups frosting.
Frost cake when completely cooled, as desired.
Recipe sources: cake recipe seen on The Way The Cookie Crumbles, originally from Cooks Illustrated. Frosting recipe from Hershey’s.


